
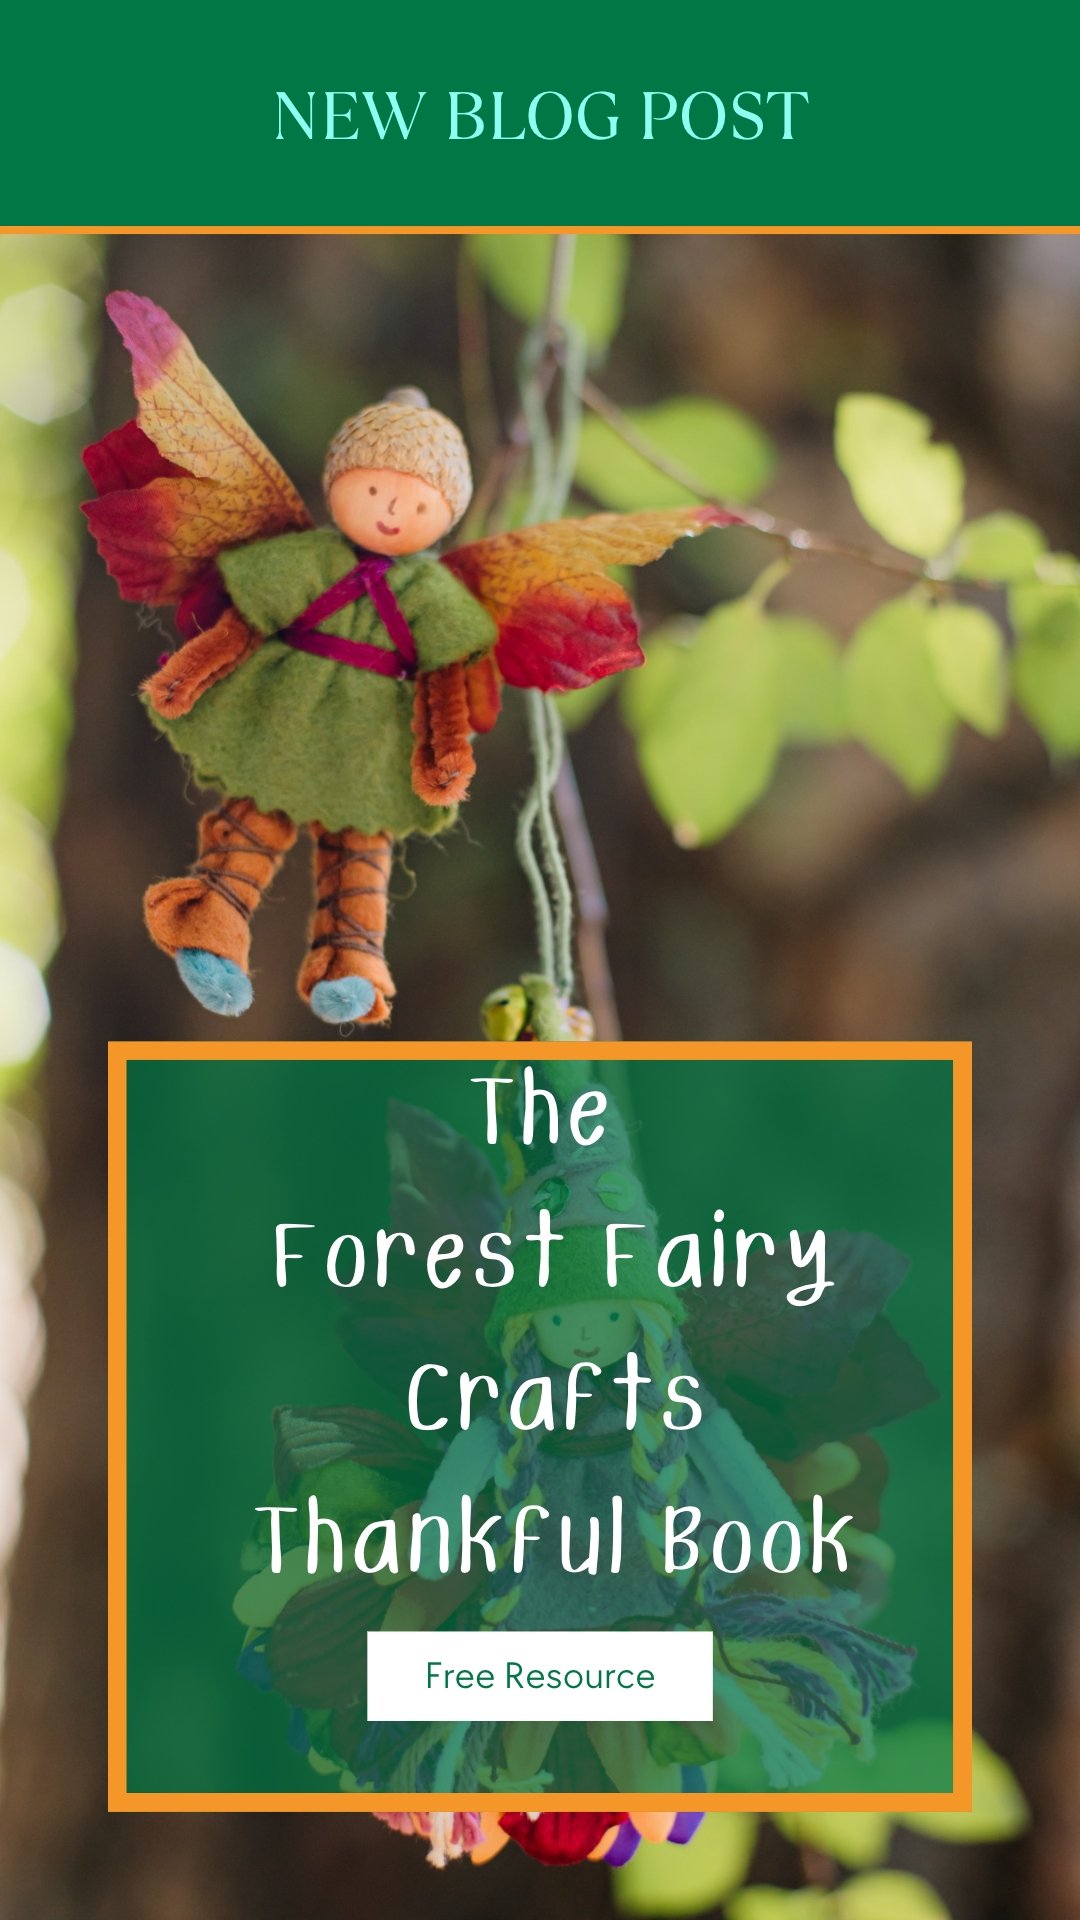
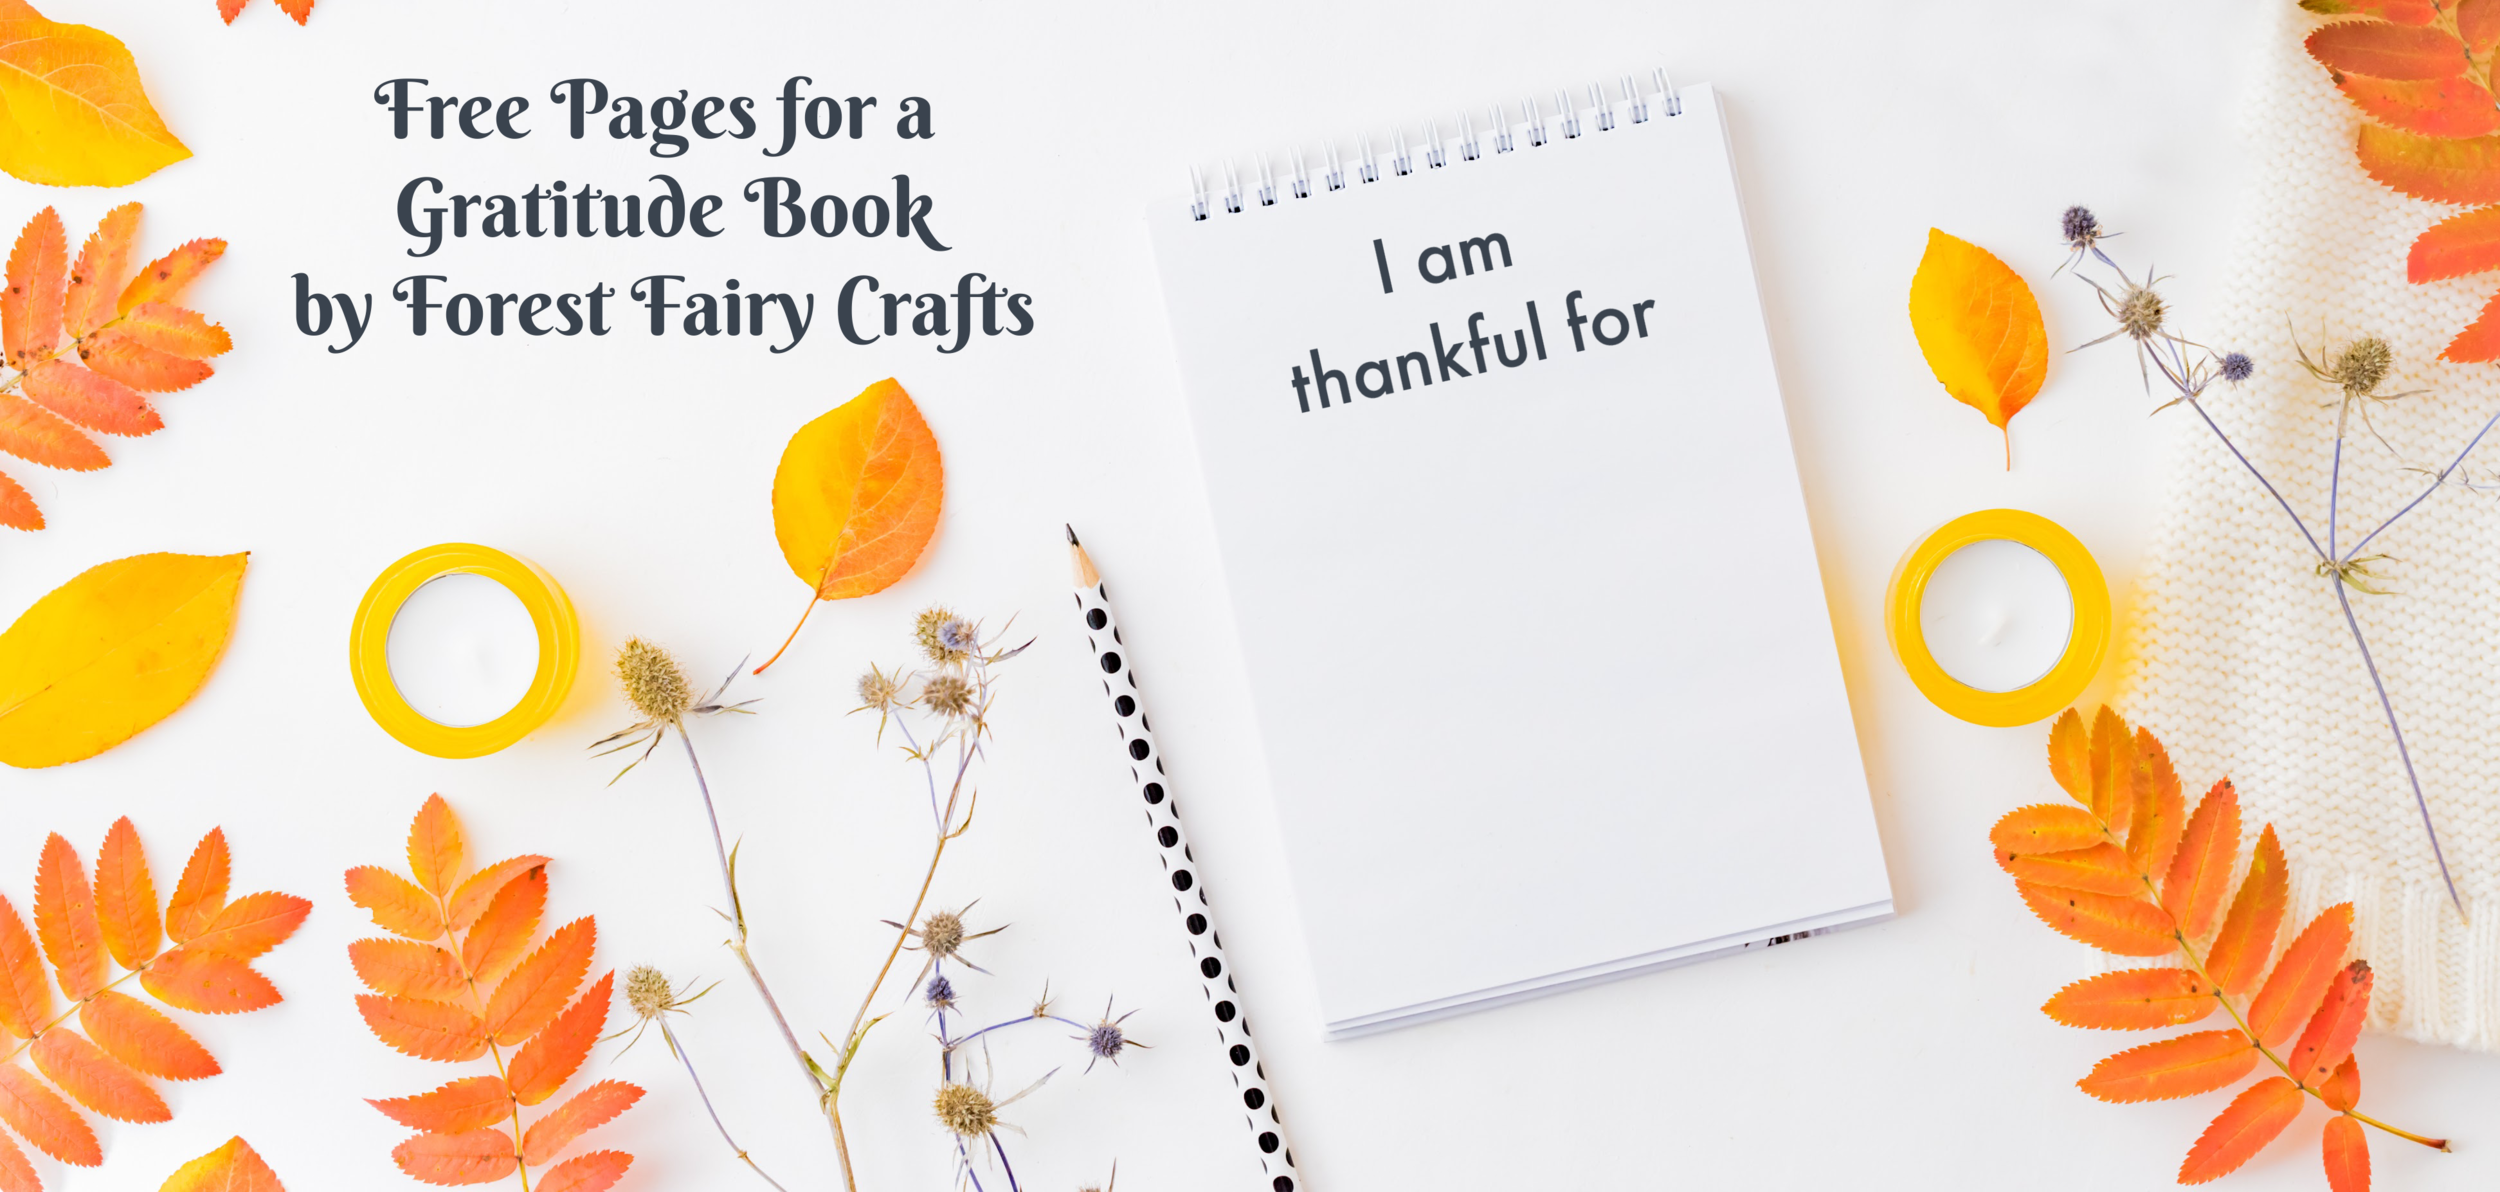
Thankful Book for Fall
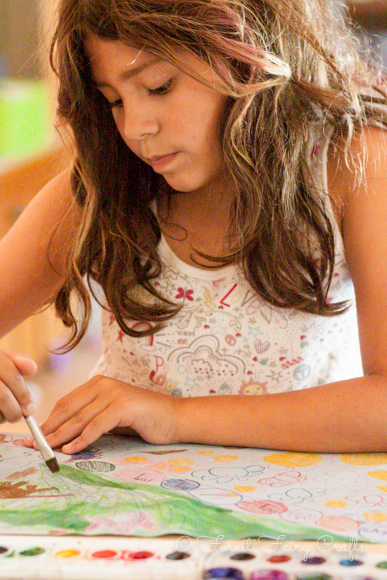
In early November, we start our book of gratitudes. Each day we add a page or two or three. We collect the loose pages right before Thanksgiving. And we have a lovely read aloud for our family celebration. In my classroom, the pages became an activity center. At home, we write spend time together creating a child and adult version. Children appreciate hearing about adult gratitudes too.
A guideline that I gave myself was to not give children ideas. Beyond a vague, “family, pets, etc.” Some would go big with “air, earth, water.” Others went more detailed. Eventually, the obvious answers (in their mind) were written down. And then resistance, “I’m out of ideas.” And then the real opportunity- “I’m going to remember grapes to write, they’re so good.” Or, “I’m thankful for goodnight stories.” They took their authorship away from the table to open their mind to ideas away from the table. Which, for me, is the real goal all along. To recognize the many gifts in our day.

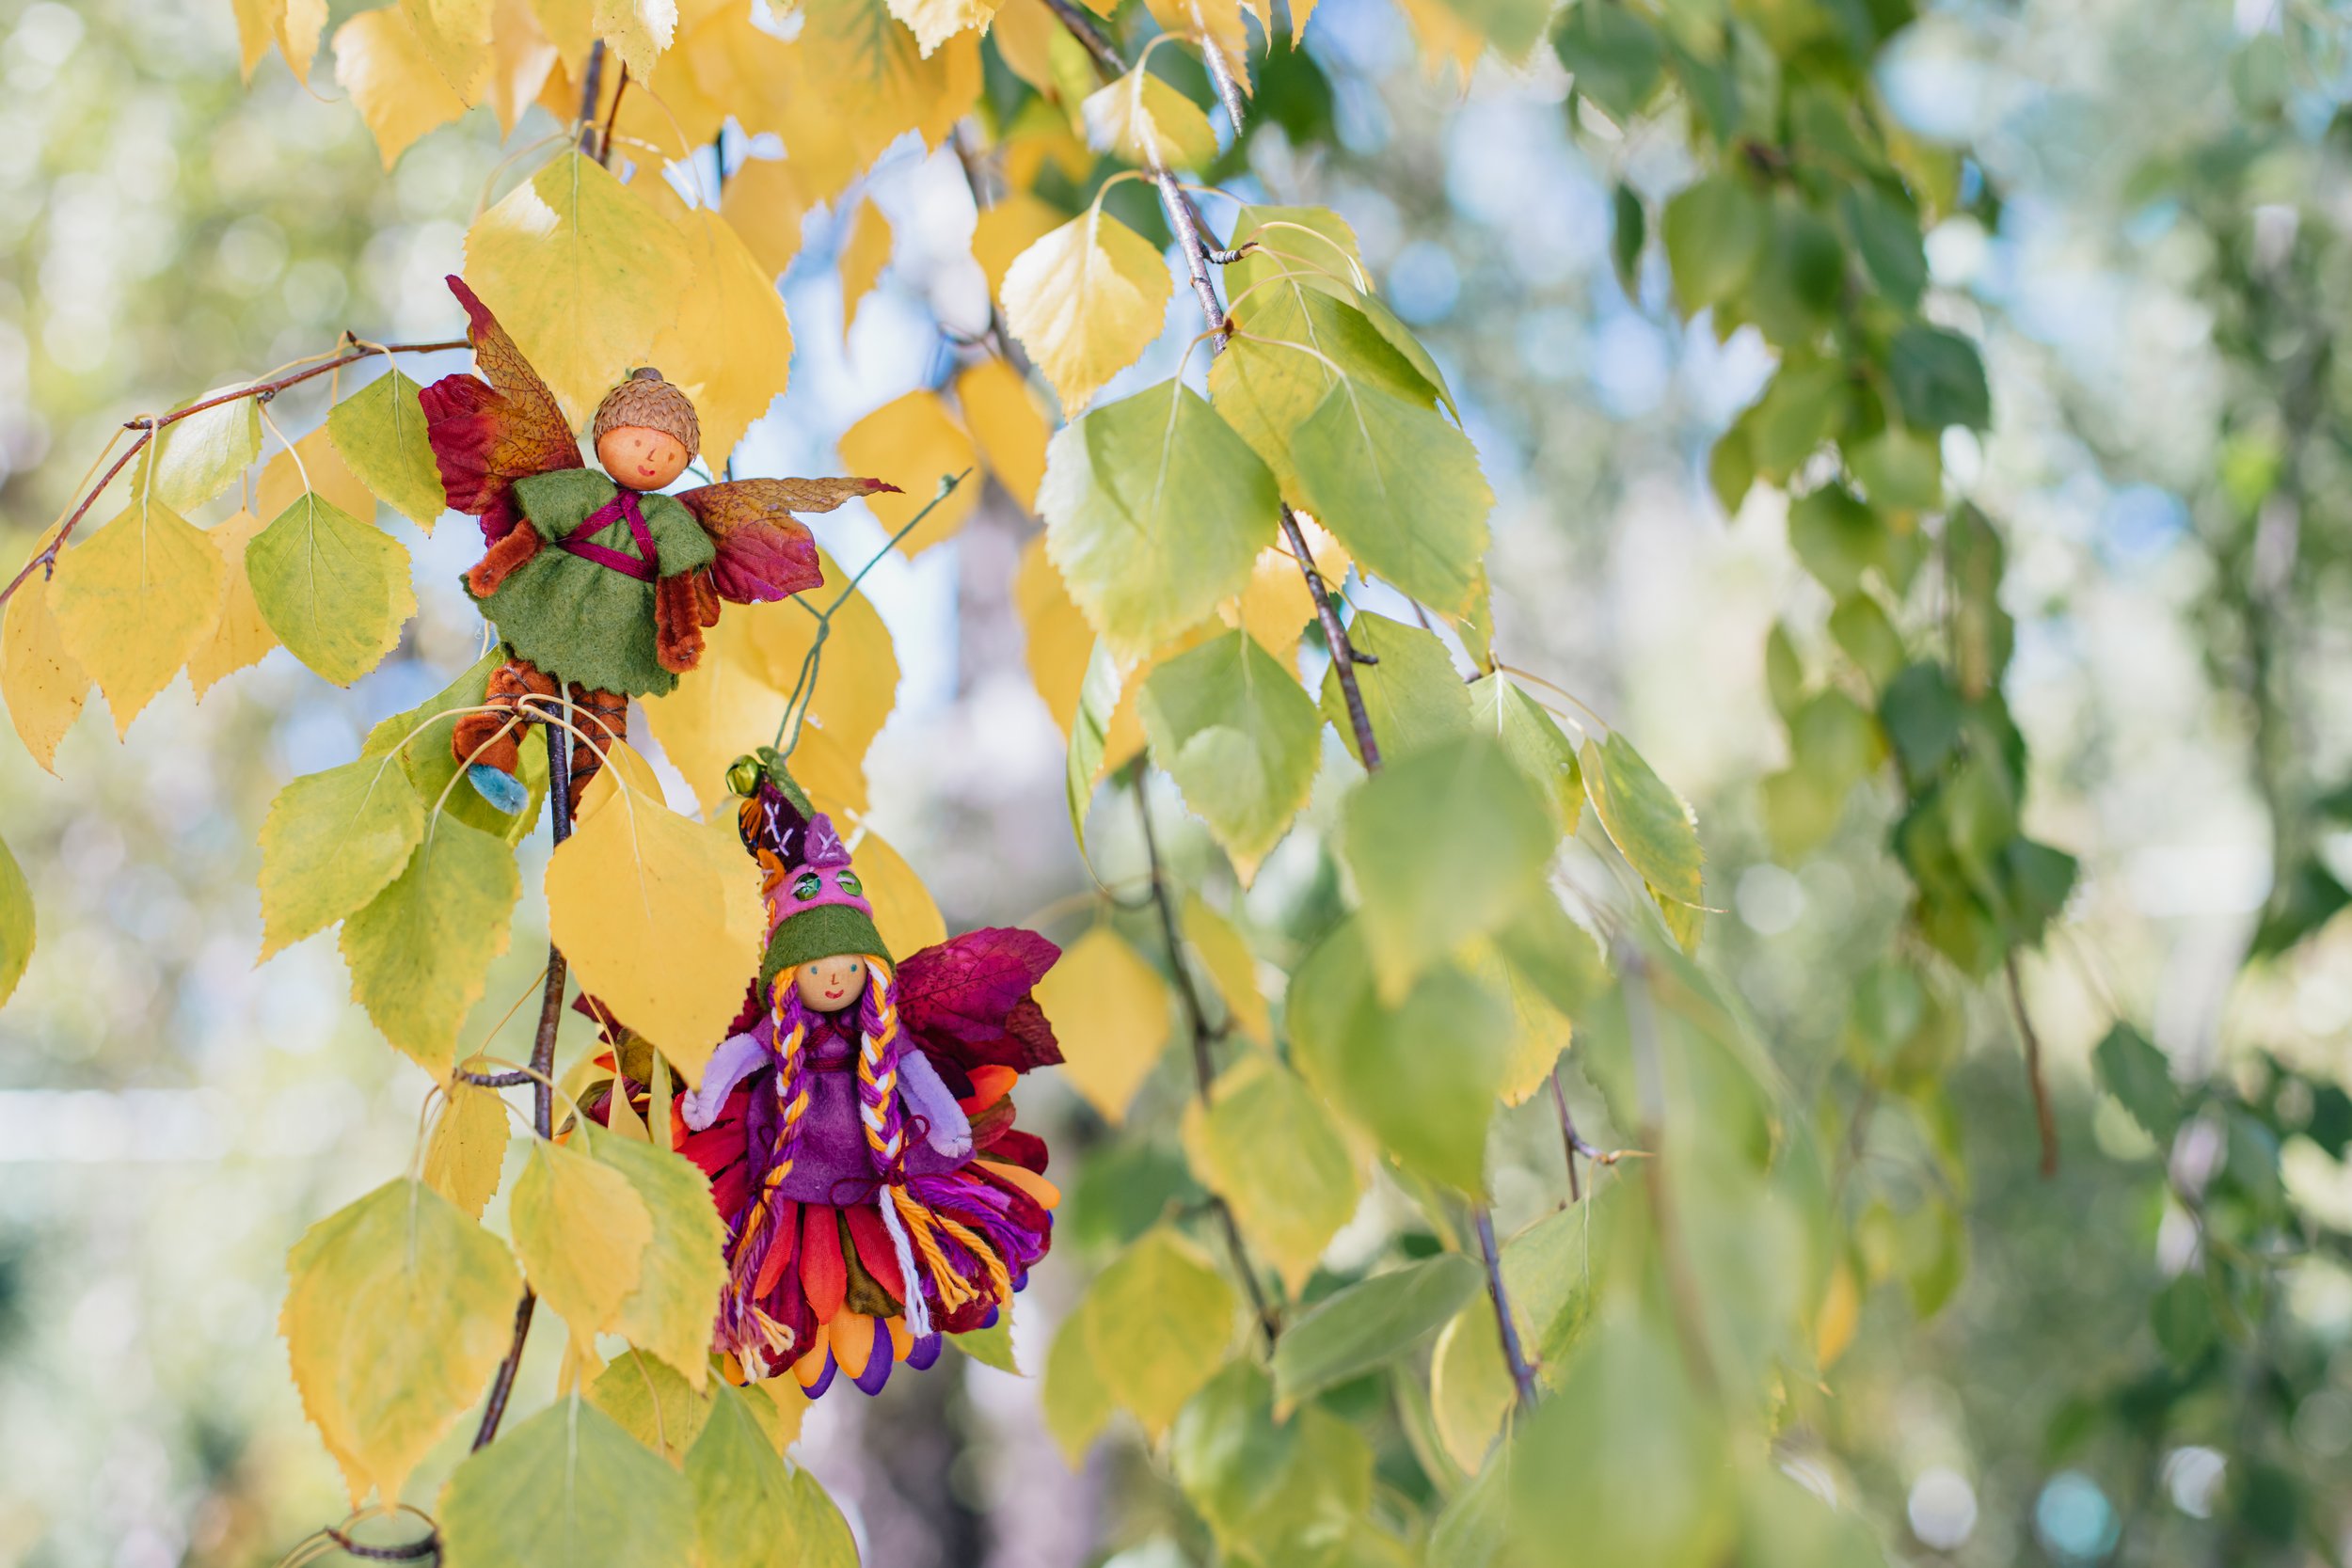
Autumn Fairy in Magical Forest Fairy Crafts Through the Seasons
I created book pages that you can download to use with children in your life. *Not for sale or resale. When you download, you’ll notice the book has 4 pages. Why would I do that? This way, each family or child gets to create their own number of pages. Save them as loose leaves until the day before Thanksgiving. That way, an author won’t run out of pages, or face a pile of empty pages on the last night before binding. Customize your book.
For older authors (6 and above), I use the smaller version which fits two pages on one piece of paper. I recommend cutting in half before binding, or you will have blank pages. Since writing instructions don’t often come easy for authors, here is my ladder of support. A conversation with authors that they understand is that the audience matters. Is this for Grandma and Grandpa to admire? Or is it just for the author? Because one way, the spelling may be more important that the other. And the main goal for a young author is to feel proud of their work. Not for us adults to judge or micromanage to the point that writing feels like a chore, but simply for the author to celebrate what they created. You may choose different styles of support based on the audience for the book.
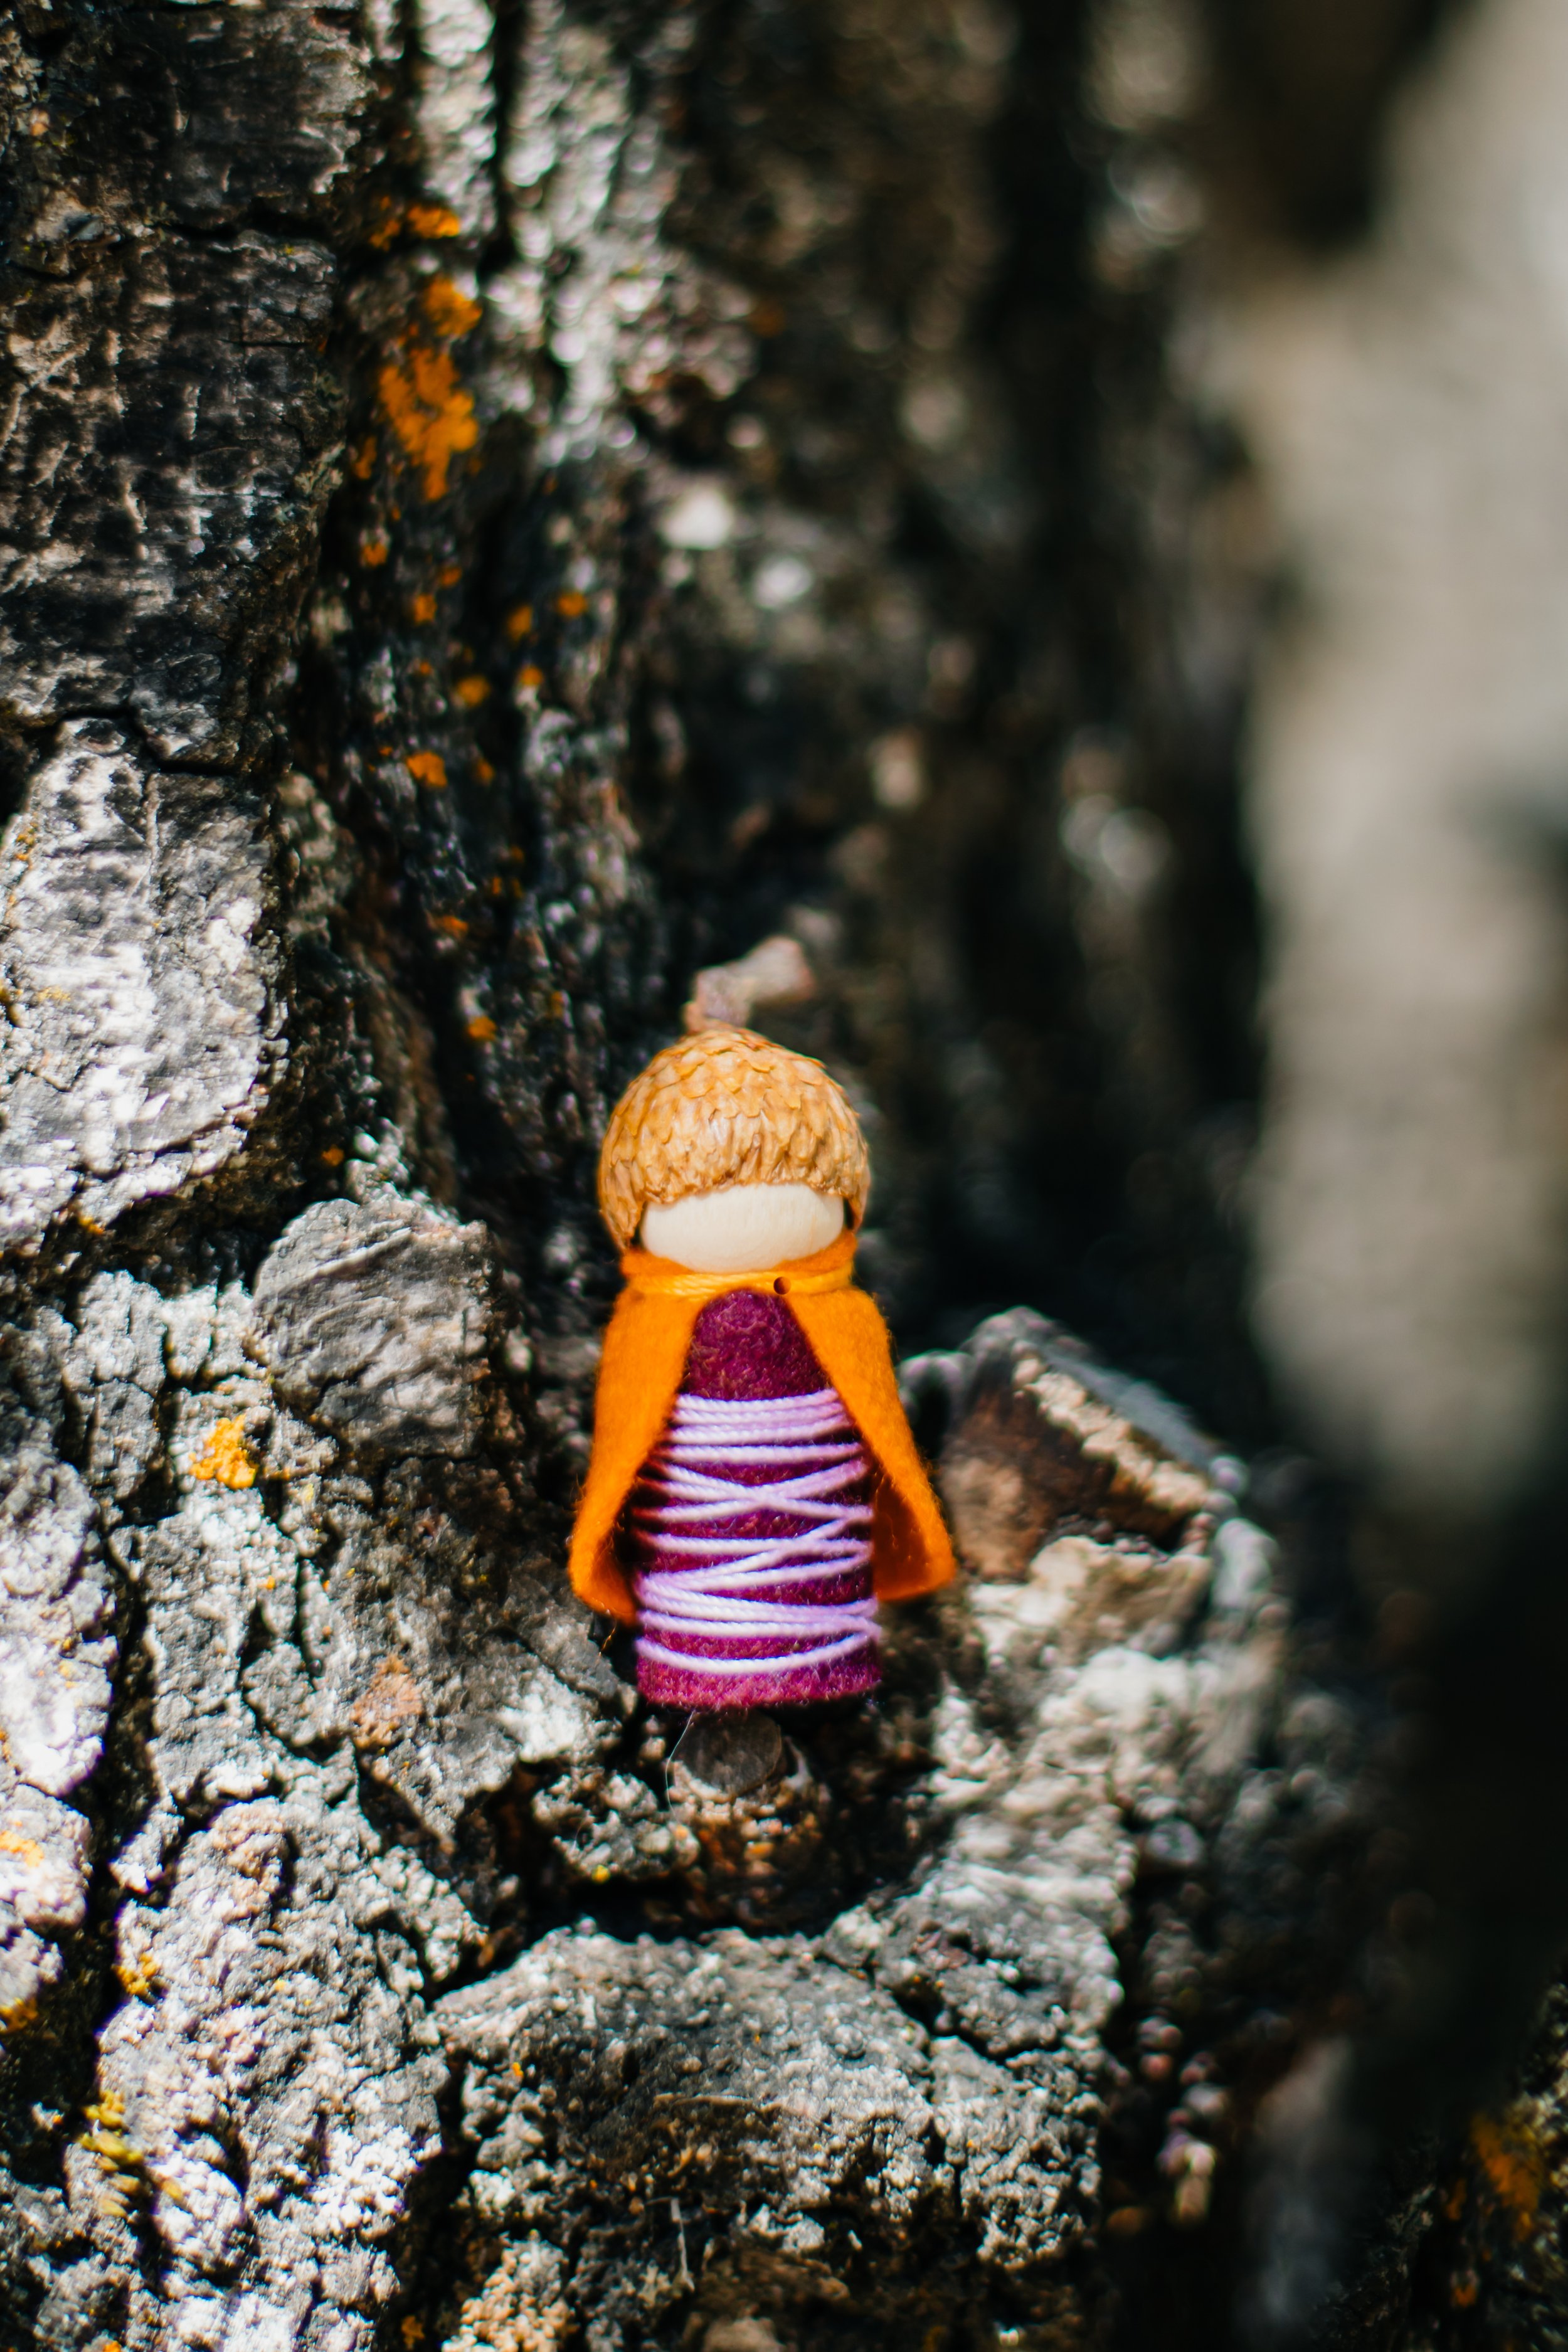
Autumn Gnome in Magical Forest Fairy Crafts Through the Seasons

Also, many supports may be appropriate for different learning challenges. I let my dyslexic daughter dictate while I typed well into high school. She’s in college now and doesn’t ask me to type any of her papers anymore. So give writers the support they need to express their ideas. Which may change from day-to-day.
You can mix and match within the same day/on the same page. They can write until they’re turned and then an adult can finish. Choose a ladder plan, then adjust as needed.
Step 1- writing for the author, letting the author dictate. This is the way to catch all the thoughts and details. This can happen alongside scribbles or attempts at “sounding out” words so that they can be read and understood later.
Step 2- writing and tracing. Use a highlighter or light handwriting that the student can trace with their own pencil. If used, the dictation from above with a step for authors to explore writing it themselves.
Step 3- Write what you hear. This may look incoherent to adults. As long as the child can read it late, then it accomplished the purpose of writing to remember your words later. It doesn’t really accomplish the write-and-share idea, but I can’t read books in other languages, so, for this stage, I let the author reading their own work be enough
Step 4- Write to share. This time, another person needs to be able to understand your words. They don’t seem to be spelled perfectly or have all the right spaces, but another person may want to read them one day. This can be supported with verbal spelling help and room to make spelling mistakes.
Step 5- Write to impress. By this time, sight words should be pretty intuitive. Writing shouldn’t be so much work by this time. Now, spelling corrections and punctuation are involved in the process.

Autumn fairies in Magical Forest Fairy Crafts Through the Seasons
Realistically, think about how long this book will be around. This was created as a process-project meant to help authors notice the world with a spirit of gratitude. Many of these books will go into recycling. You may want to keep them. But then they’ll be a time capsule of where your author’s writing skills were at that point in time. I want young authors to enjoy writing. This project is close to my heart for inspiring young authors.
Feel free to print for personal or small-group use. Print pages 2-3 (large) or 2 (small) for as many middle pages as you may like. Usage rights do not include other teaching sites or third-party websites or sales. I appreciate sharing resources with you.
Add the last page as a bookend, because we are thankful for each and every author.
And of course, Autumn Fairies love to help write these books or hear these books read aloud. They’re always up for an adventure to find more things to appreciate!
We are thankful for you!

Handmade Holidays
Every year is a fantastic year for handmade holidays. This year, especially, is a perfect time for gathering simple supplies and creating little gifts or toys for family and friends. One of a kind gifts are so appreciated! And many of us will be spending even more time at home this holiday season due to the pandemic.
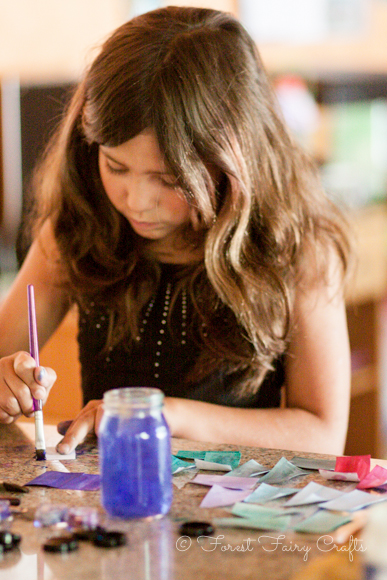
I recently looked for a photo in the archives and found all of these fun ideas that I made through the years with students and as gifts for my kids, friends, and family. The pattern for fairies or crafts is a perfect seed that can grow in many different directions. I collected a few of my favorites here. Our invitation, of course, is to take your inspiration and make it your own :)
I share a photo here with the idea, and which book has the most similar pattern. Some are loosely based on existing projects. Making gifts is one of my favorite seasonal activities.
Child Made Fairies
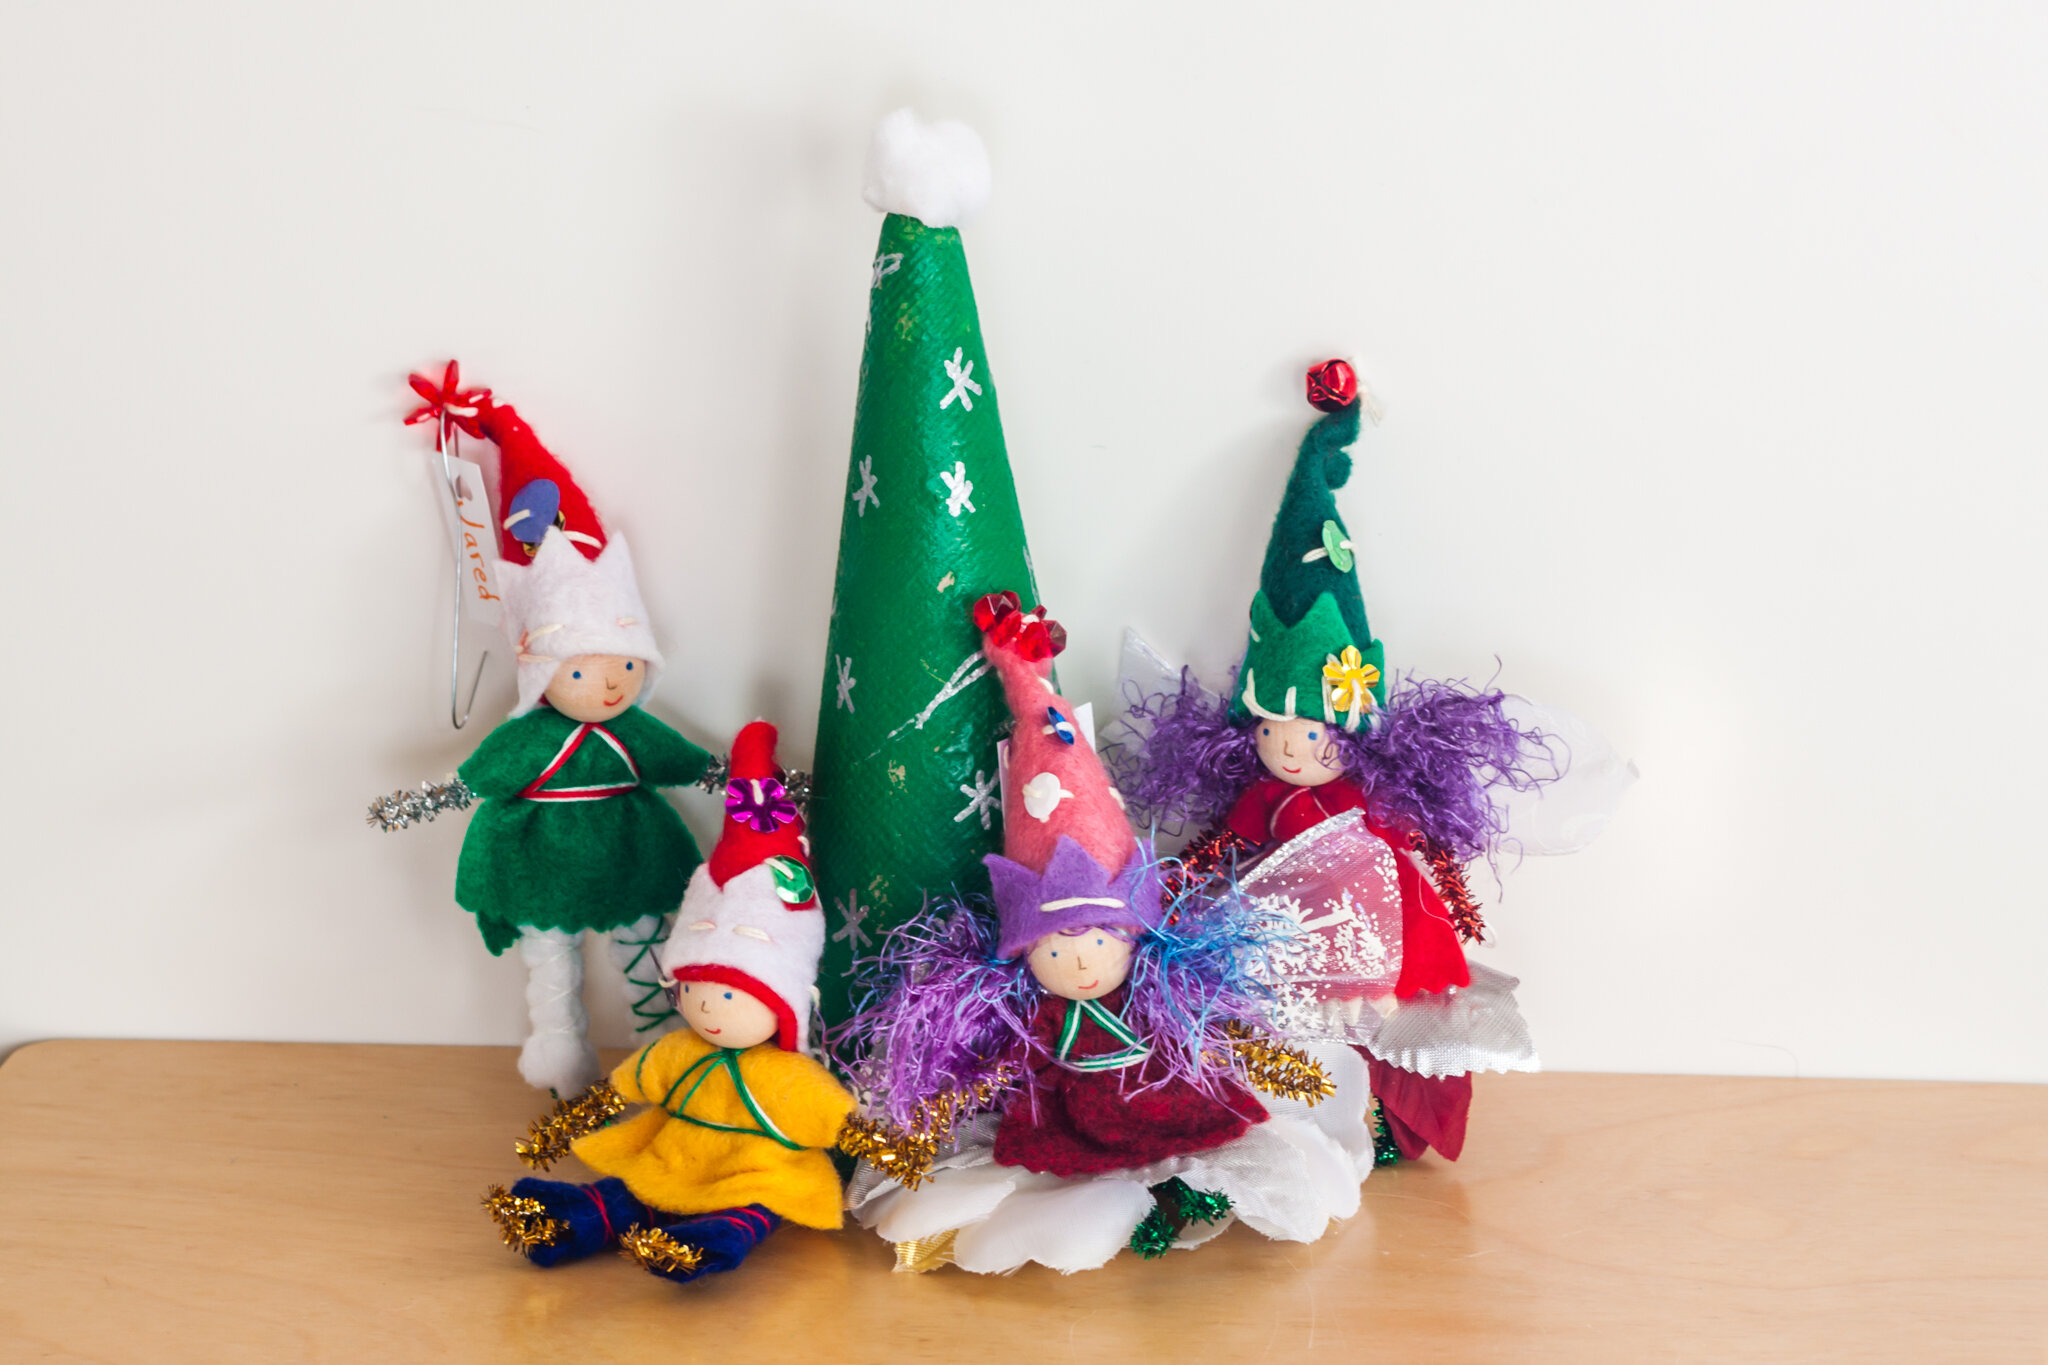
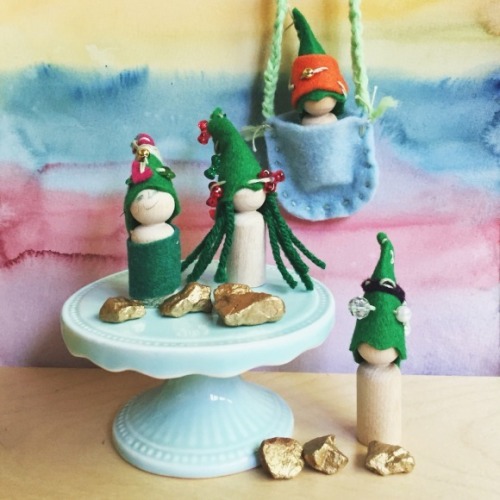
We made these many years as gifts for students to give their families. Children chose their colors of felt and sequins. I loved the variety and how each fairy spoke to each student. We wrapped them and gave them to a family member so they would stay on the student’s holiday tree (which students appreciated). Of course, they often made another for grandparents :). The fairies are the introductory fairy design found in both books which sparkly pipe cleaners and variegated red/green/white crochet thread.
Oh, and the tree was a cone sold at the craft store that my son painted. When the paint dried, he used a silver pen to draw the stars.

Favorite Characters
Whether your favorites are a certain ice queen, or Santa, you can create storybooks with fairies. For the ice queen, I used the Leprechaun pattern from Forest Fairy Crafts for her dress with curvy lines instead of triangles. Her hat uses star-shaped sequins. Santa was made with the wizard robe from Forest Fairy Crafts. His robe is edged with faux fur, which is visually perfect but super-fiddly, fair warning. If you haven’t tried it before, practice cutting before making your strips to sew on the robe. You need to “part” the fur to clip the underlying cloth. It can be tricky for pushing a needle through depending on how tightly wound the underlying fabric is. I sewed two strips along the front of the robe, not around the neck because the fur is too stiff. You can achieve the same look with white felt edging a red coat. You could even make it shorter to look just like Santa’s jacket. Mrs. Claus can be made with a red and white felt dress.
Children would have a difficult time sewing faux fur. If they’re sewing, I recommend white felt and white sequins. The little pompom on top of his hat was found in a packet of pompoms at the craft store.
I also gave Santa a white shirt and red pants using black thread with the basic fairy pattern. He’s a favorite ornament on our tree now :)

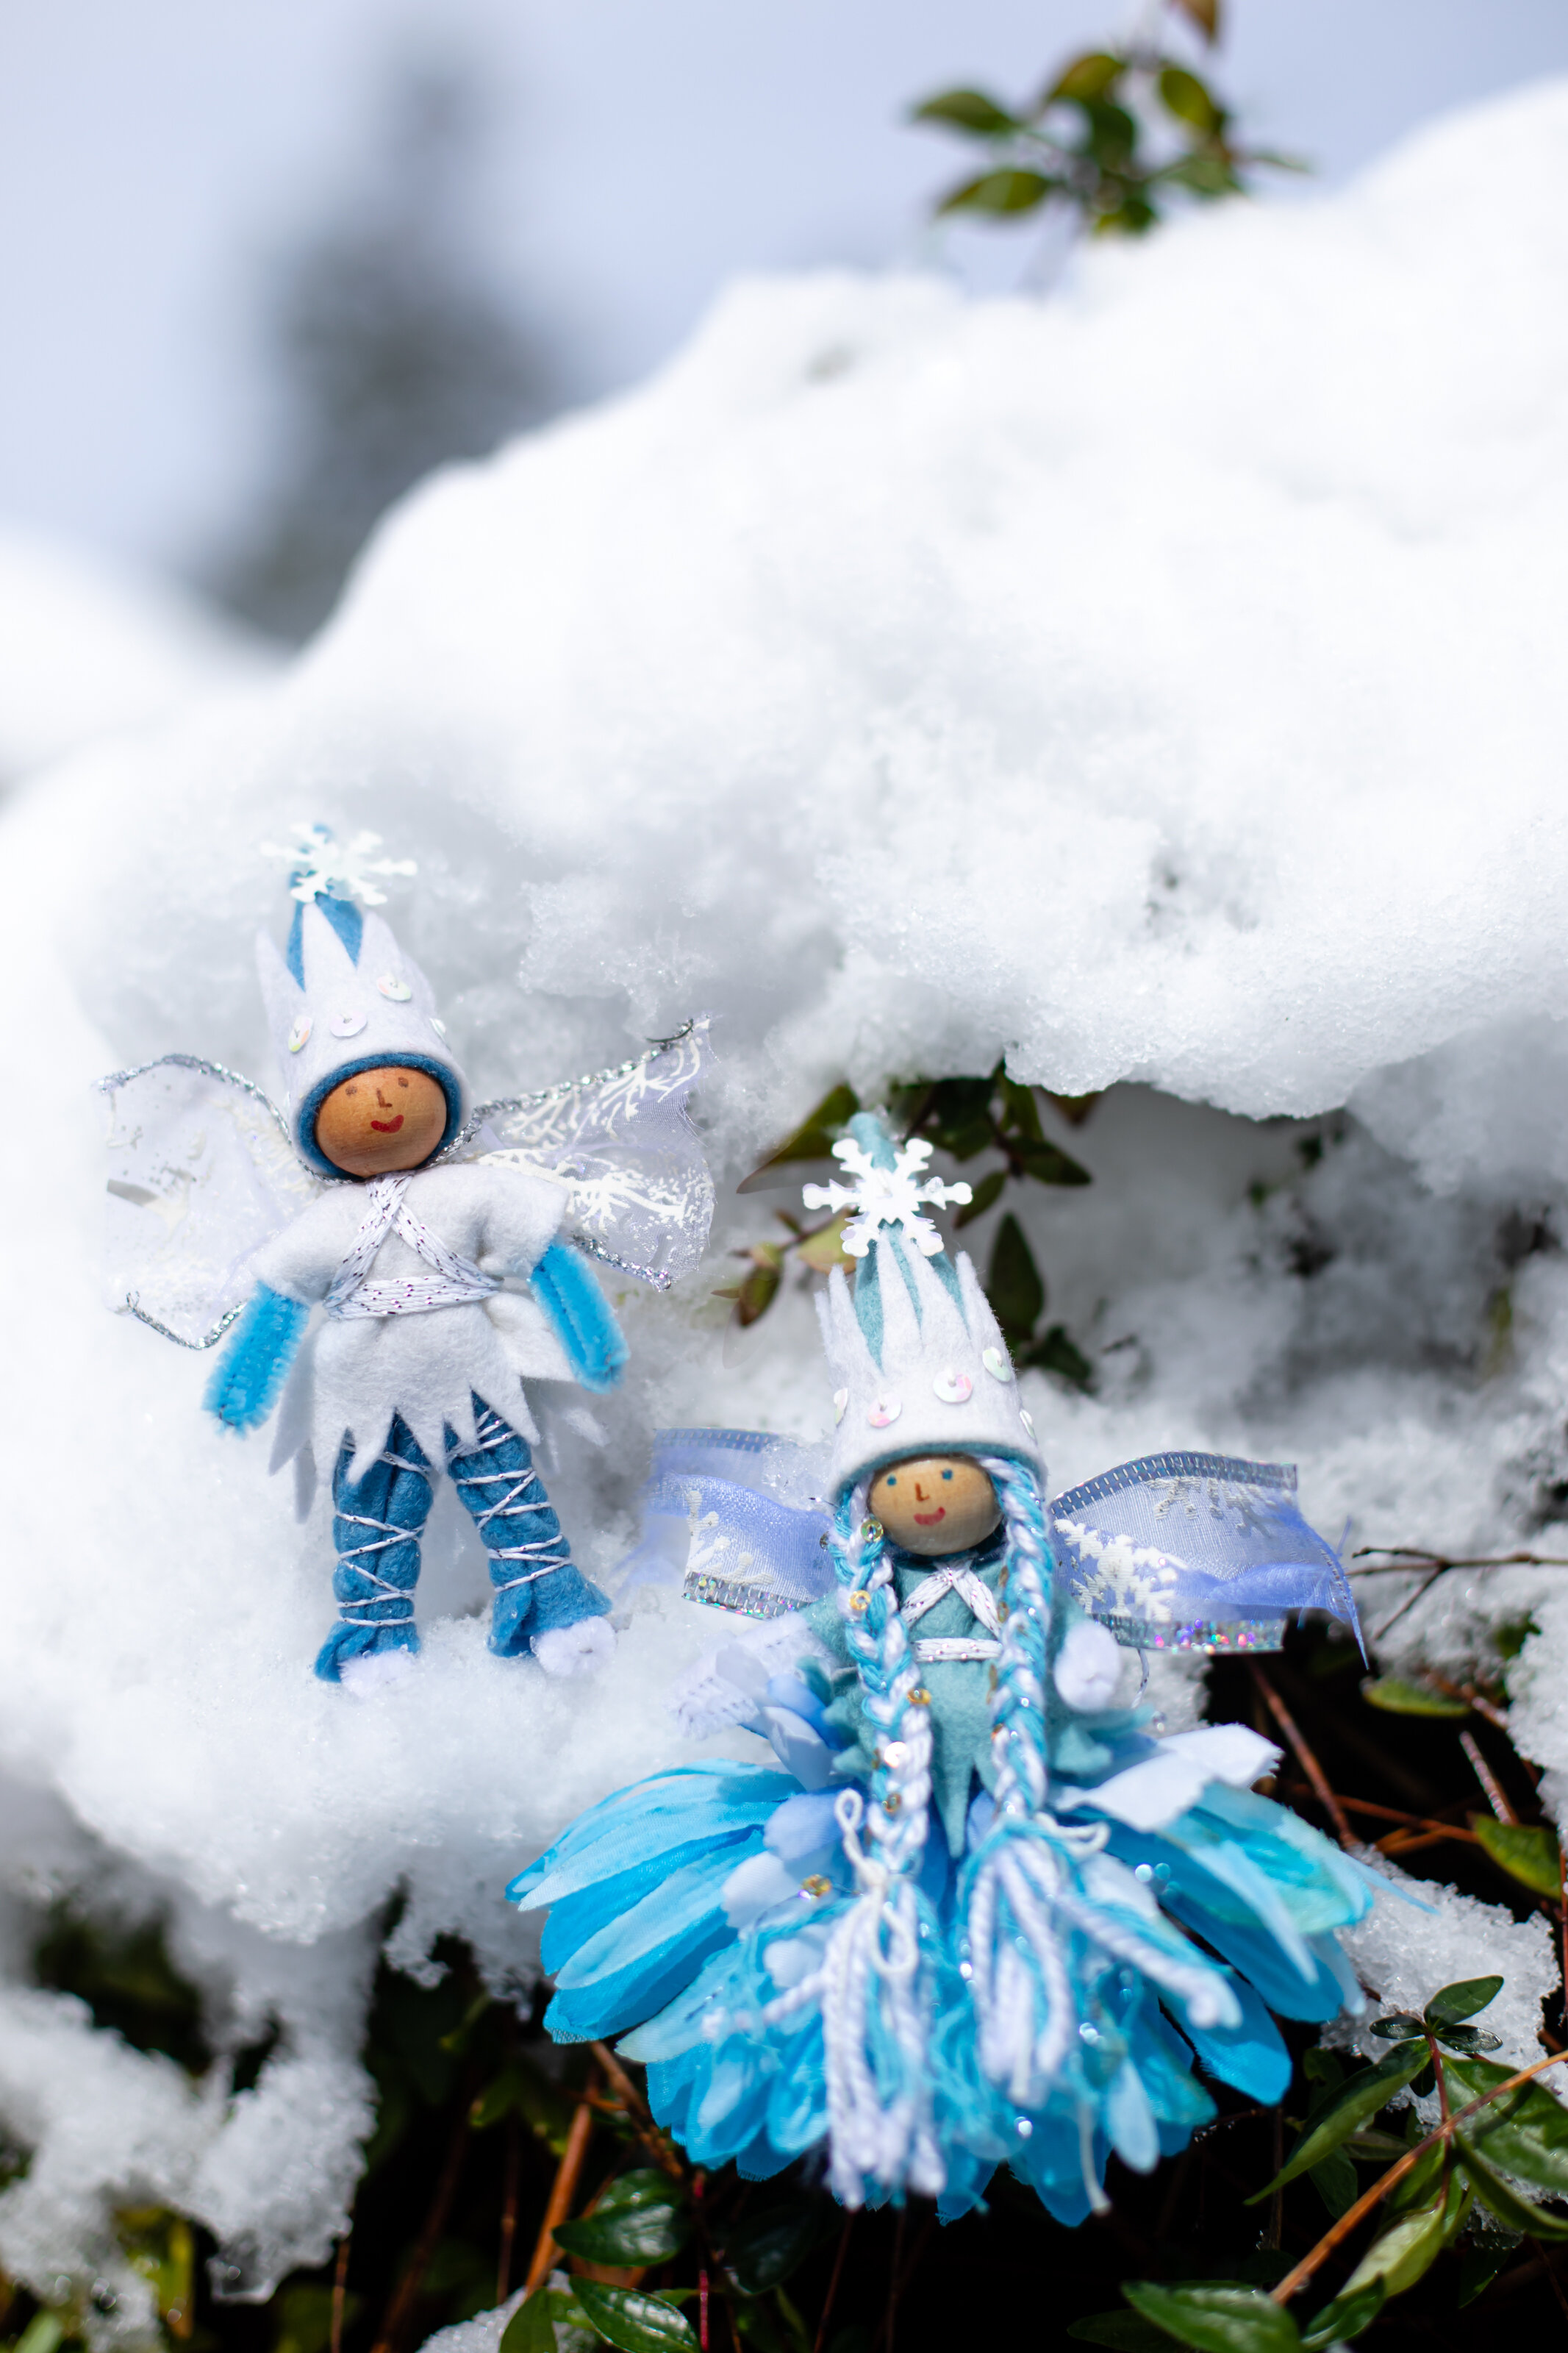
Winter Fairy Ornament
The winter fairies are wonderful ornaments or toys for kids that love a certain ice queen movie. They’re in Magical Forest Fairy Crafts through the Seasons which has their exact instructions (no modifications necessary).

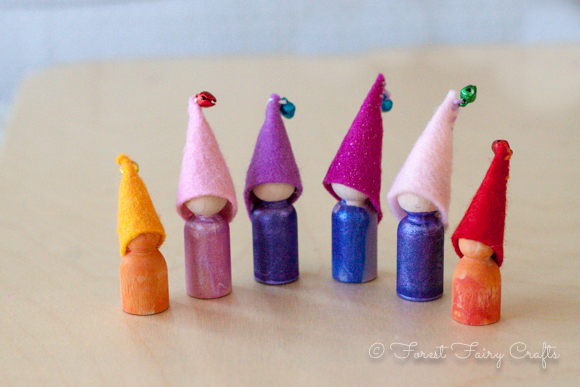
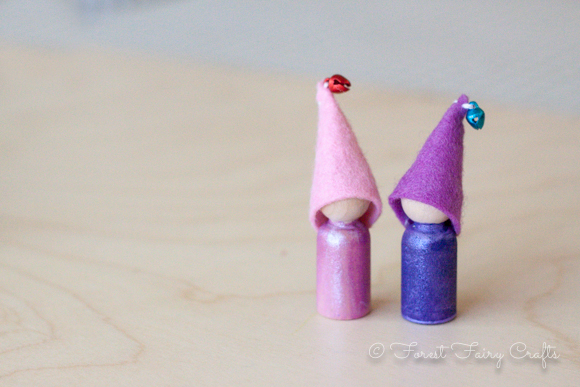
The Fairy Family
This was a gift for my niece when she enjoyed dollhouses and little worlds. This family featured many of her favorite colors. I’ve given them as well when the fairies matched people in a child’s own family (two brothers or two moms or more children). I even add gnomes to show a baby. You can make the “adult” fairies and “baby” gnomes with either book. The “kids” aka little brother and sister are in Forest Fairy Crafts.

Mermaid Ornament
These are above-and-beyond mermaids I made when my daughter was obsessed with mermaids. A mermaid by herself isn’t that seasonal until you give her a Santa hat. The faux fur is fiddly, and not the most fun for hand sewing, so I wouldn’t expect a child to enjoy sewing with it. The hat looks great with white felt as well if the faux fur is too fiddly. You can make mermaids with the mermaid pattern in Forest Fairy Crafts. I wanted a challenge so I tweaked the mermaid pattern to the curve (currently not in a book). You don’t need a curving pattern to make a cute mermaid ornament for your tree. When I do tweak patterns, I first trace the top of the pattern that needs to math onto a blank piece of paper, then draw the curving tail. I cut that out and hold up to a wireframe fairy body to see if the scale will work, then cut a piece of scrap felt to again see if I like the shape and scale (too small or too big). If it looks good, I cut the final version from the felt I’ll use for the ornament. You can use this technique to adjust just about any pattern to match a new idea.

Hand Sewn Ornaments
These are in Magical Forest Fairy Crafts through the Seasons, including the shapes for appliqué. You can tuck a tea bag into them for cinnamon or minty scents. These (not as fancy stitching) were one of the first sewing projects we brought into classrooms. They were favorite family gifts. If you do add a tea-bag, they can be gifted as sachets (though don’t get the tea bags wet. Tea will stain the felt).

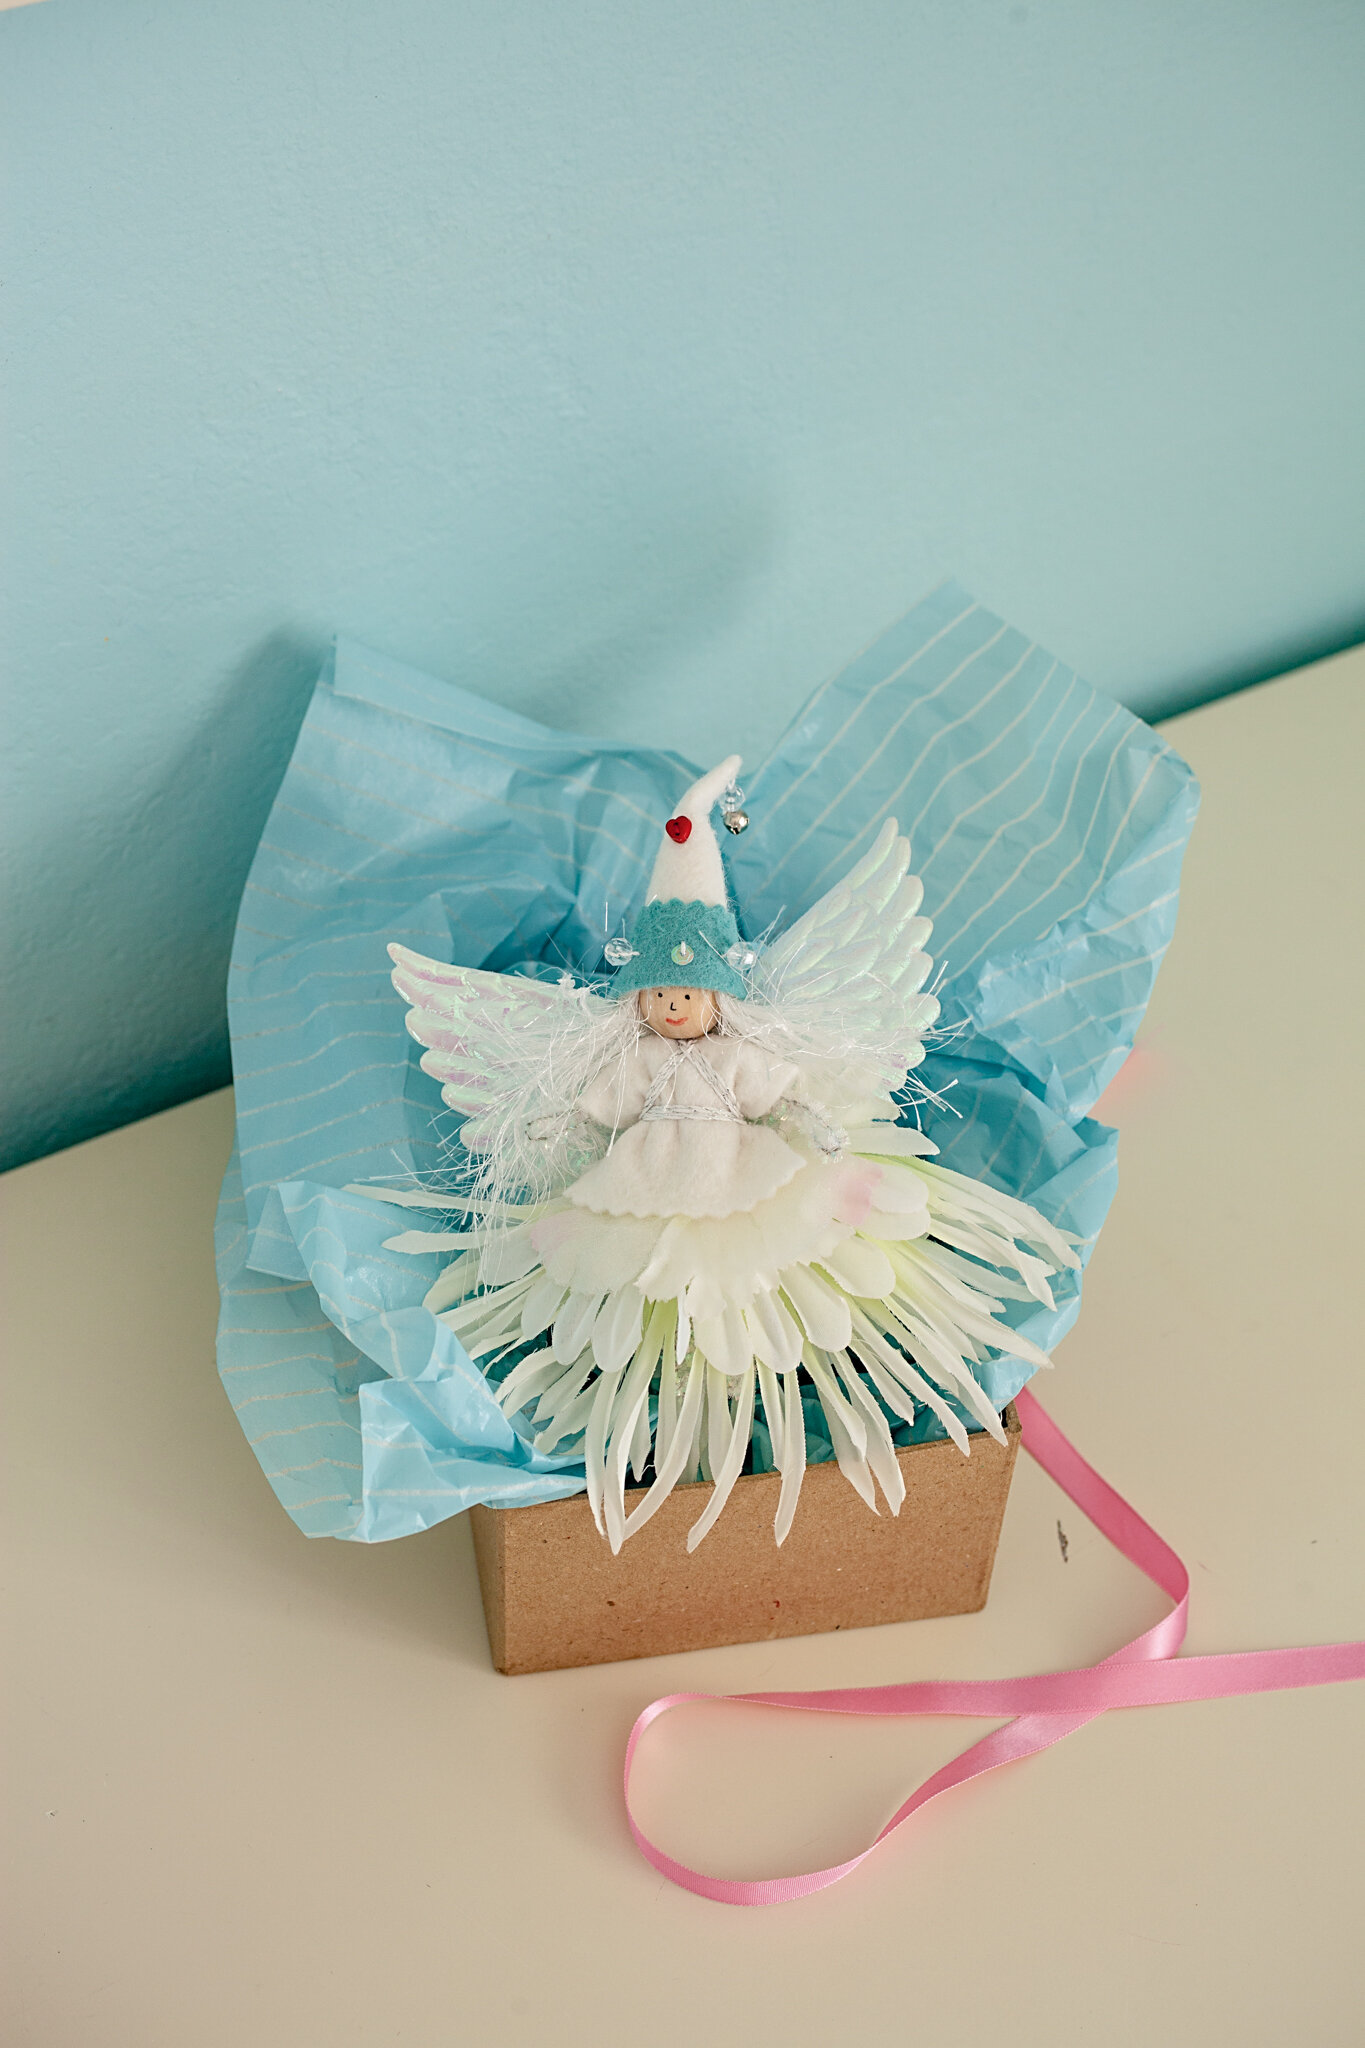
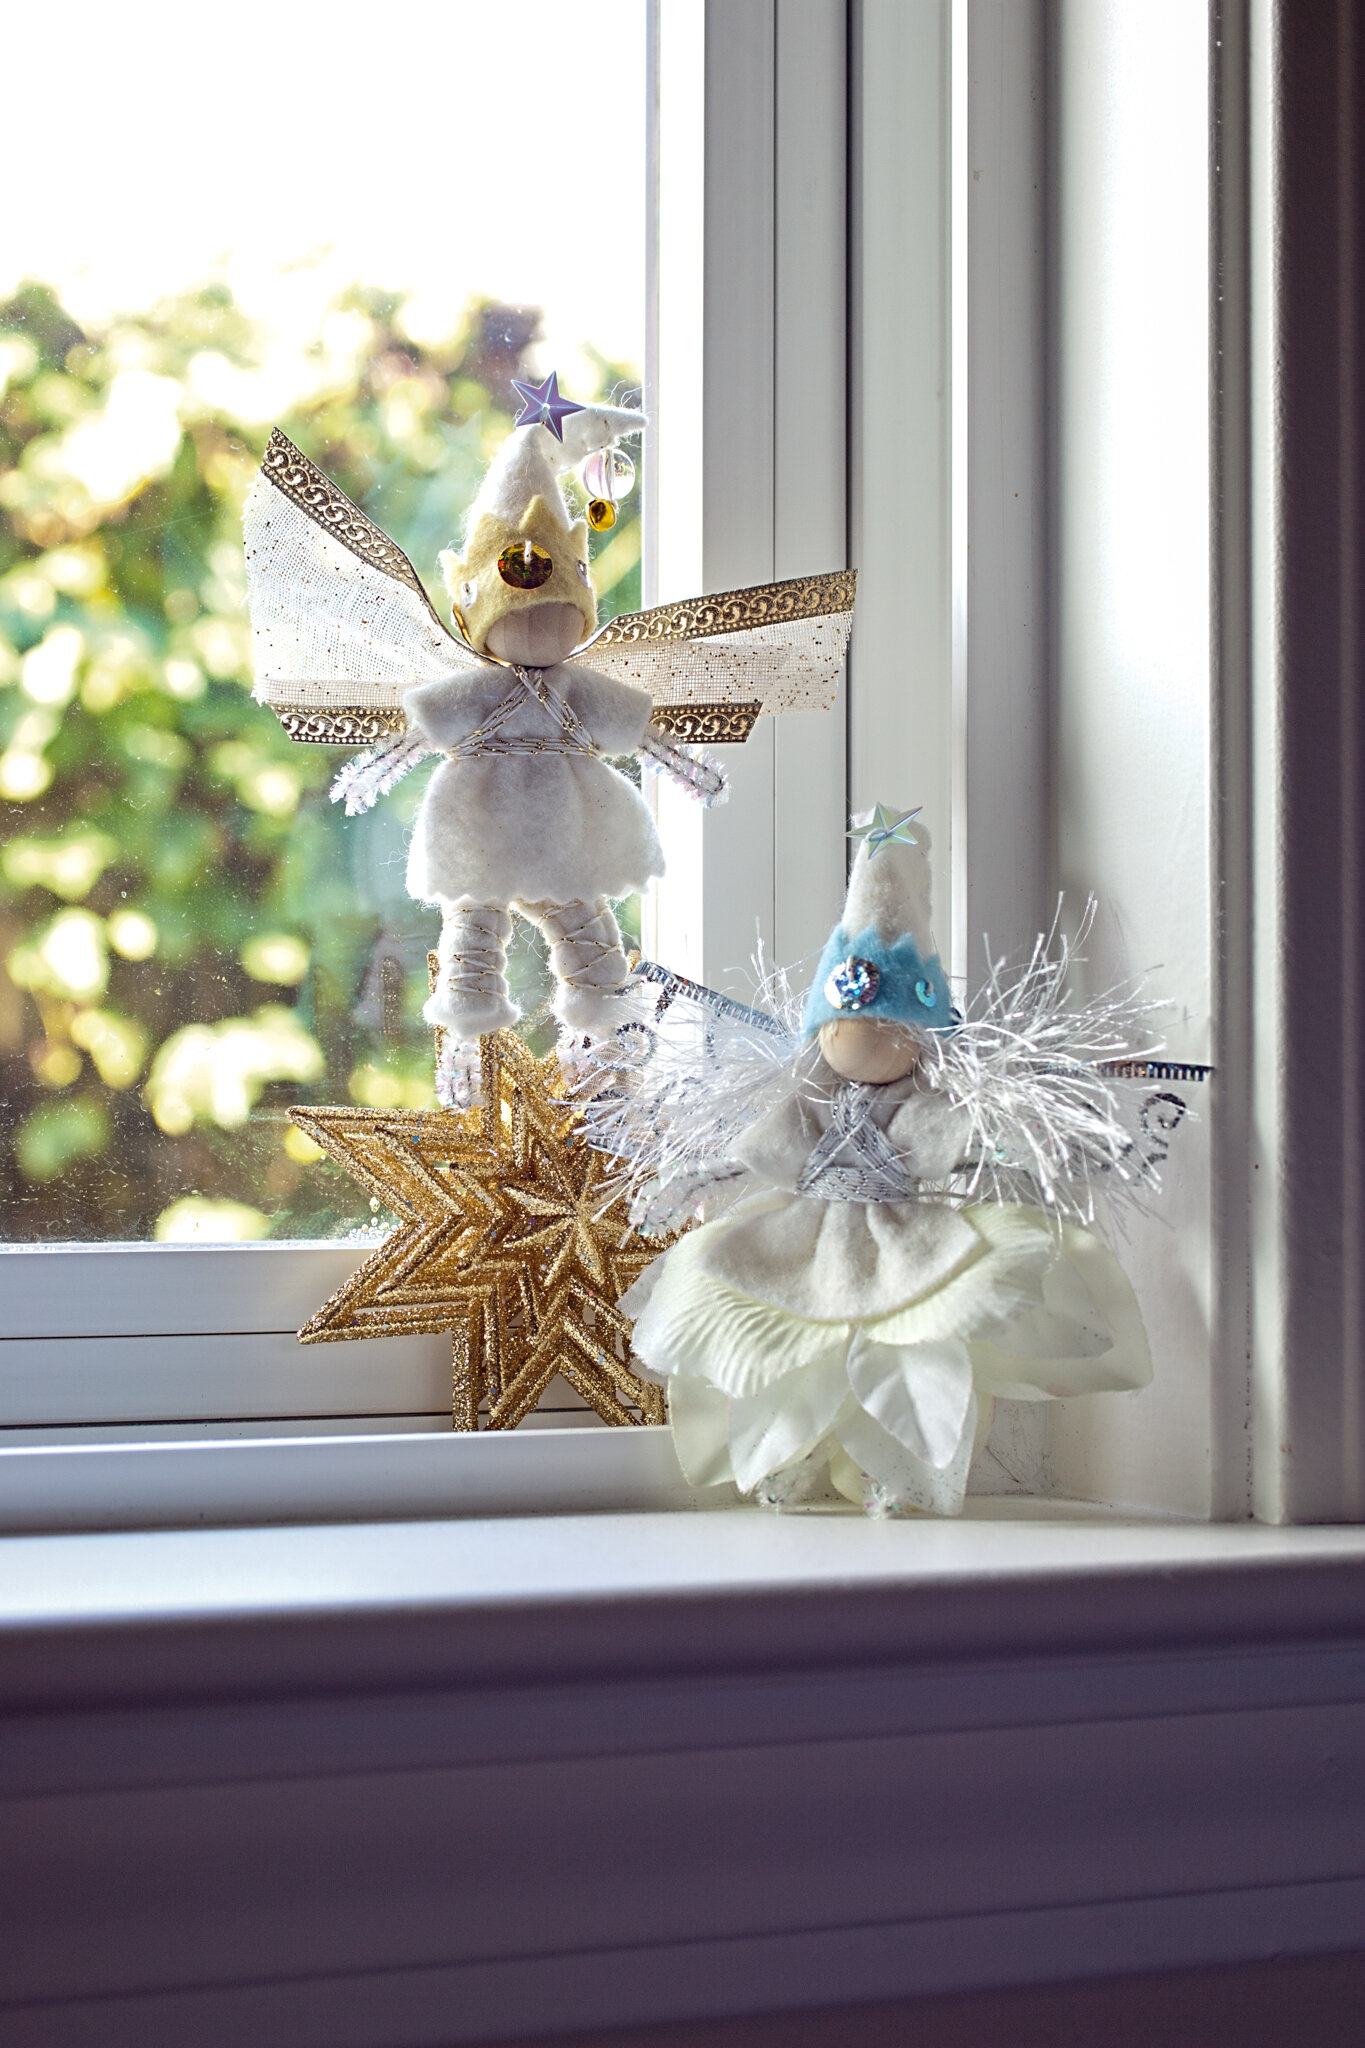
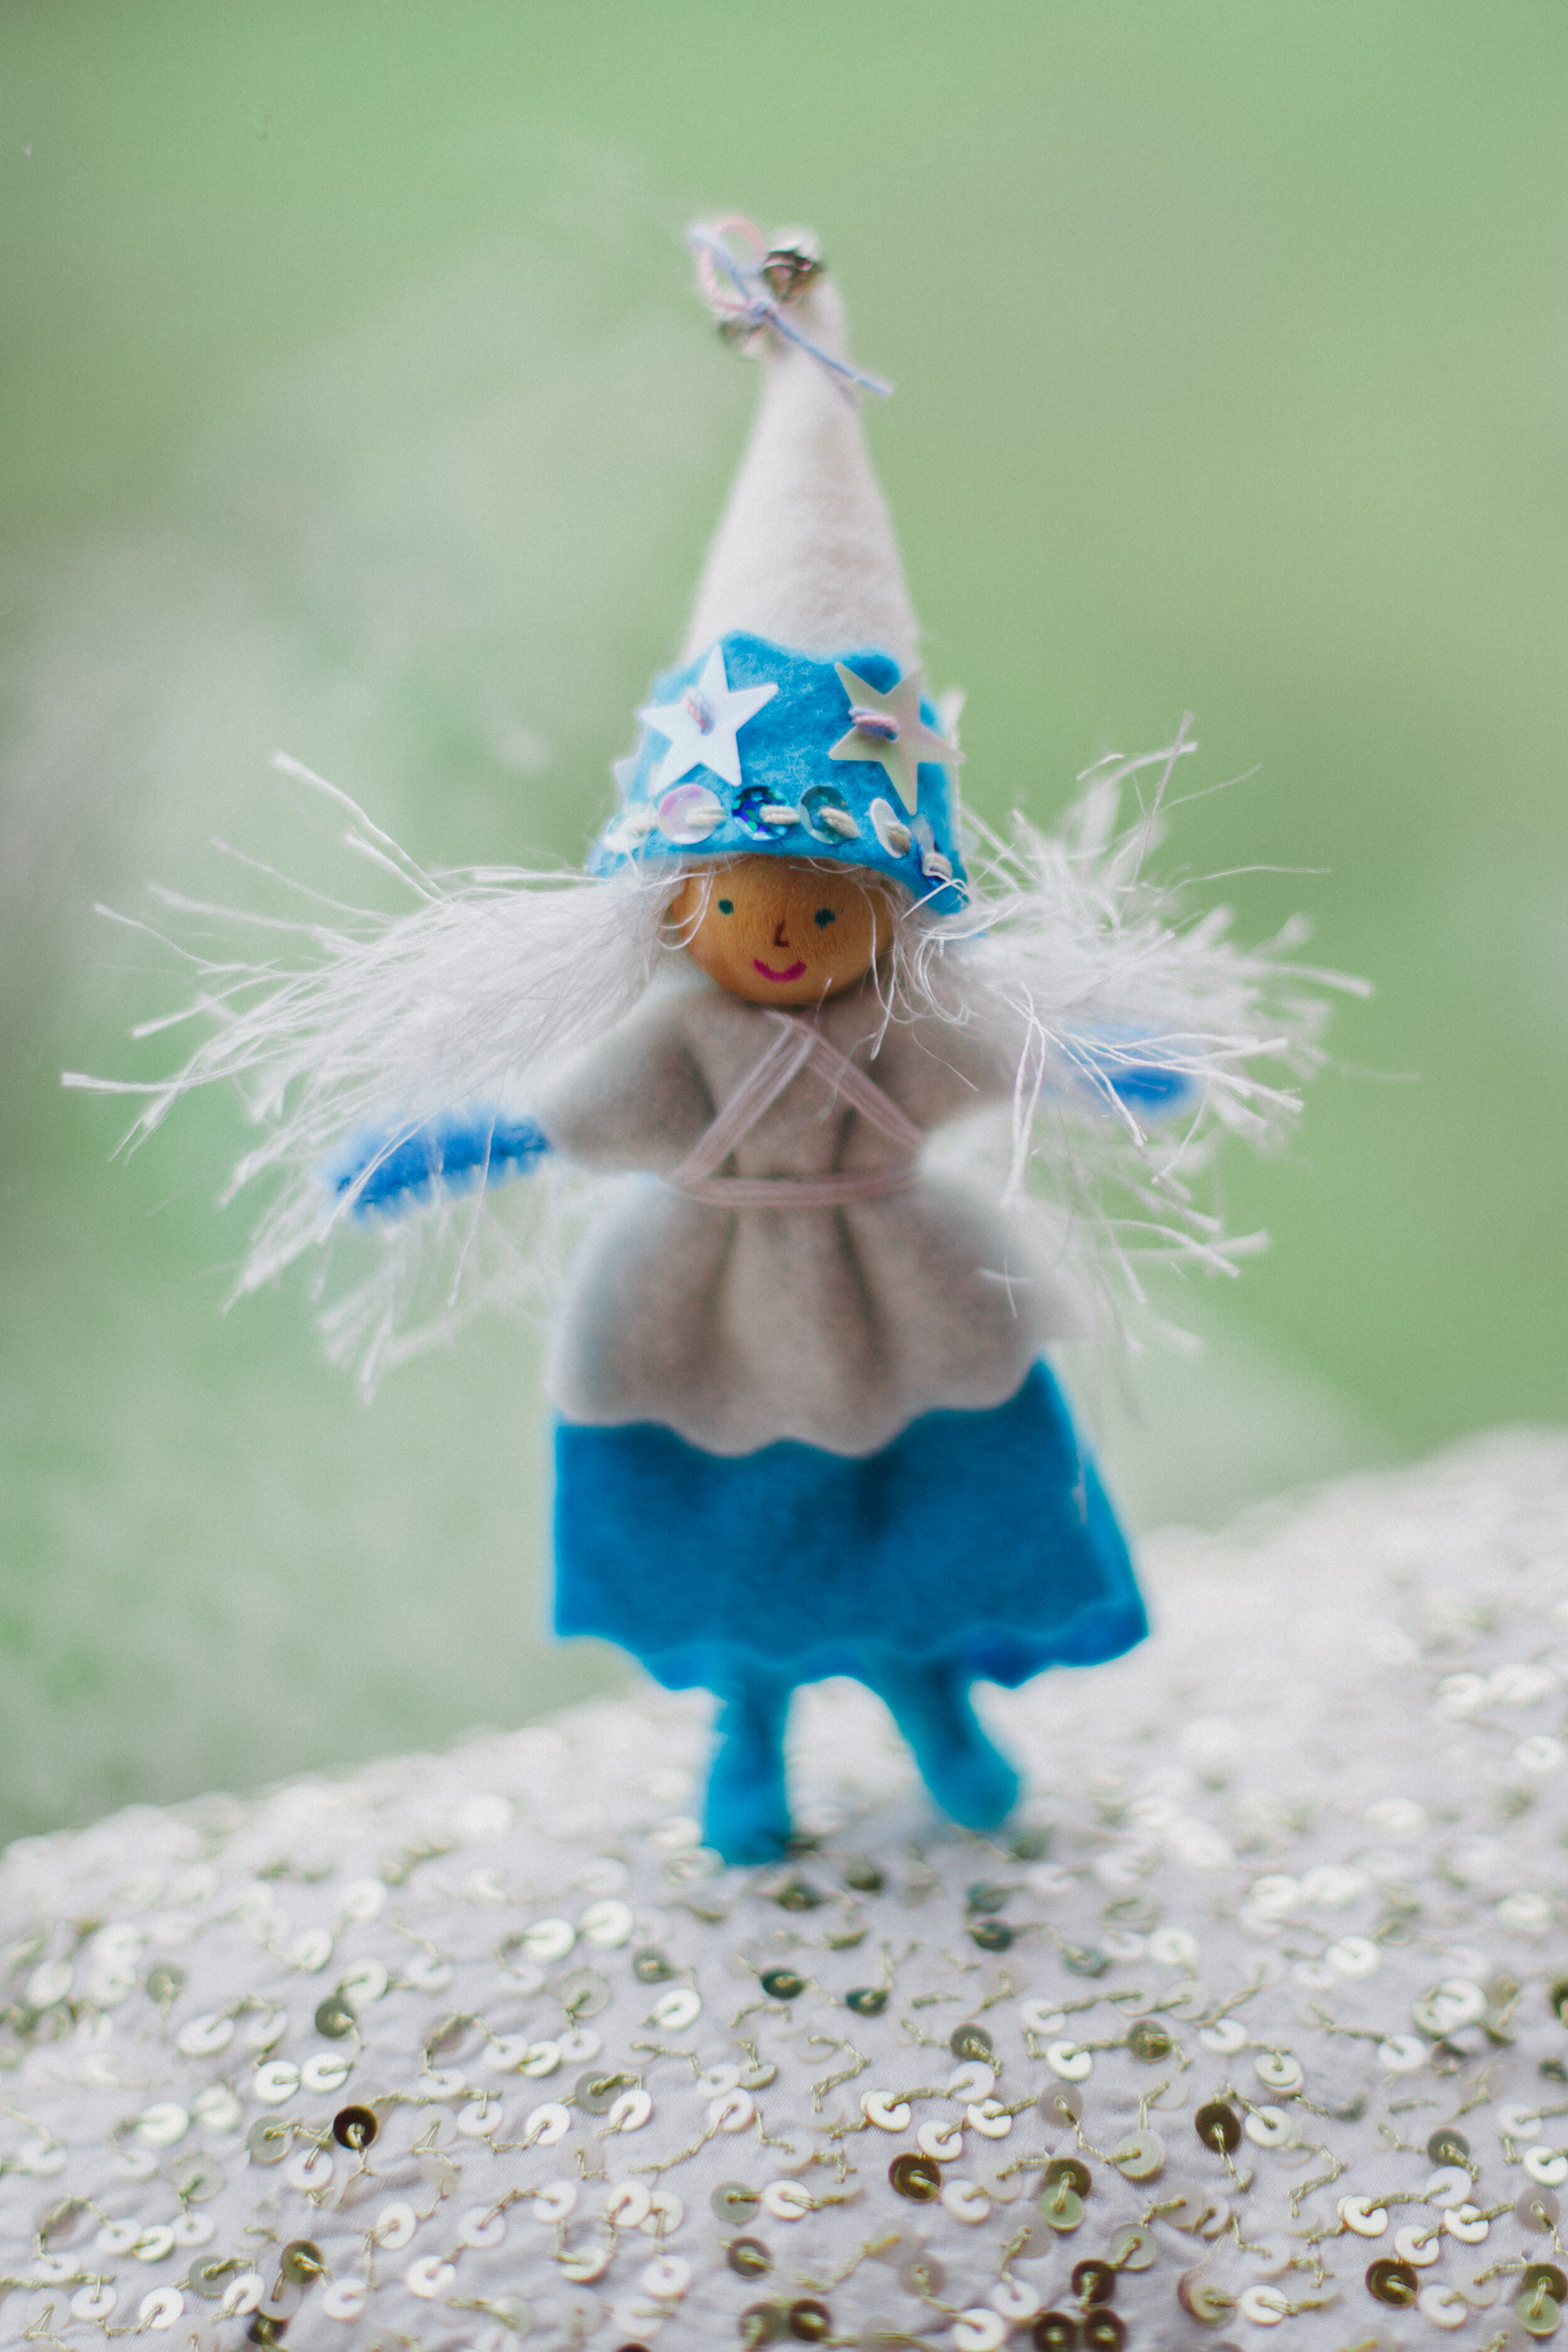
Angels
You can create guardian angels that can stay on a shelf or hang in a window all year round, or they can be ornaments. I’ve made them with soft highlight colors, like in the photo above, or leaning into silver or gold, like in the photo below.
For the fancy fairy, below, her iridescent wings were at the craft store and I knew they would look amazing on an angel. I added them the same way as I make any other fairy wings winding the thread around her shirt and wings. I added the red heart button on her hat for the love she holds in her heart.
The angel is in Forest Fairy Crafts.
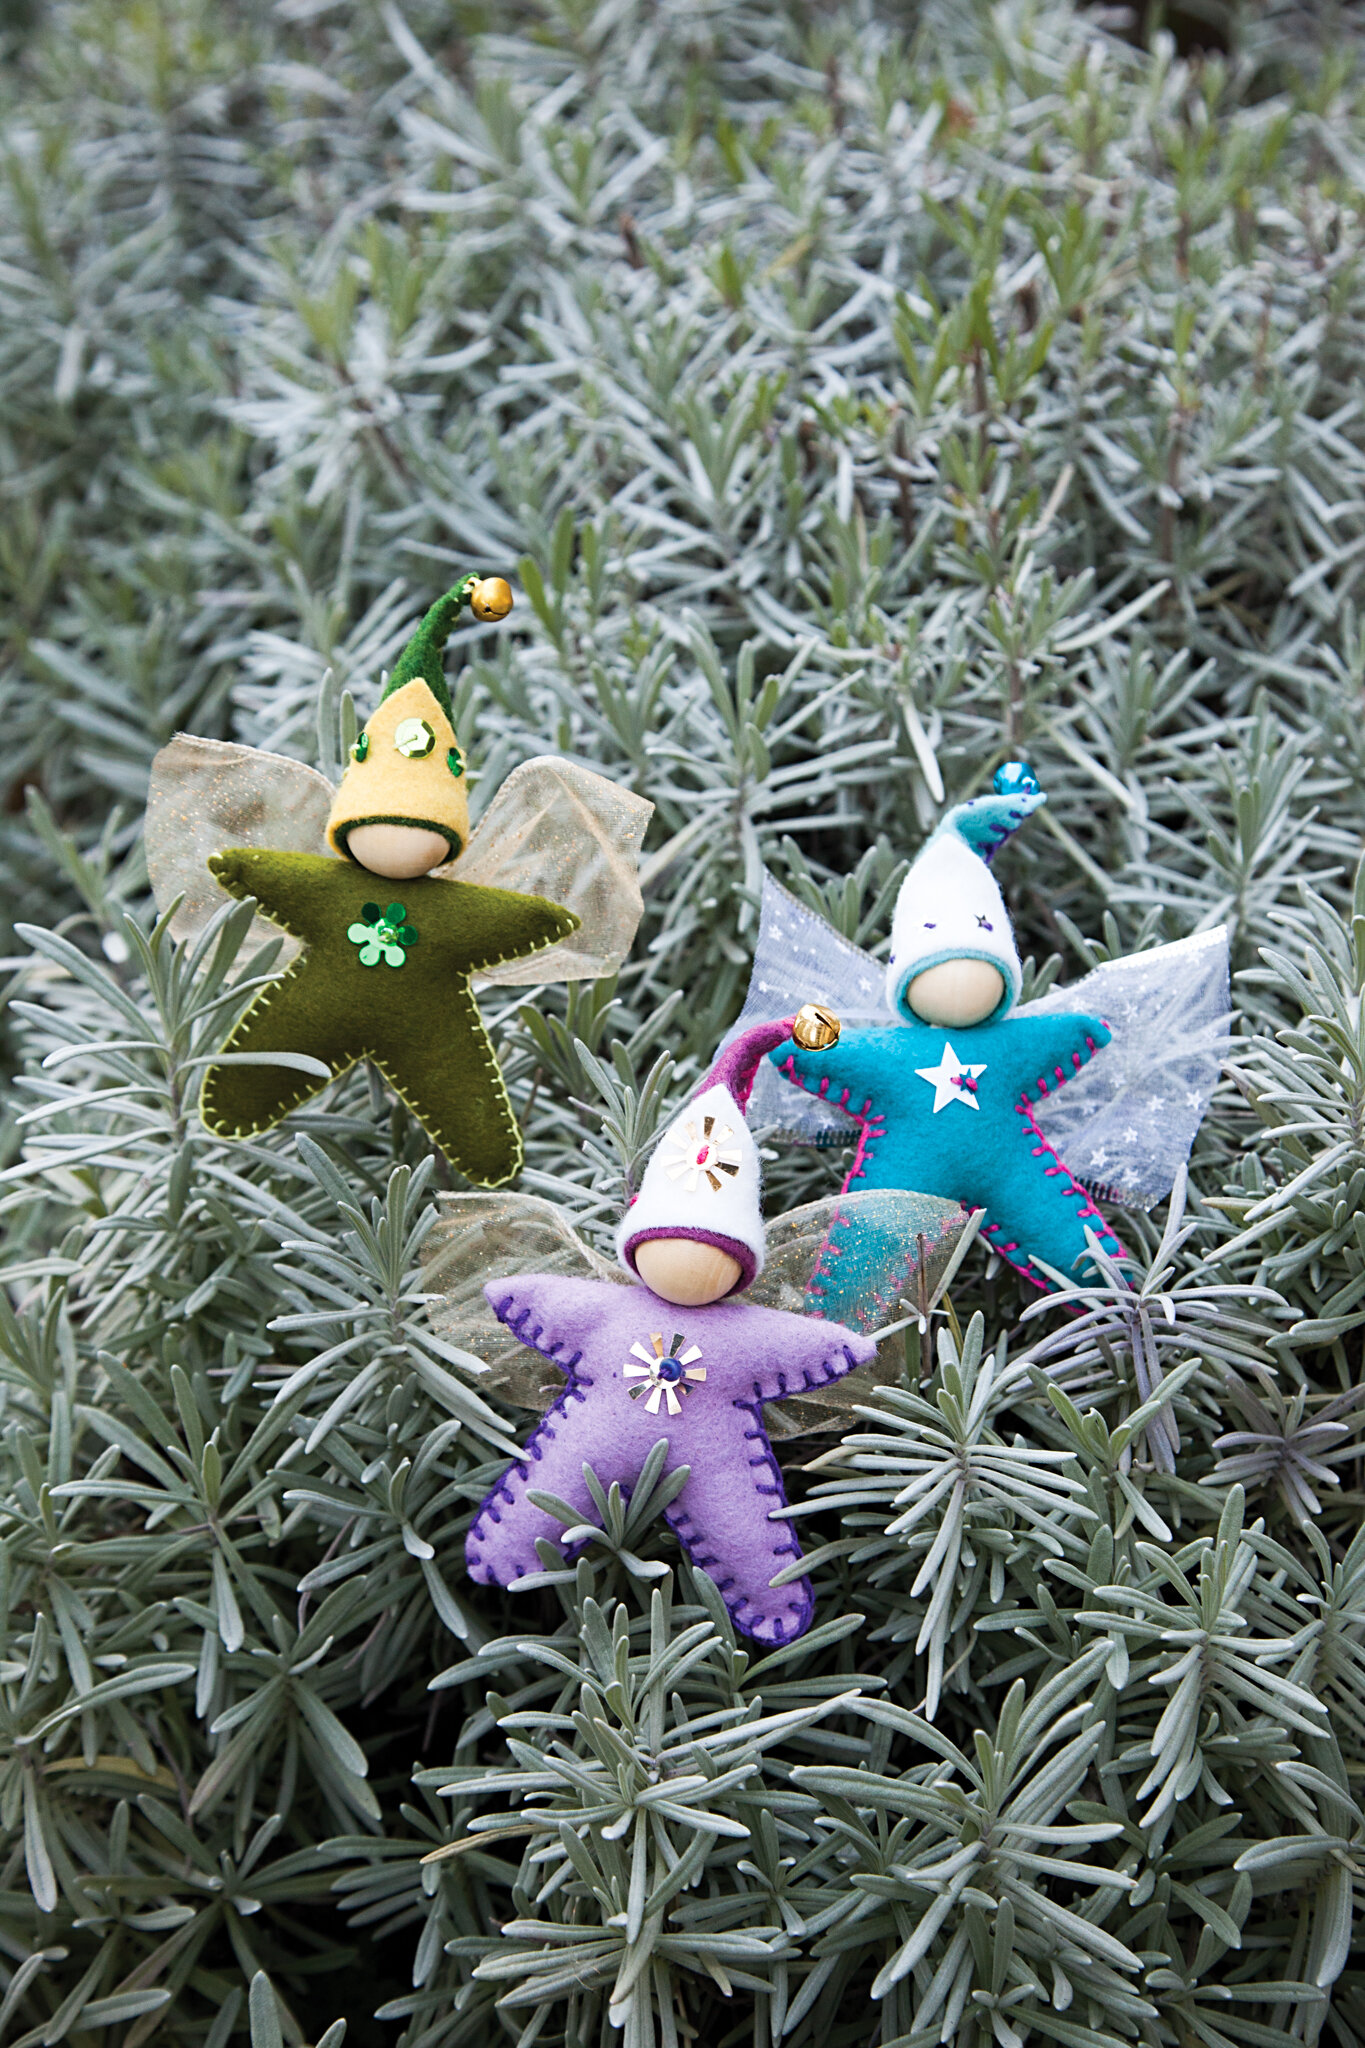
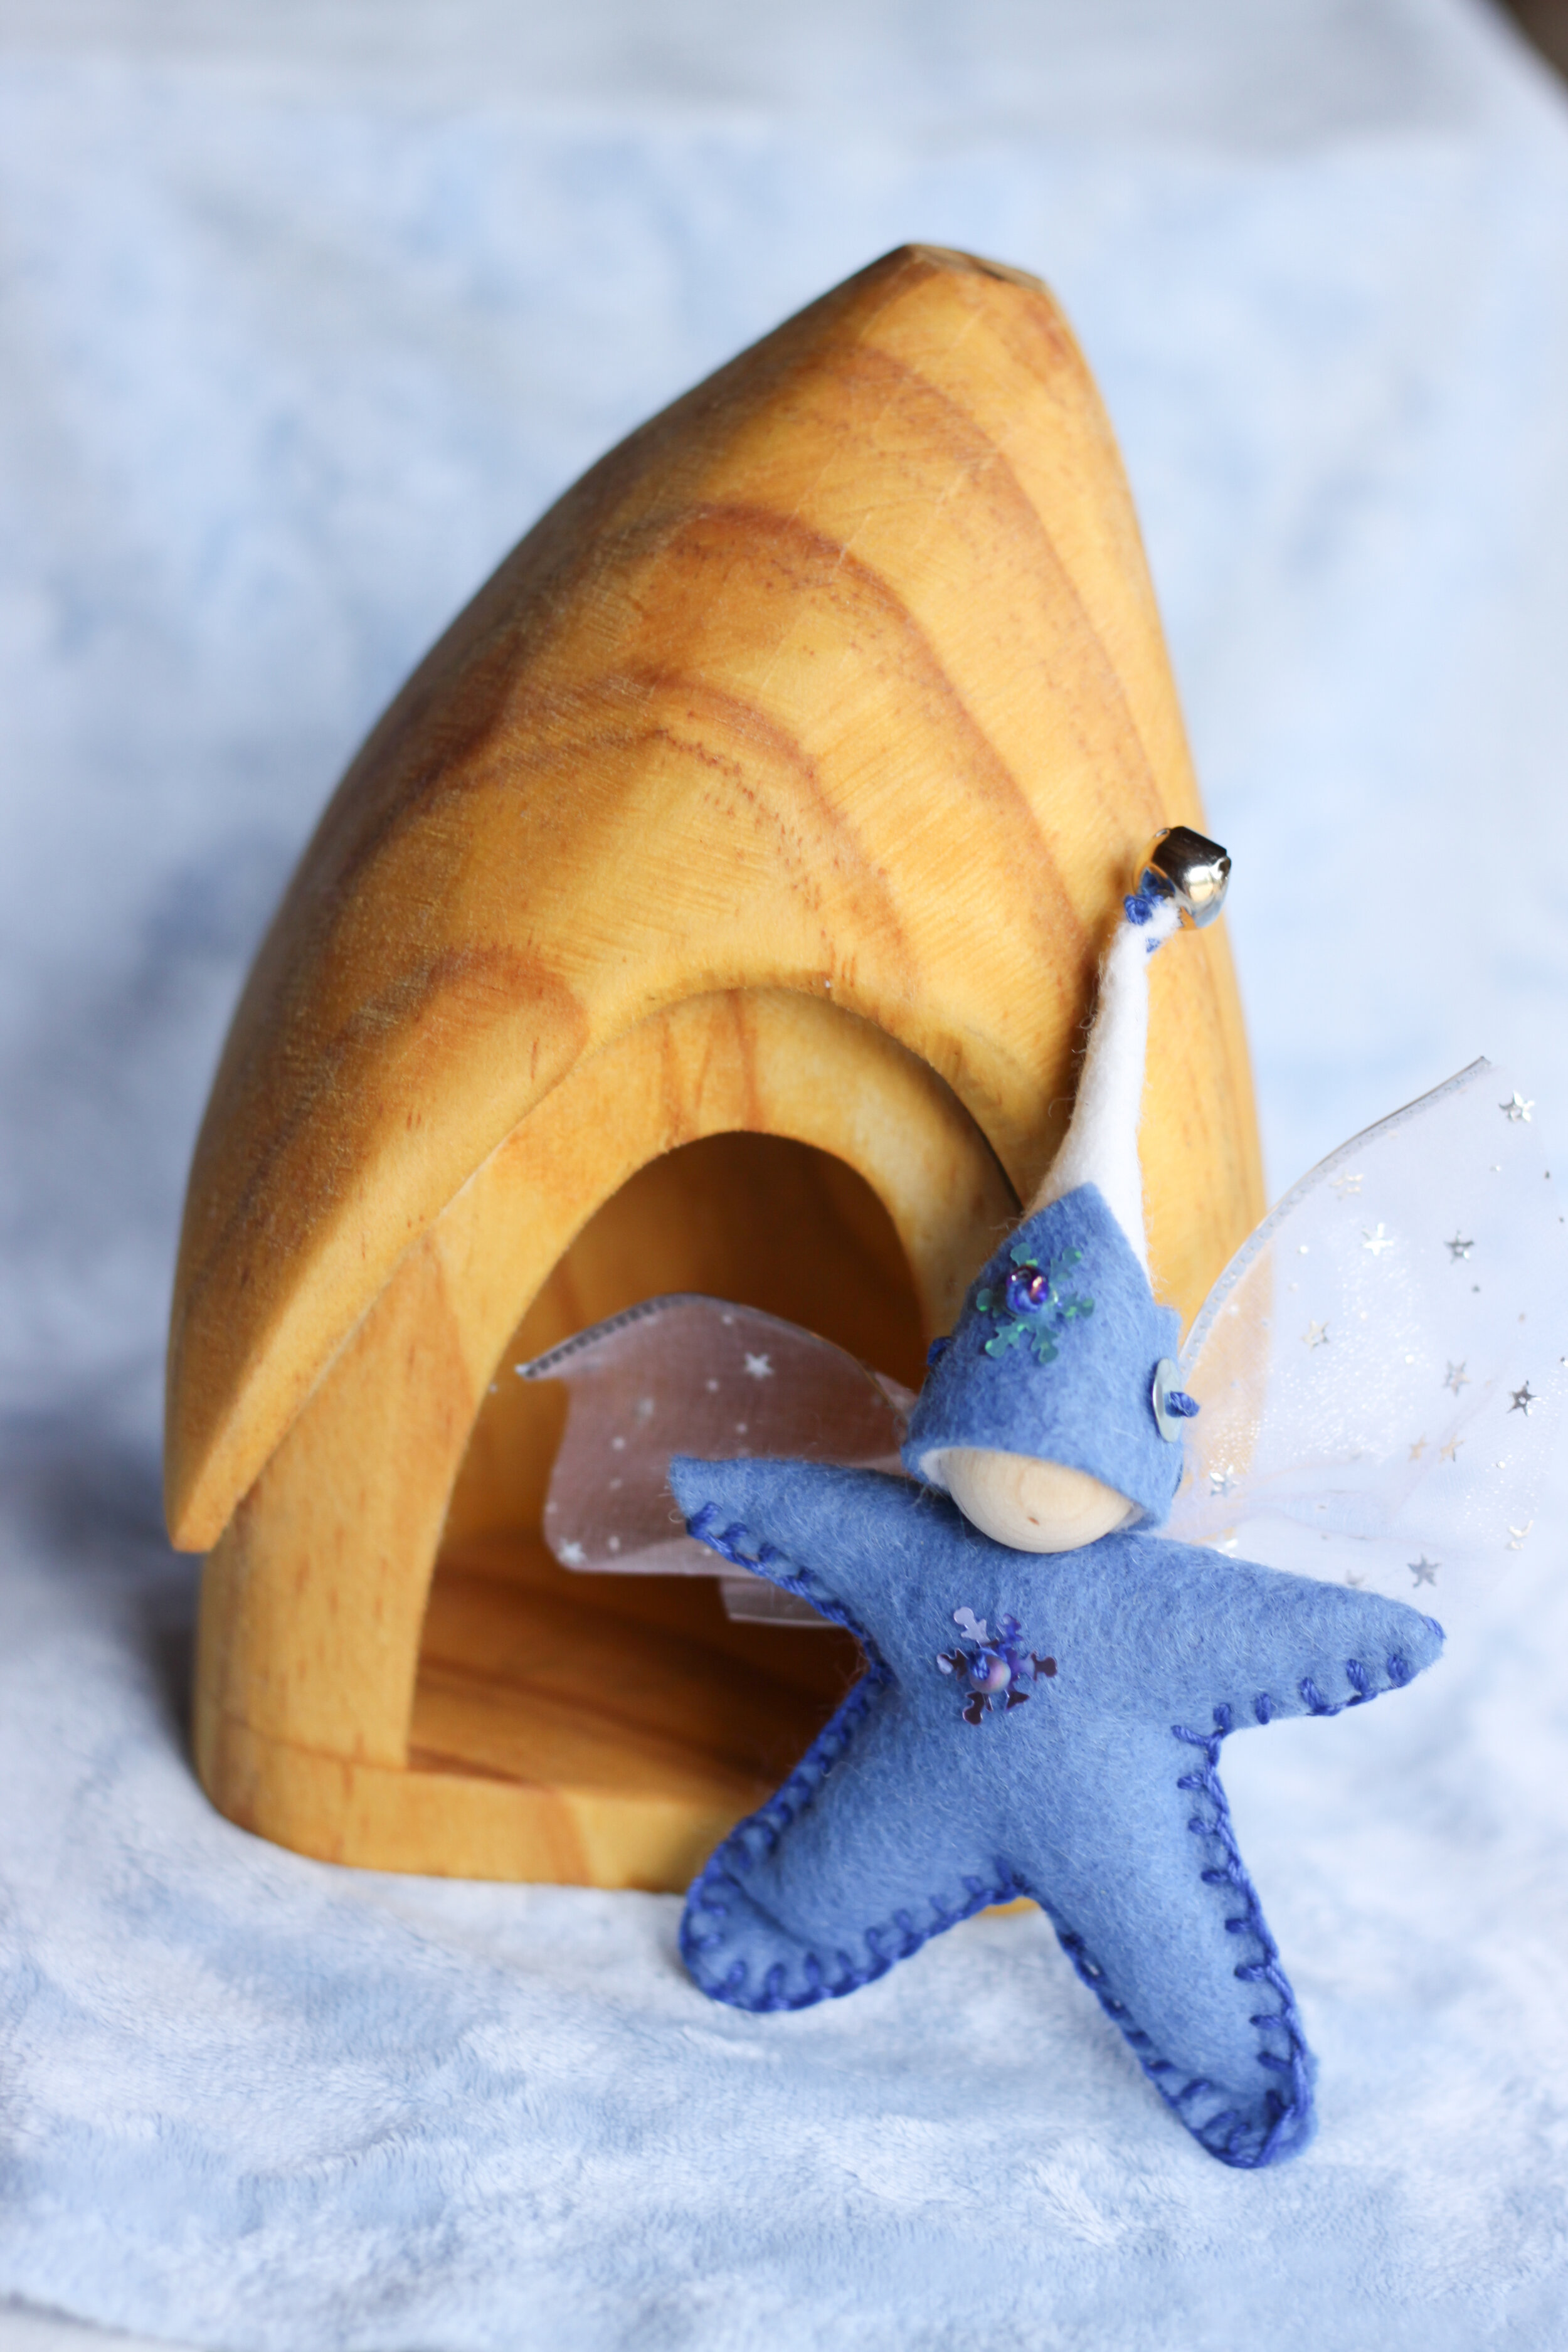
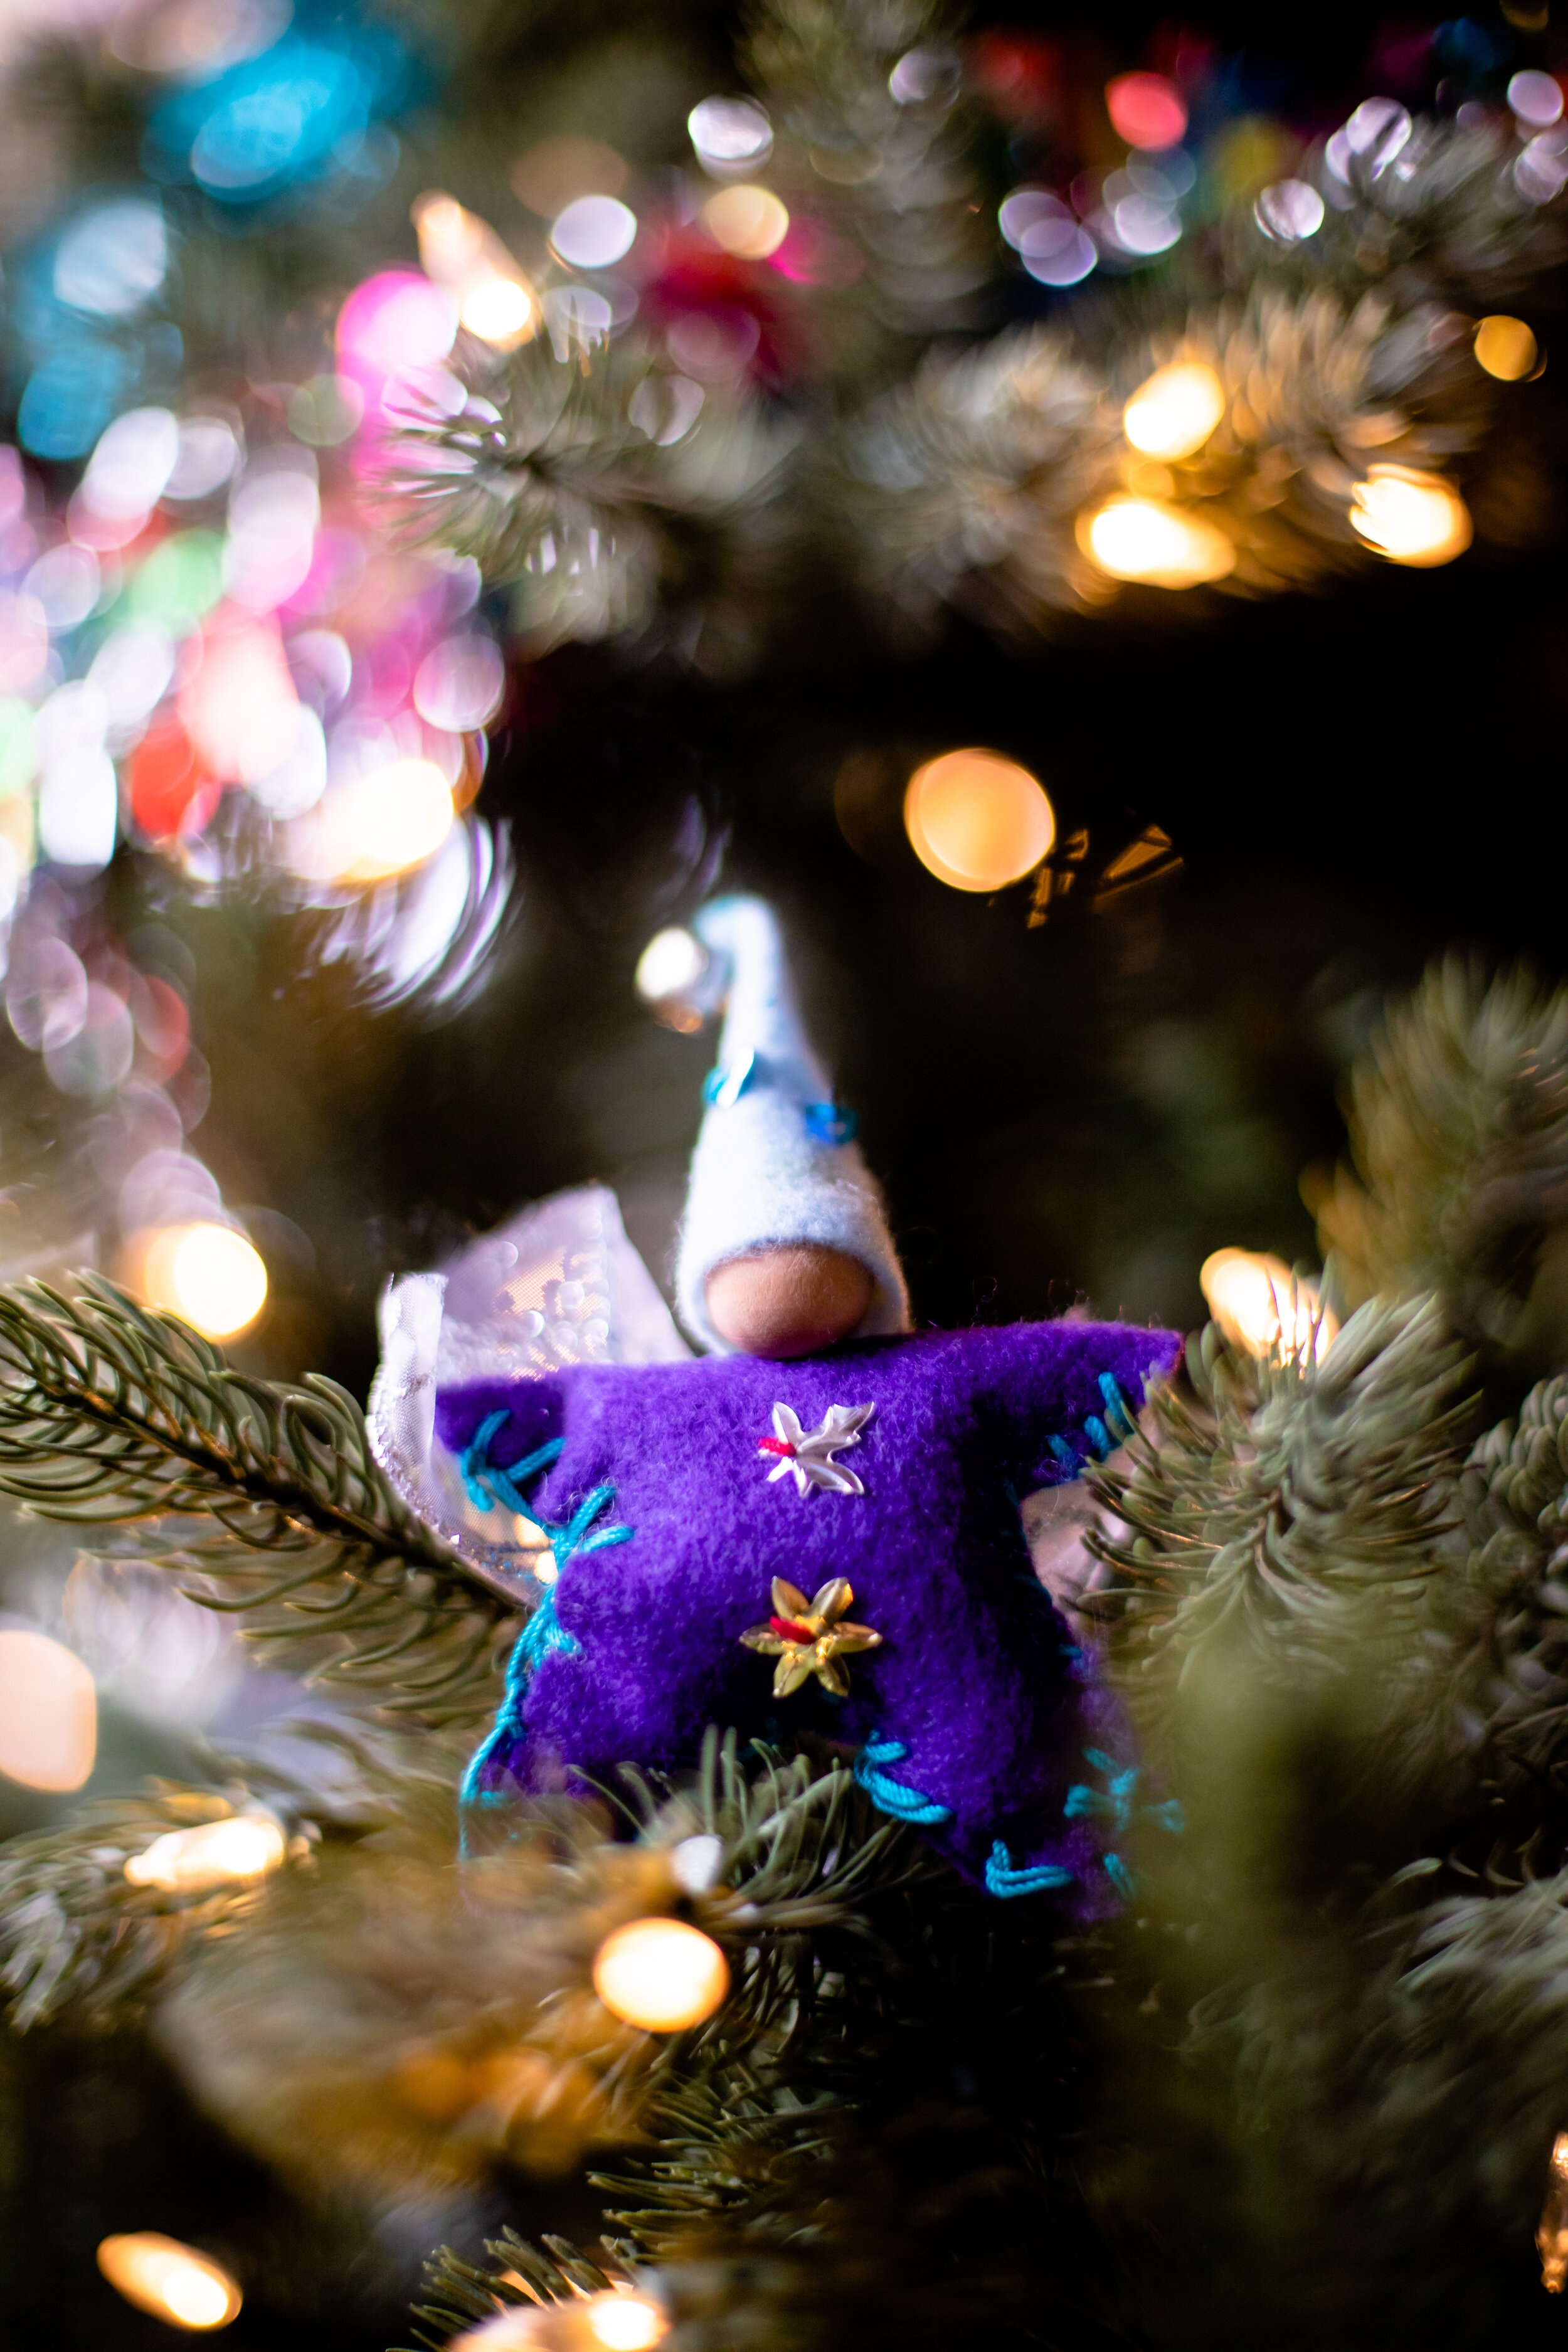
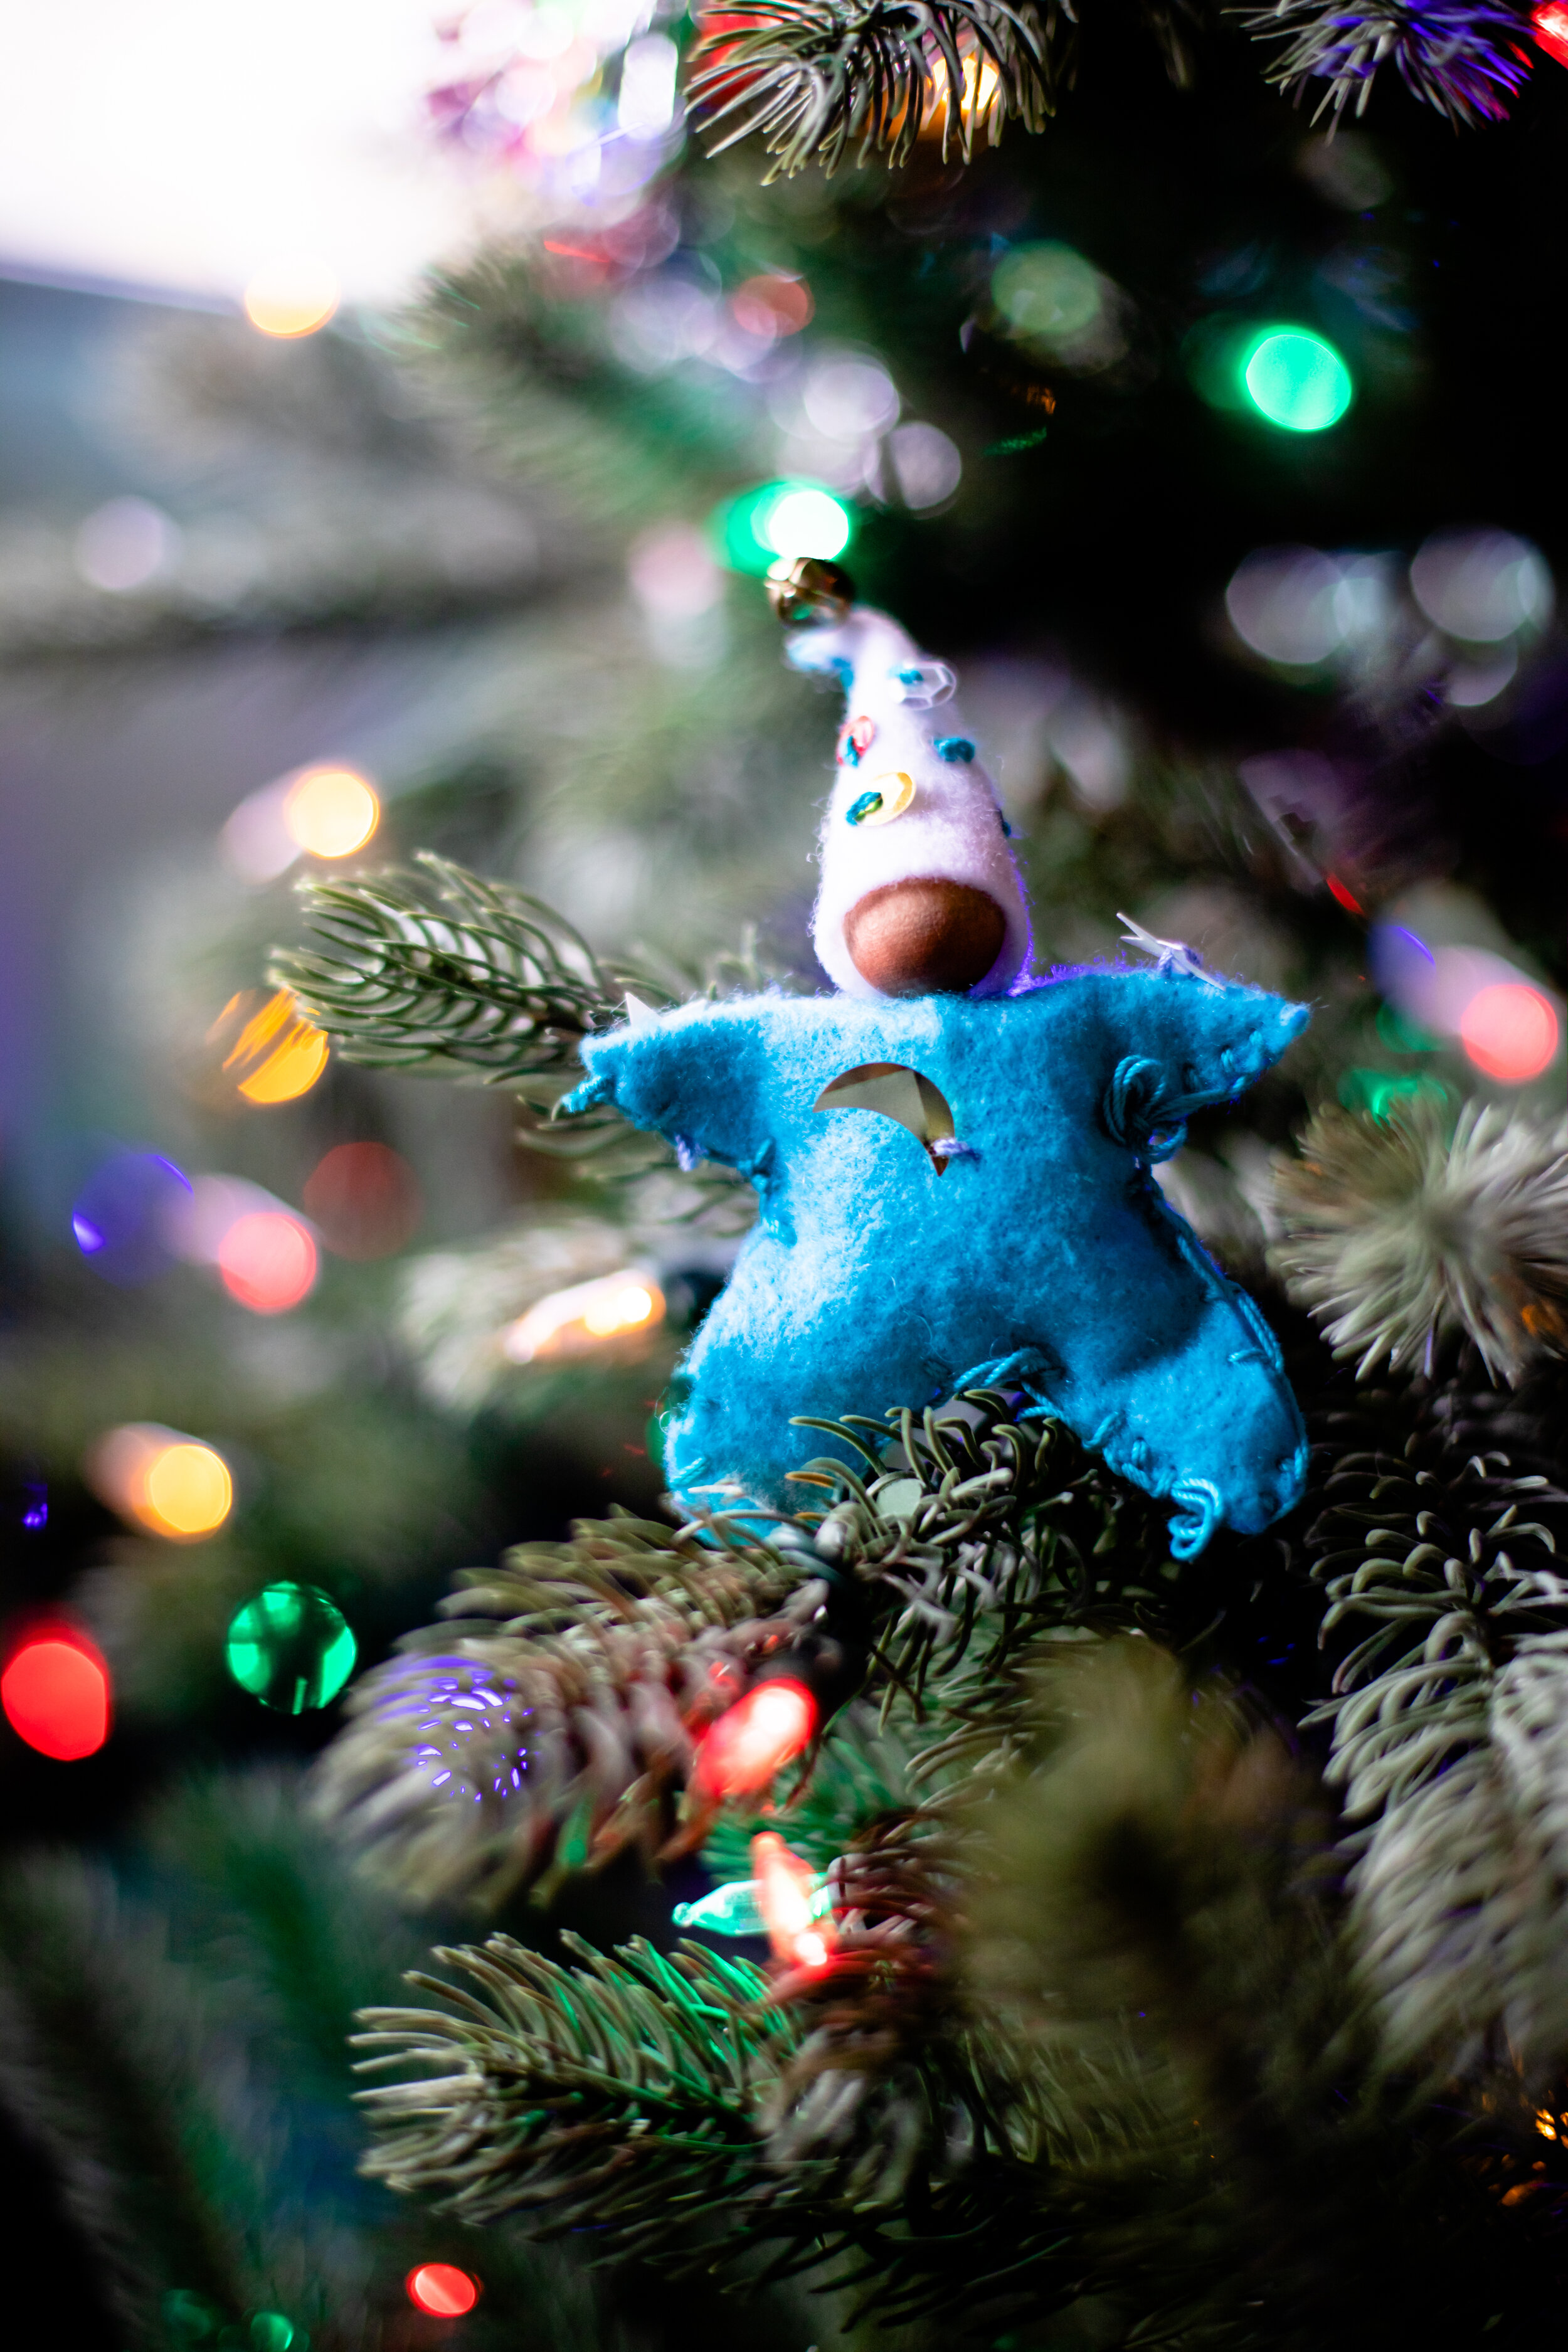
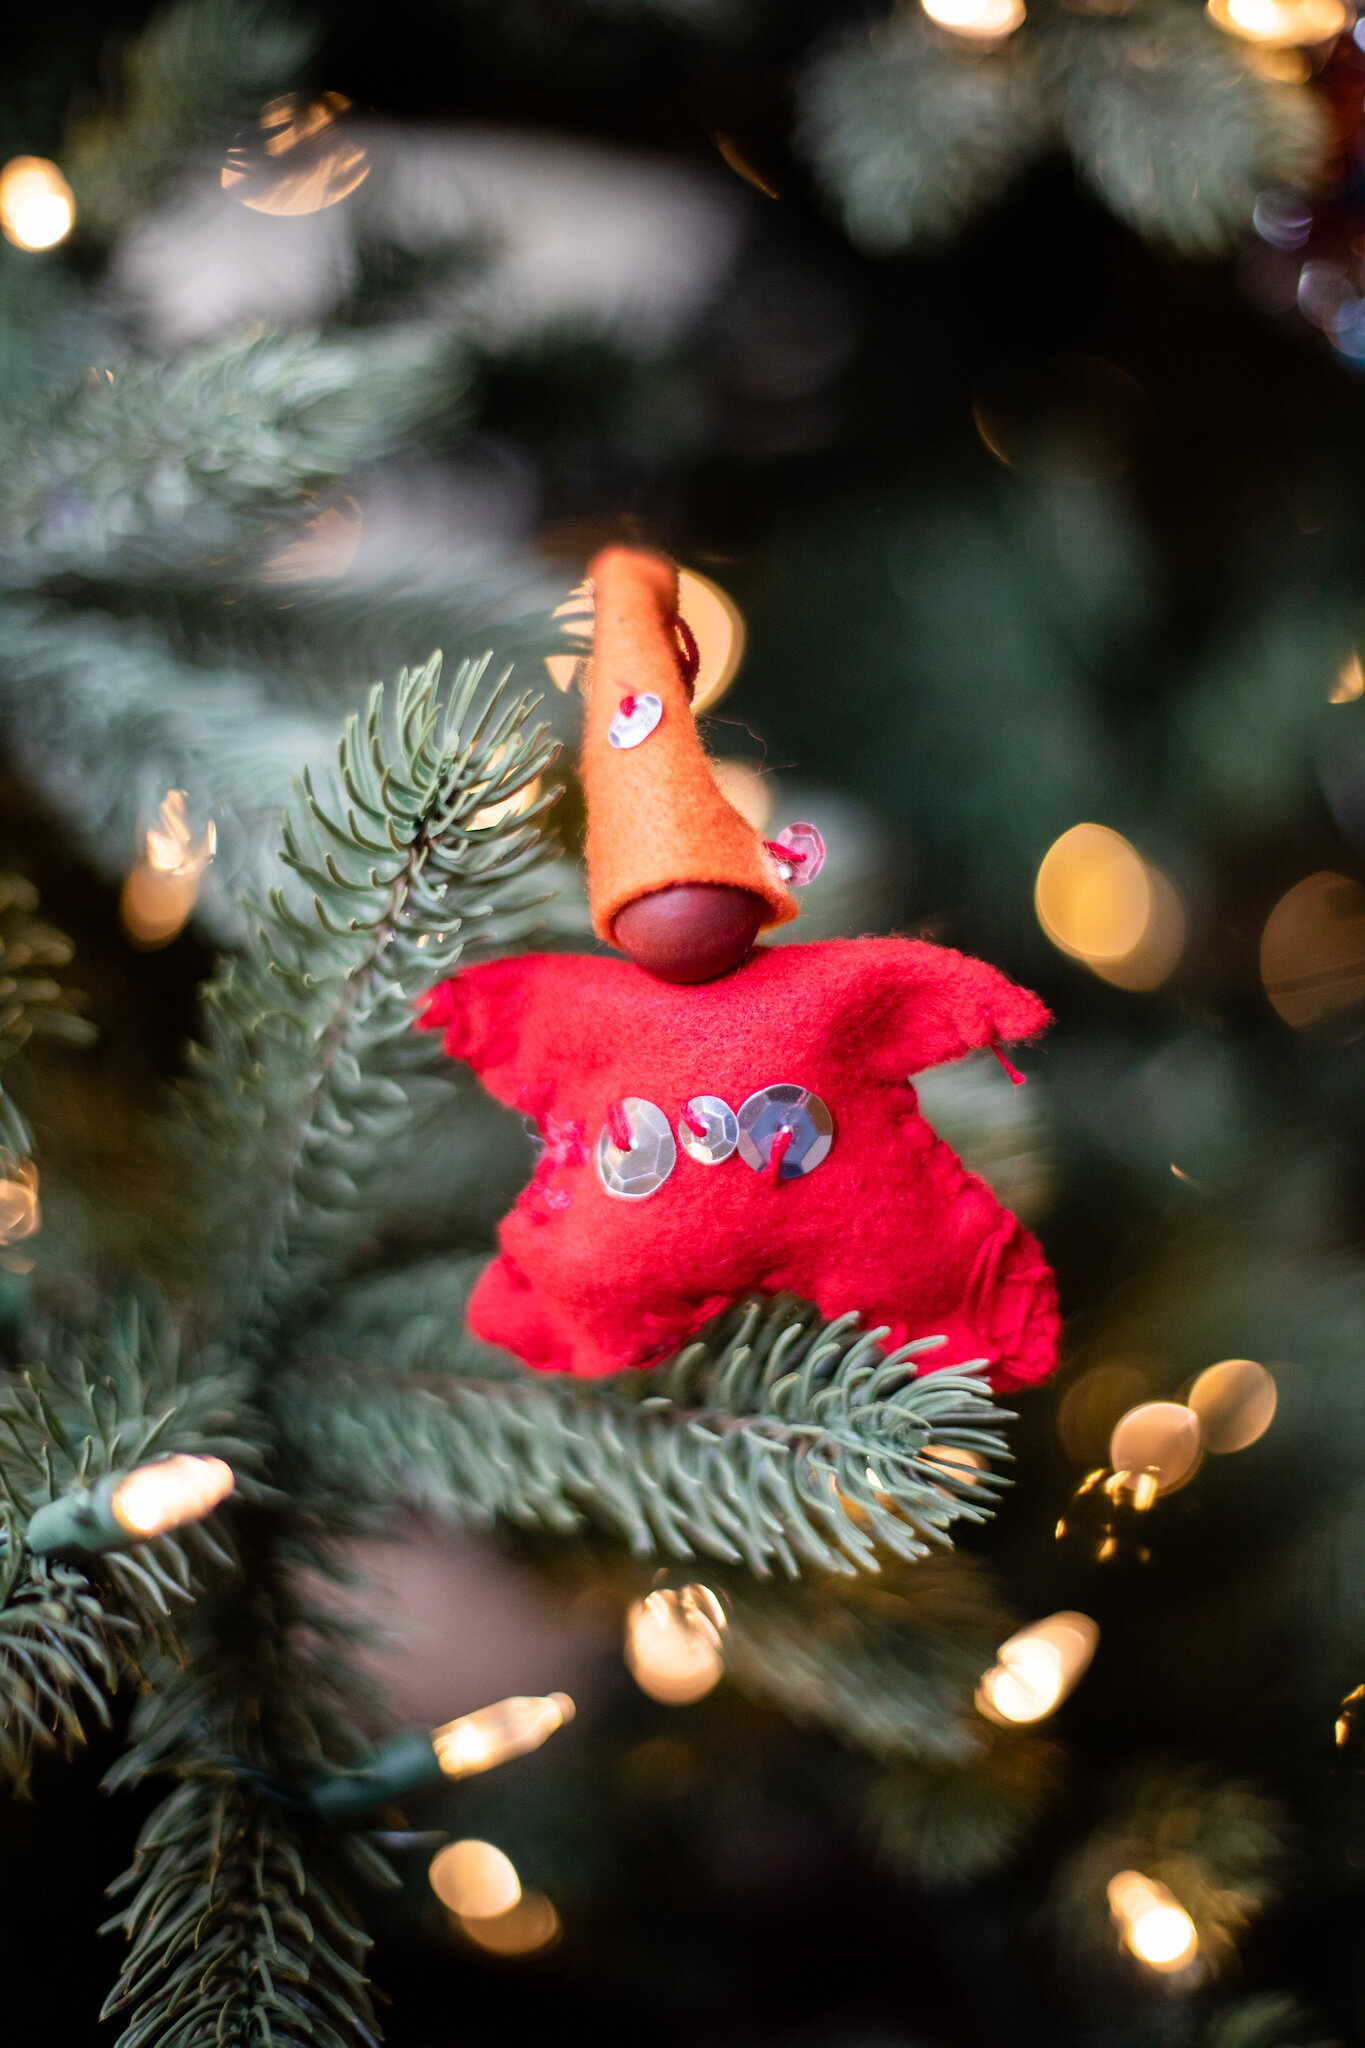
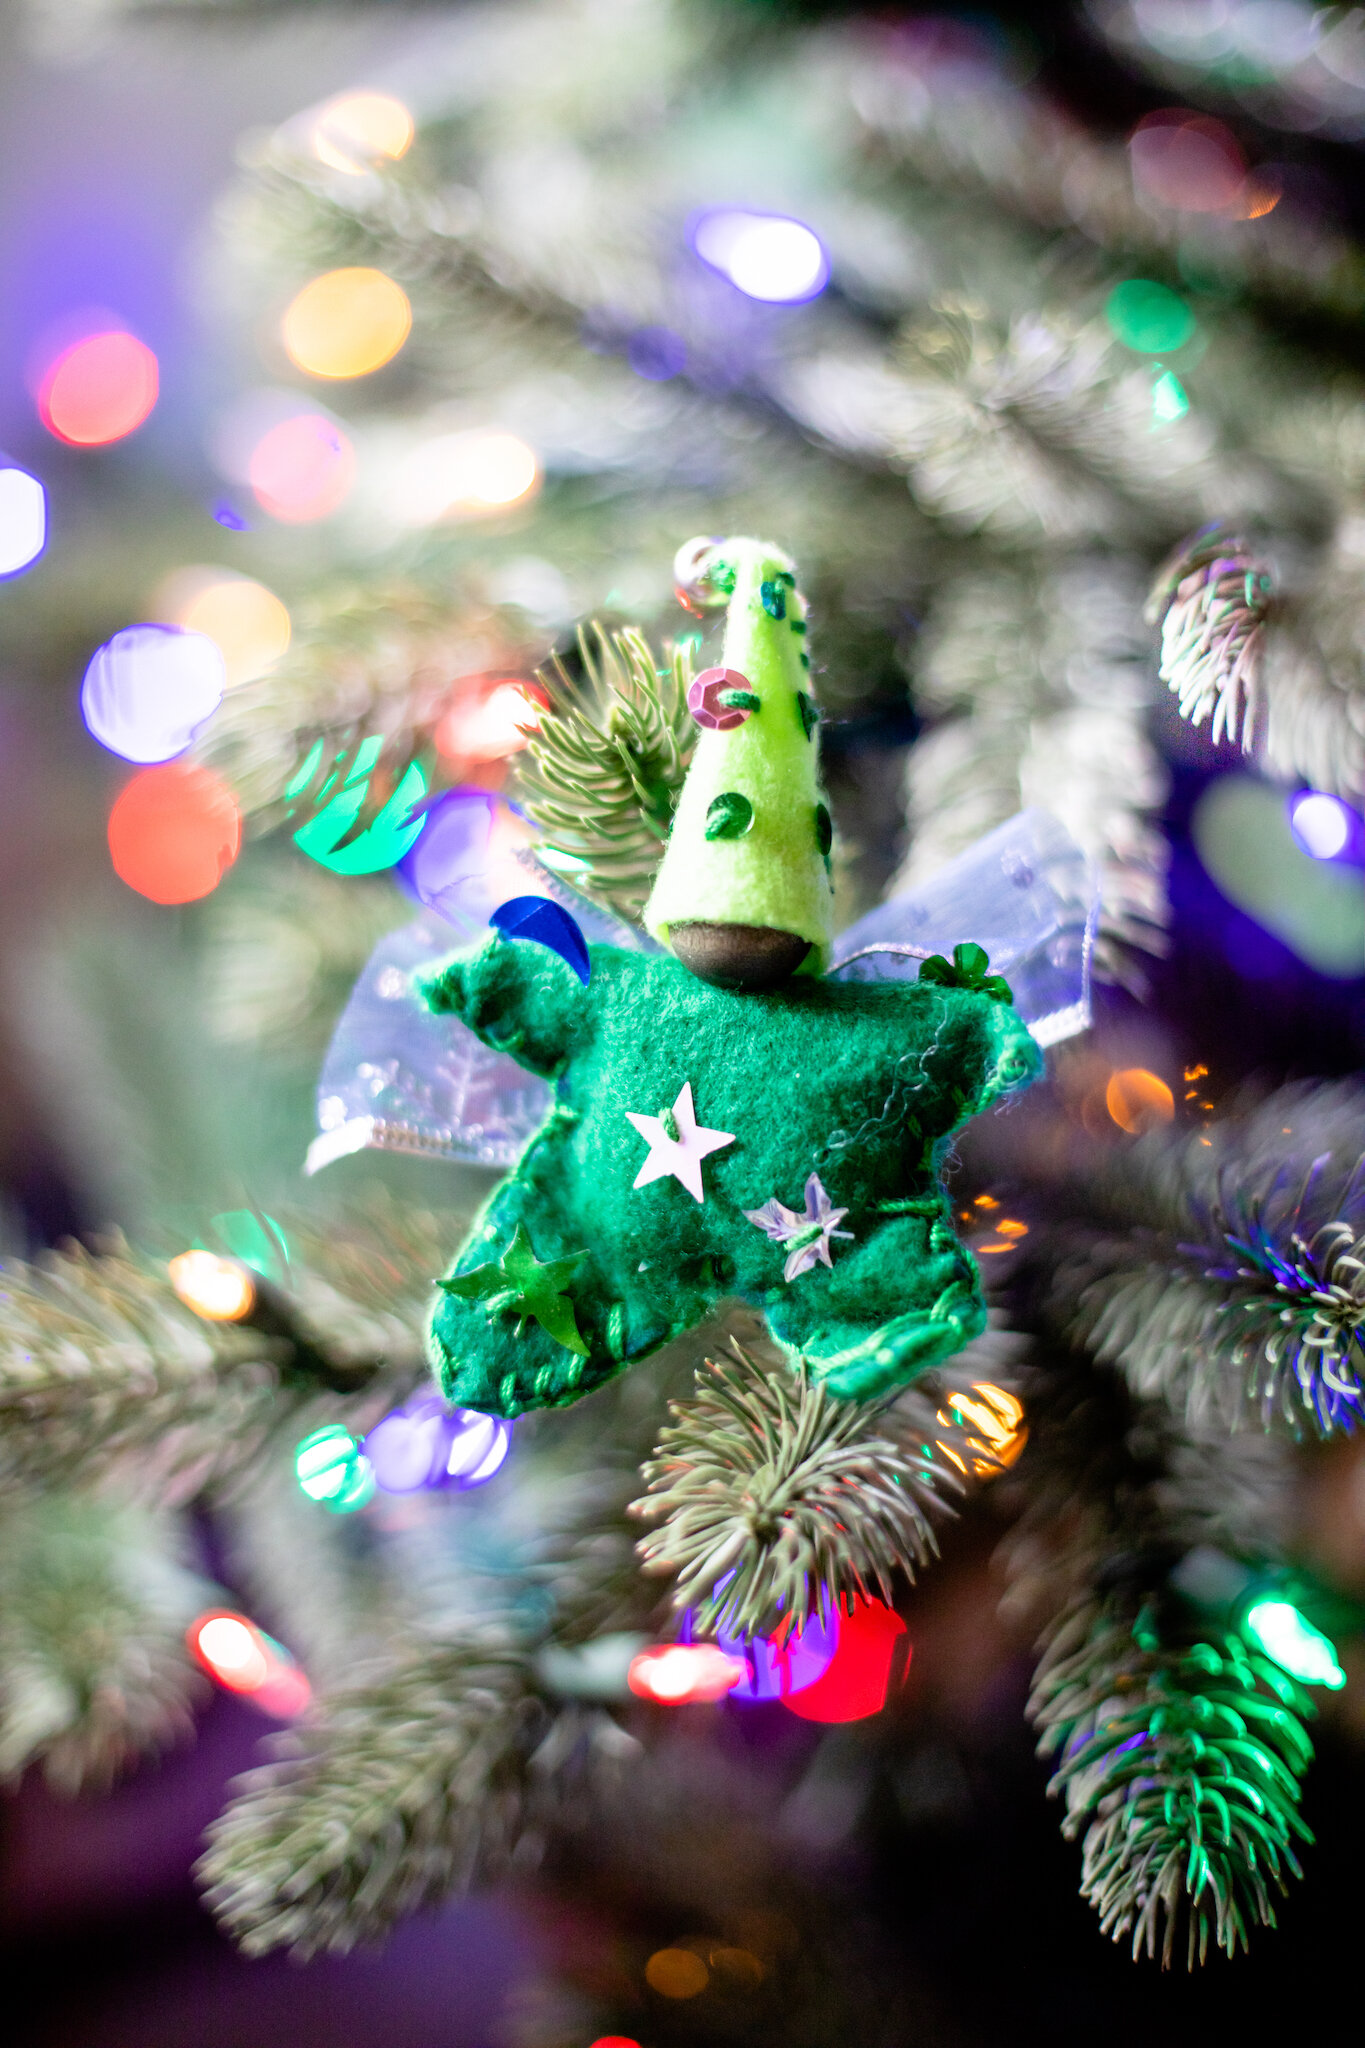
Star Babies
Star babies were a favorite with second-grade students. They were so charming and lent themself to a “wish upon a star” thought to go with the ornament as a gift. With my son, I let him choose a favorite color for his star baby. The star babies that my kids made at school are treasured ornaments (scroll to see a few made by students a couple of years ago). Star babies are in Forest Fairy Crafts.

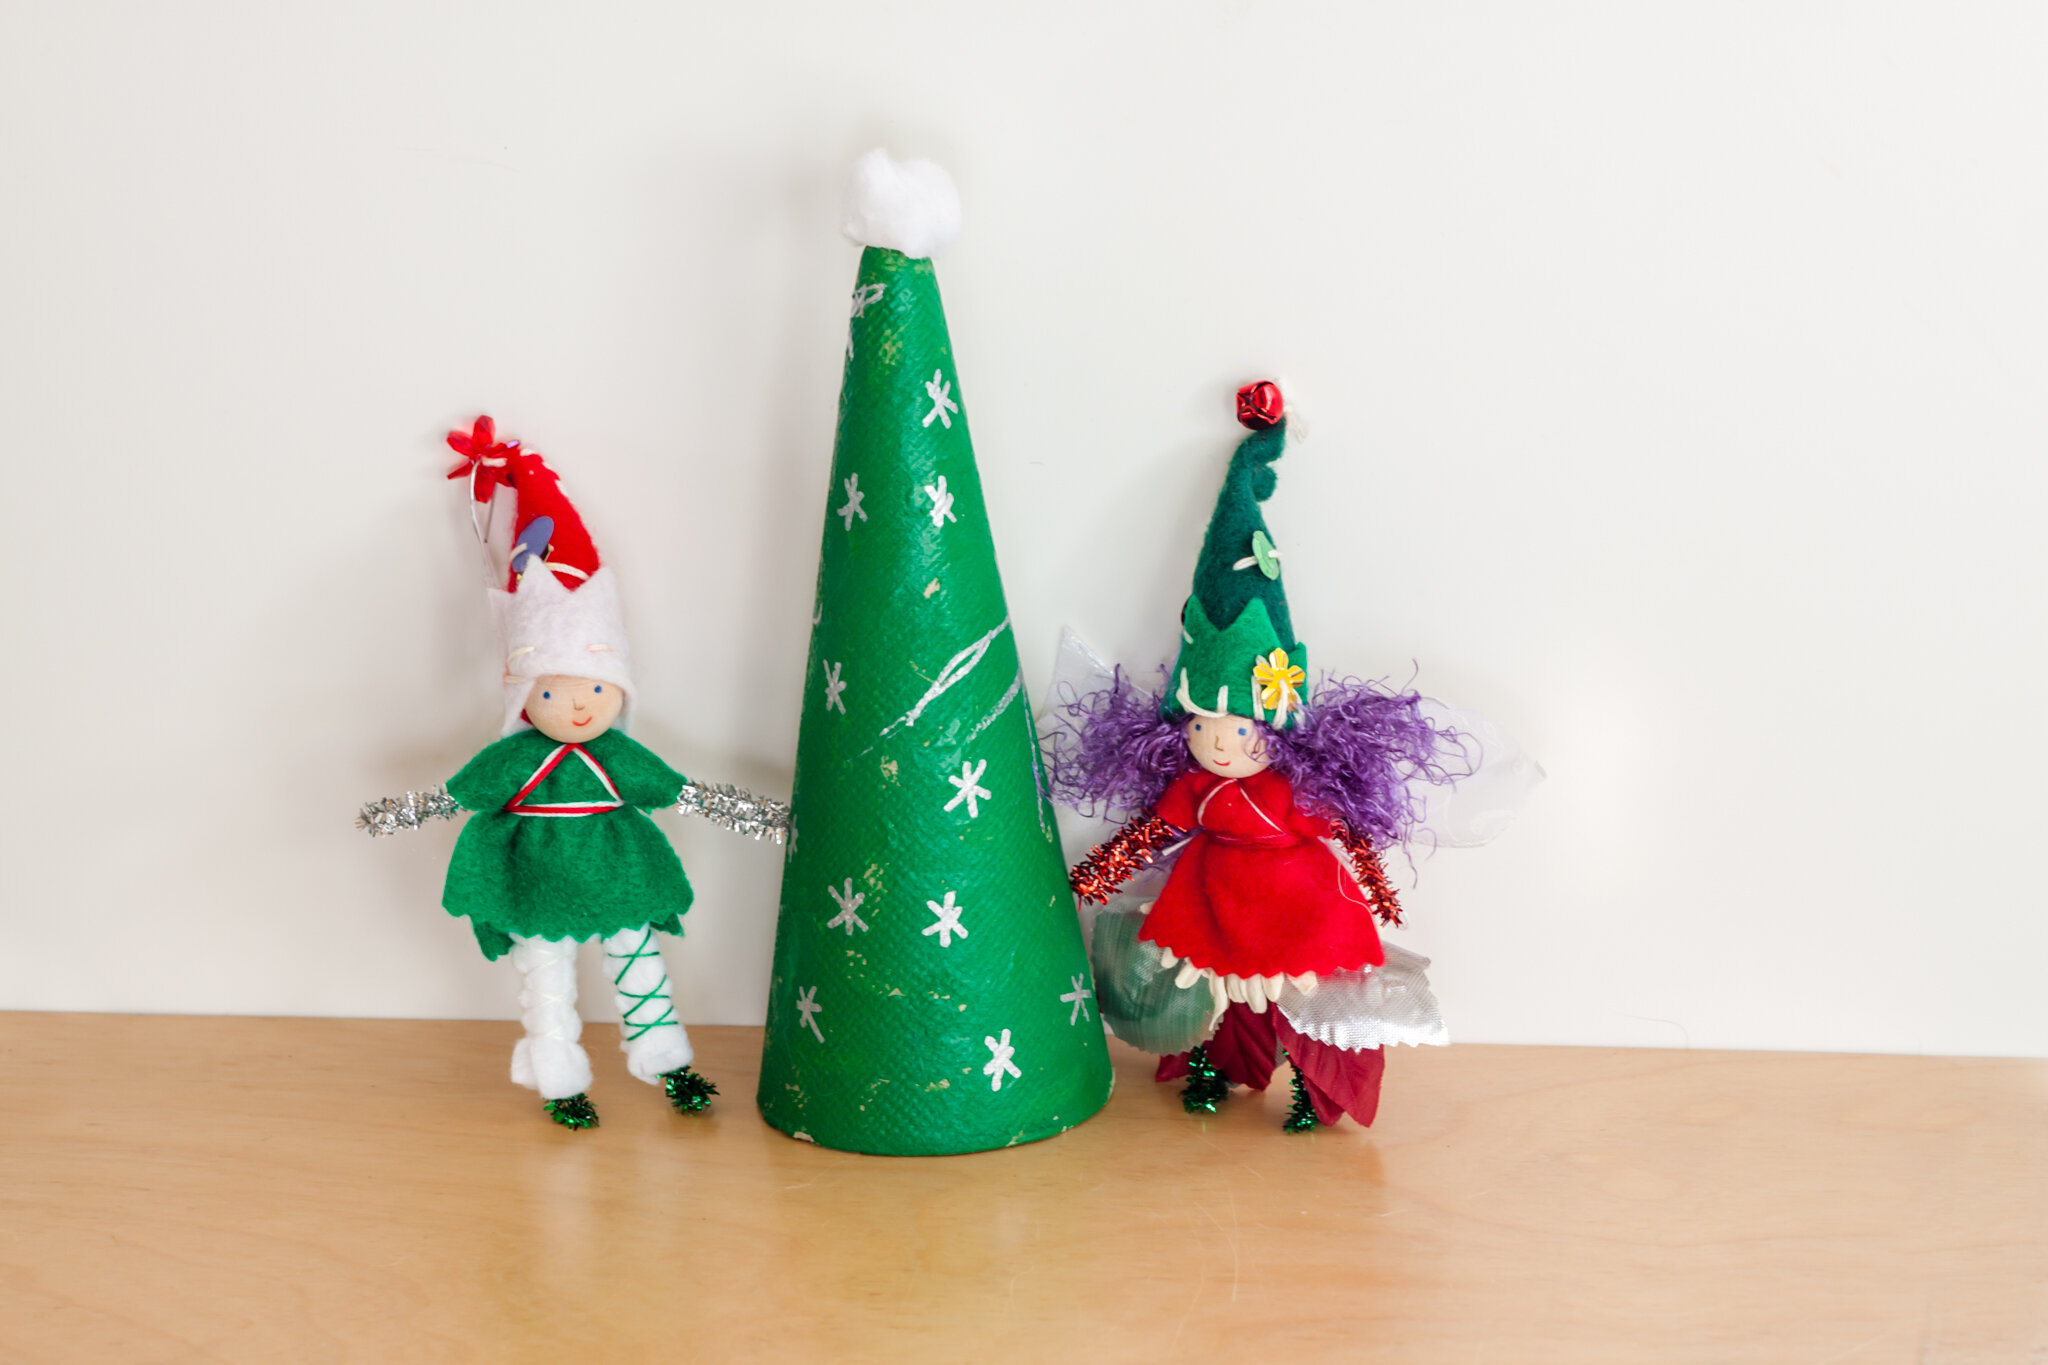
Christmas Fairies
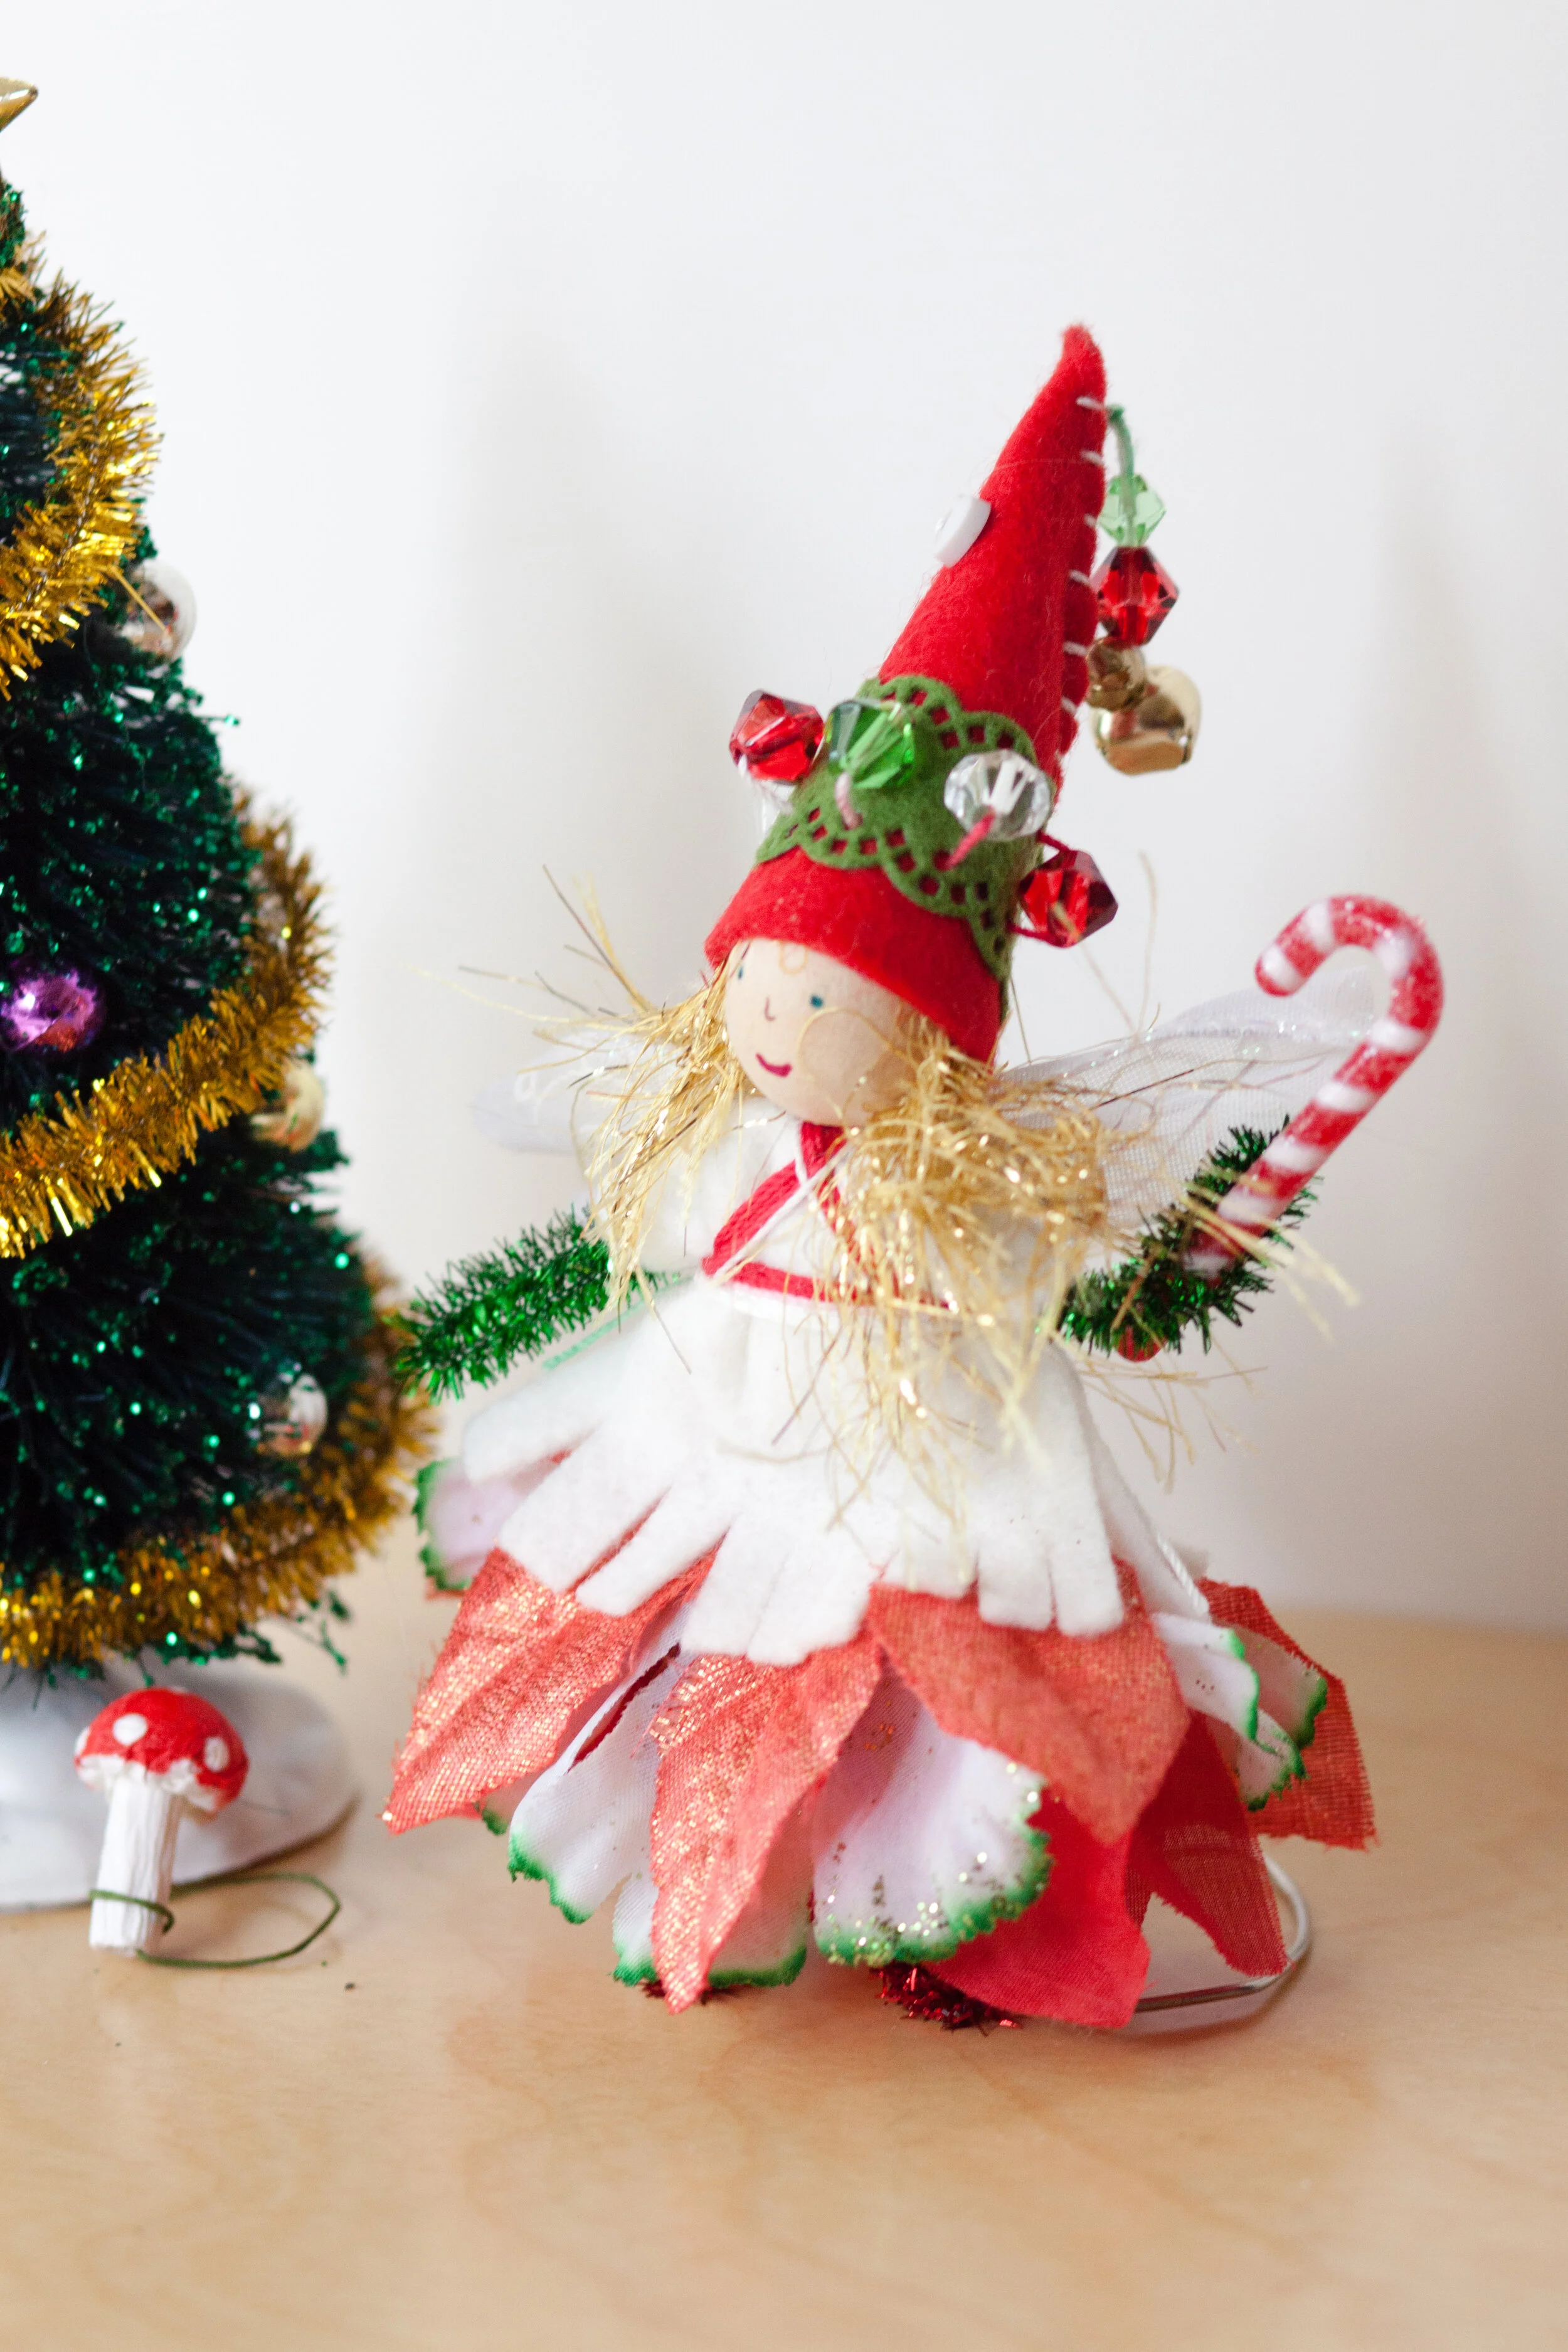
They may be simple, but they’re still magical. The premise for these fairies is seasonal colors. Red, green, and white for Christmas. With gold bells. They’re a celebration of nostalgic Christmas celebrations. I found the little candy cane in the miniatures section of the craft store. And the fancy ribbon with edging was also in the craft store. The nice thing with fairies is a little of a supply goes a long way. I like the beads because they look like ornaments themselves. The sparkly pipe cleaners are also fun when Christmas lights shine on them. You can find many seasonal petals at places like the Dollar Store. The pattern for Christmas fairies is the basic fairy pattern in both books. The Christmas fairies in the left image are in Forest Fairy Crafts.

Modern or Mod Christmas Fairies
While I love classic Christmas colors as much as anyone, playing with modern colors delights me (or are they retro colors, or mod colors?). Regardless, they’re so fun to play with pink, turquoise, and lime green. The scalloped ribbon was a perfect decorative accent (you can see another shade on the Christmas fairy, above). And you may recognize the star sequin from the ice queen fairy with Santa. You’ll start seeing elements appearing on very different fairies. After all, a little decoration goes a long way :). You can use the flower from Forest Fairy Crafts or spring fairy from Magical Forest Fairy Crafts Through the Seasons with whatever colors inspire your holiday vibe.
Phew, if you made it this far, congratulations! I created galleries below that may inspire you. All of the projects are the same as those mentioned above. I do have more projects that didn’t appear in either book. I’d love to share more for different holidays. And I have more, like the peppermints fairies. More inspirations for other posts. For now, I hope one of these has sparked an idea that could entertain you, and/or your children, in the weeks before the holidays. Once you learn one, it’s easy to make more and more. I’ve heard of people gifting them to local children’s organizations. And one person made quite a few to decorate a tree in the local children’s hospital, that could be gifted to children on Christmas. The holidays are all about sharing magic.
Enjoy!

My favorite holidays are handmade :)

Handmade Holiday Gifts in the Forest Fairy Crafts Books for Decorations and Giving to Family and Friends
Disclaimer: This post contains affiliate links. Should you choose to purchase after clicking through a link, a small commission is paid to us while your pricing remains the same. Thank you for supporting the Forest!

A Gratitude Book
The first day of November starts one of my favorite classroom projects- the gratitude books. The idea is simple enough. Each day, children wrote one page for a book that I put together for them to bring home before Thanksgiving. We created books for a number of years, which gave me additional ideas and perspectives on how to inspire and support students along the way. The good news for all of you this year is that I made printable PDF pages to jumpstart your child’s creativity.
You can start the book anytime (and any time of year). You can complete one page a day or a page a week or multiple pages a day. Whatever works best for your children or students.
All of our projects are invitations. Take the idea and make it your own. The templates are set up to be half pages that you can print, cut in half, then staple or punch holes to thread yarn for binding the book. Your book can be 5 pages or 50 pages. I recommend not binding the book until you reach the end of the project. That way you don’t find yourself either with blank unfinished pages or running out of pages. I kept them in a folder. This way, too, I could shuffle pages that a child had already completed, and they could read the pages to me before adding a new page (massive reading practice reinforcement). And students could plan the order of pages before we assembled the final book.
Creating pages itself is fun. The real magic, however, is what happens as children plan pages.
The idea is simple. Make a stack of pages- blank or use our template or make your own. Each day, the child adds another page. They write the sentence (or more if they want) and illustrate it. The only guidance is that each page needs to be different- choosing dogs, dogs, dogs, every day becomes repetitive. However, if they want to vary the dogs- thankful for black dogs and spotty dogs, that’s fine. Here’s why-
They start noticing things throughout the day.
In the beginning, I say that it’s fine to use obvious/easy answers. Some children go right to “air” and “food”. They eventually run out of easy answers. And that’s when they start paying attention to plan the next day’s page. If they get stuck, I’ll ask for details. What’s your favorite food? Or your favorite place to go? But mostly I try to stay quiet and let them simmer ideas and choose on their own time. They know that they need an idea for the next day, and eventually, they realize that paying attention can give them an idea before they sit at the table to write.
The original book project was a daily activity during group time. You could easily change the duration of the project for whatever is available for your family, classroom, or group. The pages can be made in an afternoon or over a number of weeks.
One way that I make it easier for younger children is to write the beginning of the sentence because the goal for me is thinking and writing unique ideas. The templates use a gray font because I would encourage children to trace the written letters if possible. Tracing takes less brain-power and reinforces the spelling for later. If students are tired or overwhelmed by that quest, skip tracing the letters.
A supportive idea for their own words is that they could tell you the end of the sentence and you write the letters lightly for them to trace, or they use a colored pencil over your letters to make it colorful. For very young children, you can write the words and they draw the pictures.

As with all my projects, I ask myself, “What is the goal?” If the book is going to be shared around at Thanksgiving, you may want to pay closer attention to correct spelling and neatness. If the goal is an immersive celebration of all the wonders of a child’s life, then don’t worry too much about neatness and correct spelling.
And I guarantee you, they love reading this book. By having the first words exactly the same on every page, it builds confidence for early readers.
With older children, I encouraged looking for details. Why say cats when you mean super fluffy cats? Why say food when you mean garlic mashed potatoes with gravy?
I encourage adults to create their own books as well. Show that appreciation continues through all of our years. This year, in particular, brings massive challenges. Yet the appreciations are so sweet. I appreciate my fluffy black and white dog that cuddles throughout the day.
Further ideas and notes: you can make the book resemble a scrapbook. Collect leaves or look through old magazines for images that inspire. Add them to pages. Use watercolors or paint or stickers. Give students room to imagine how each page can express their ideas. By assembling at the end, you won’t worry about paints smearing onto other pages. Feel free to let children express their creativity. I am so grateful for that!
Our template has a text box and another page with a line. You can add more lines, or a top line and dashed middle line if that matches your child’s learning process. It’s easier to add lines than remove them :)
If a child wants to write more than one page a day, that’s totally fine. Some students wanted to write many, many pages. When you assemble the book on a date instead of binding it in the beginning, making a page a work of art won’t damage other pages.
We hope that you enjoy the project! The Gratitude Book was a delight to create and read with students. And they were so proud of their books (as they should be).
As an added bonus, children went to Thanksgiving celebrations with plenty of answers to “What are you thankful for?”
We’ve included a “print” font version and a “handwriting” font for practicing cursive. Both can be printed on printers. Enjoy!


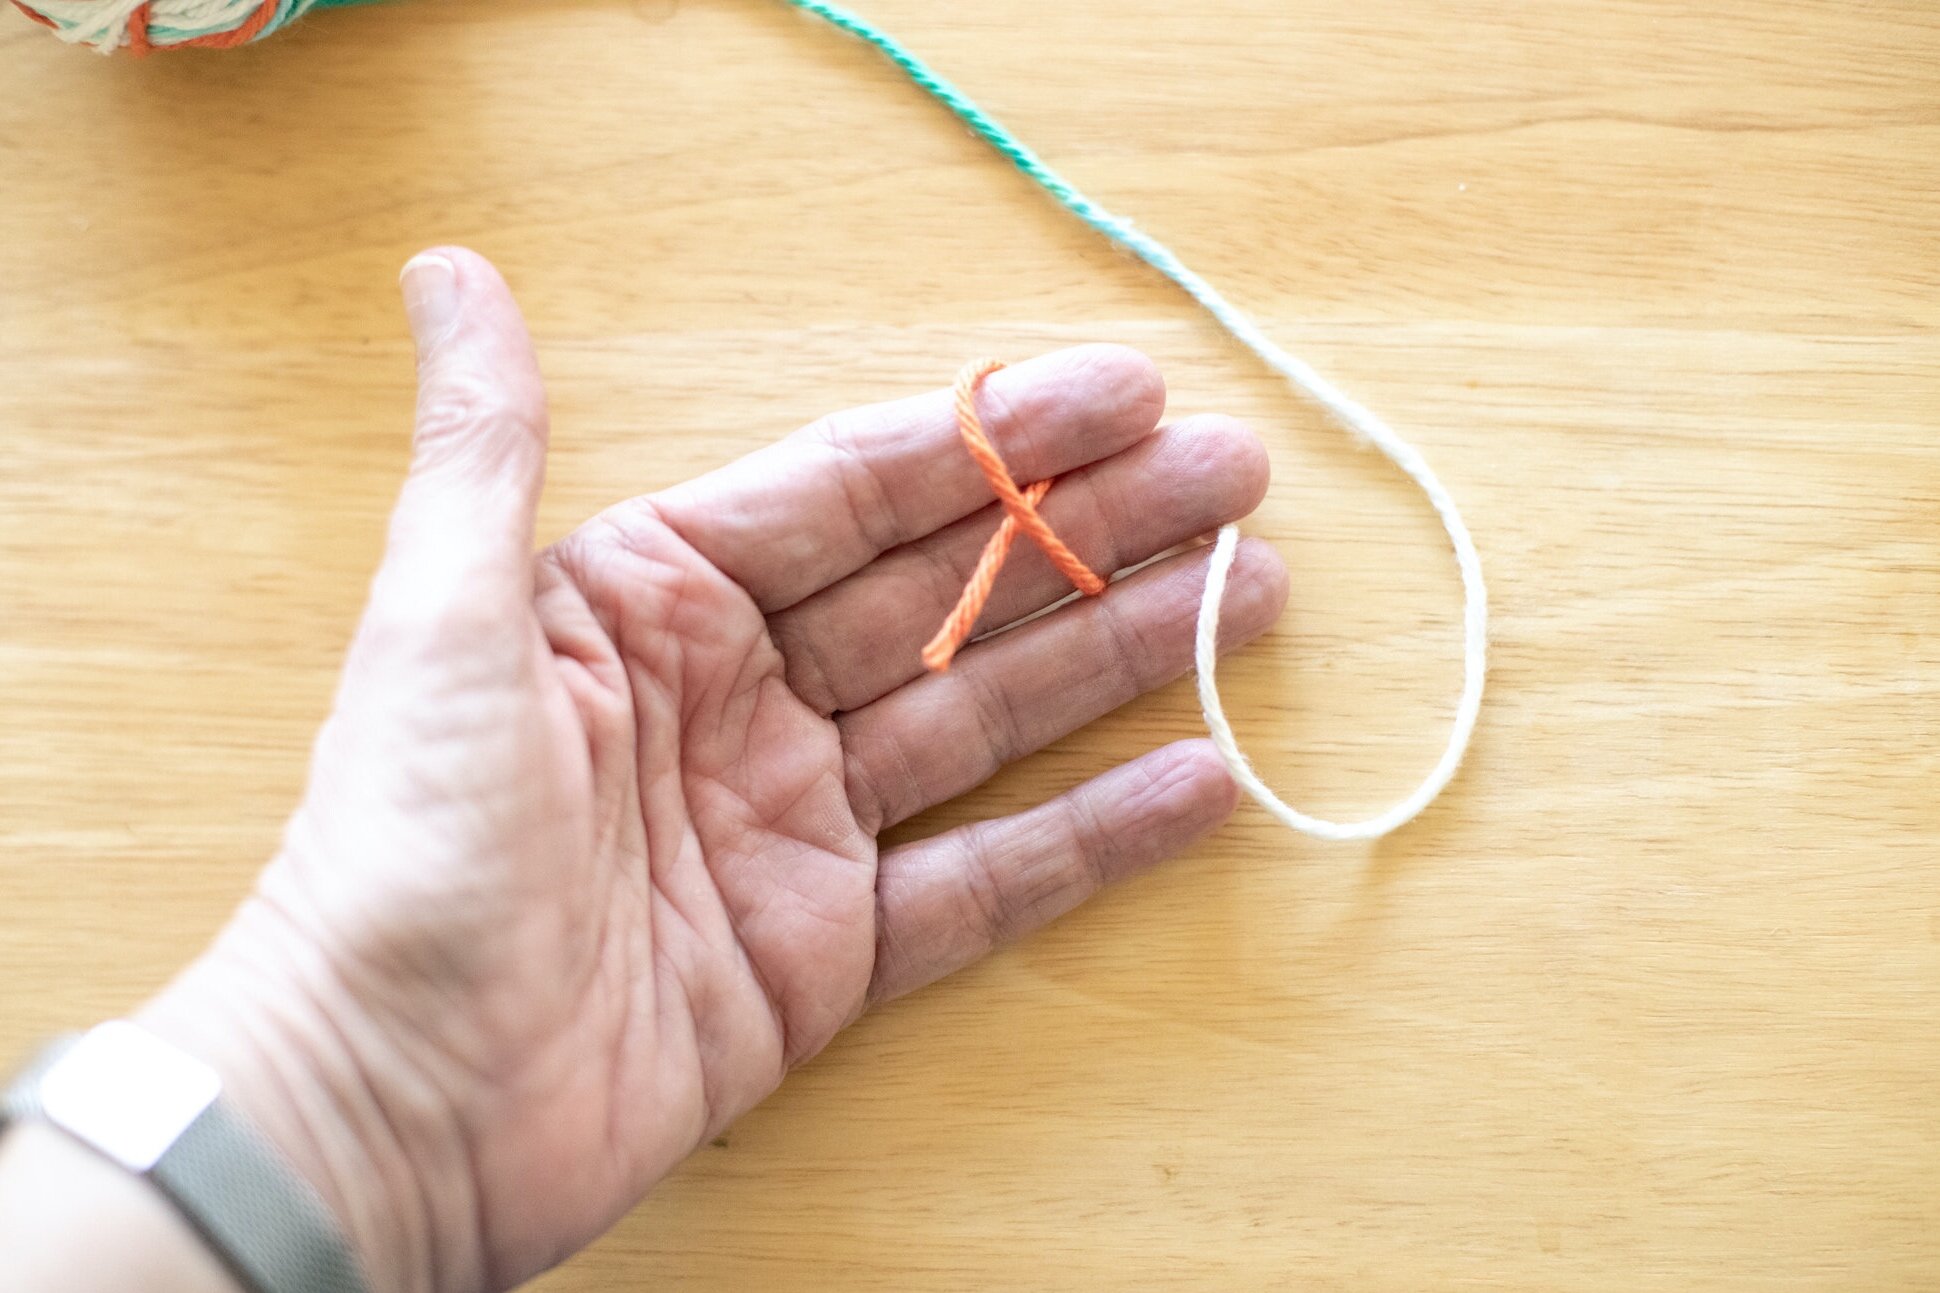
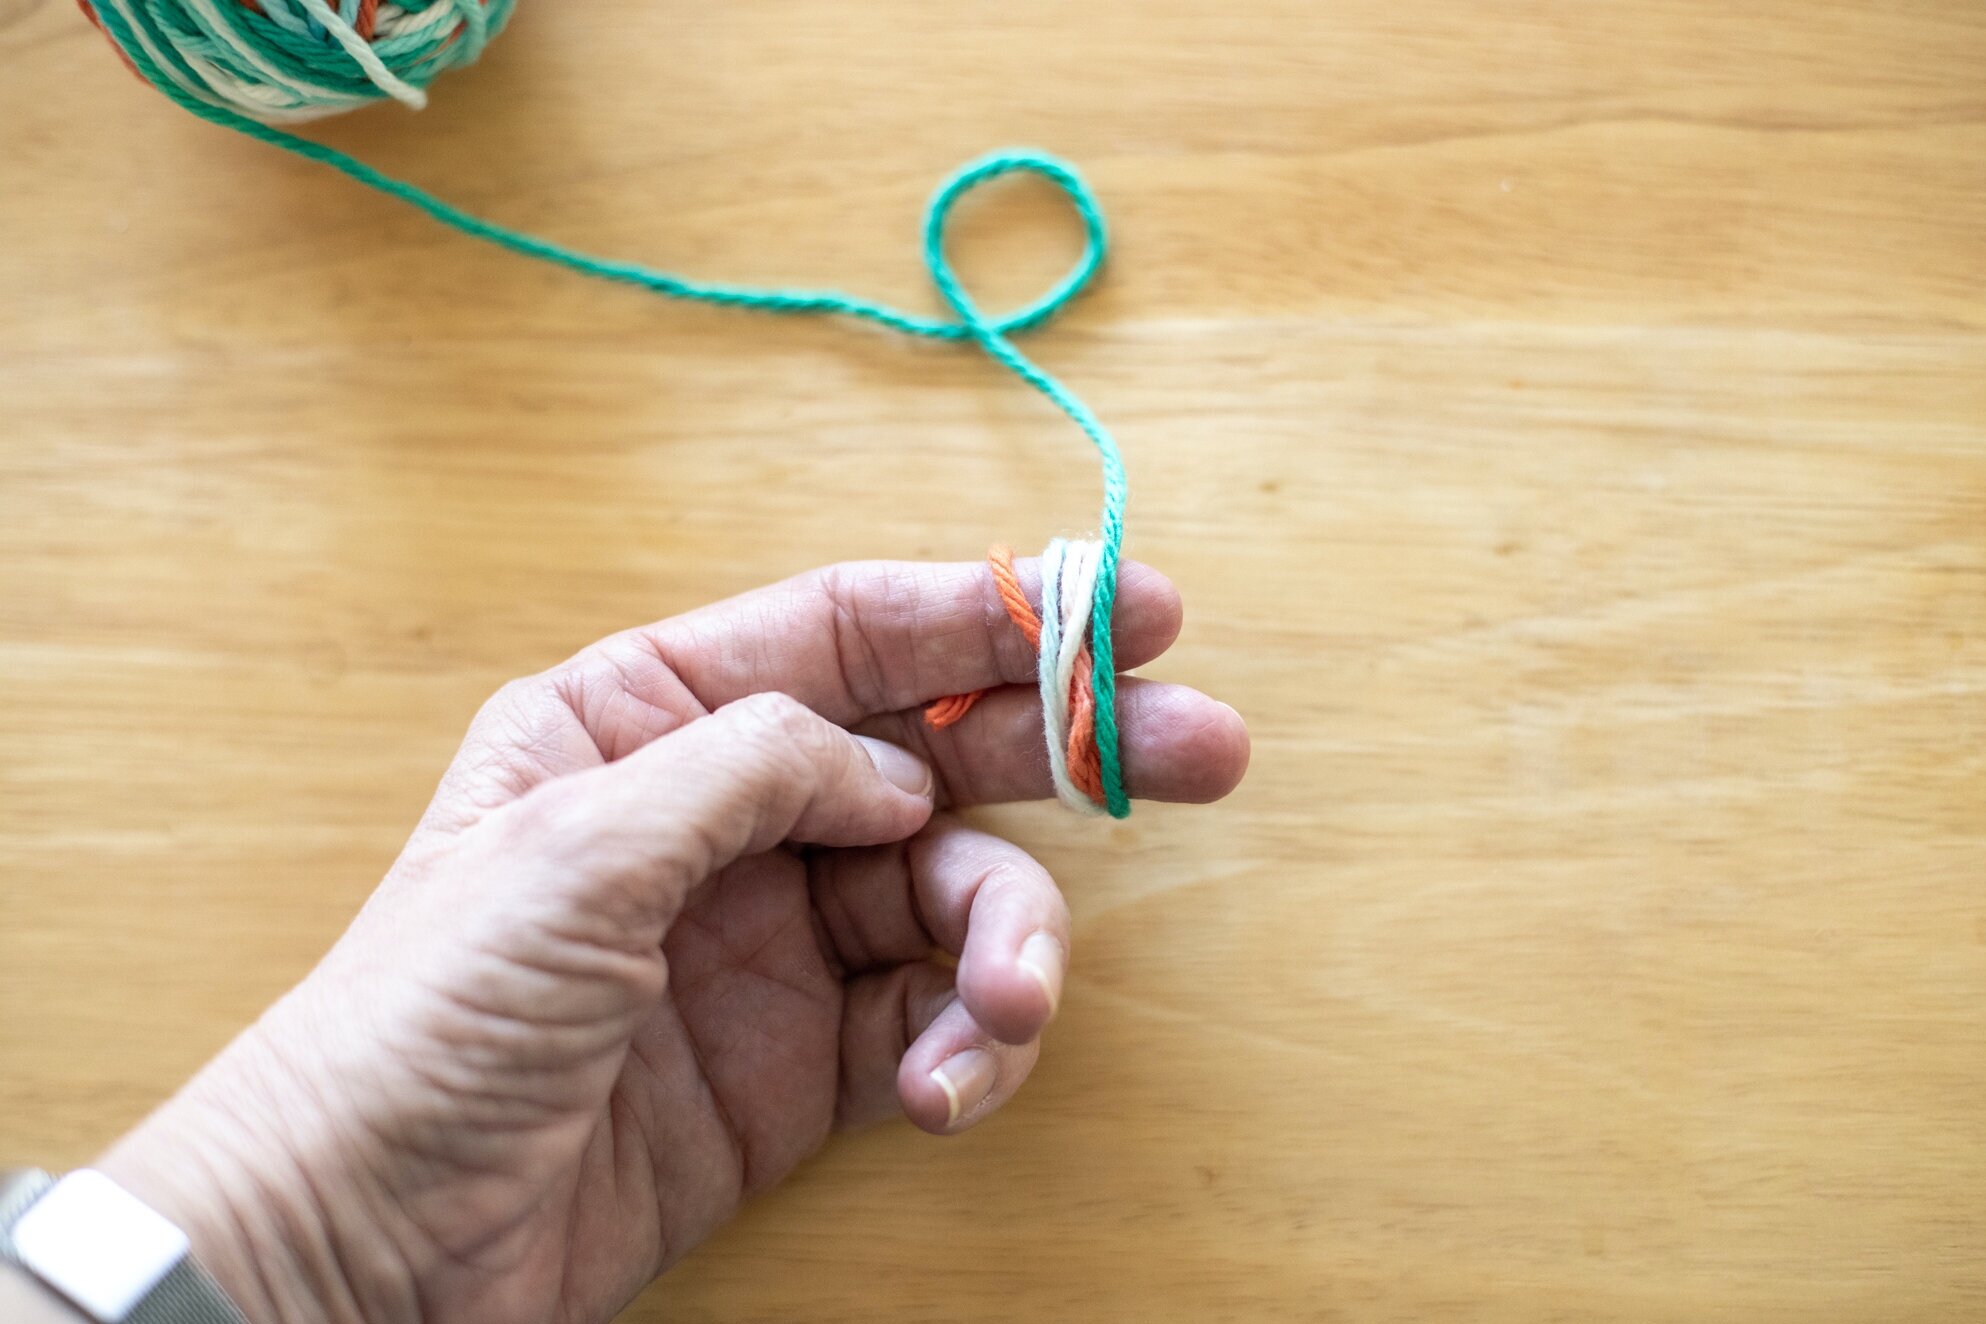
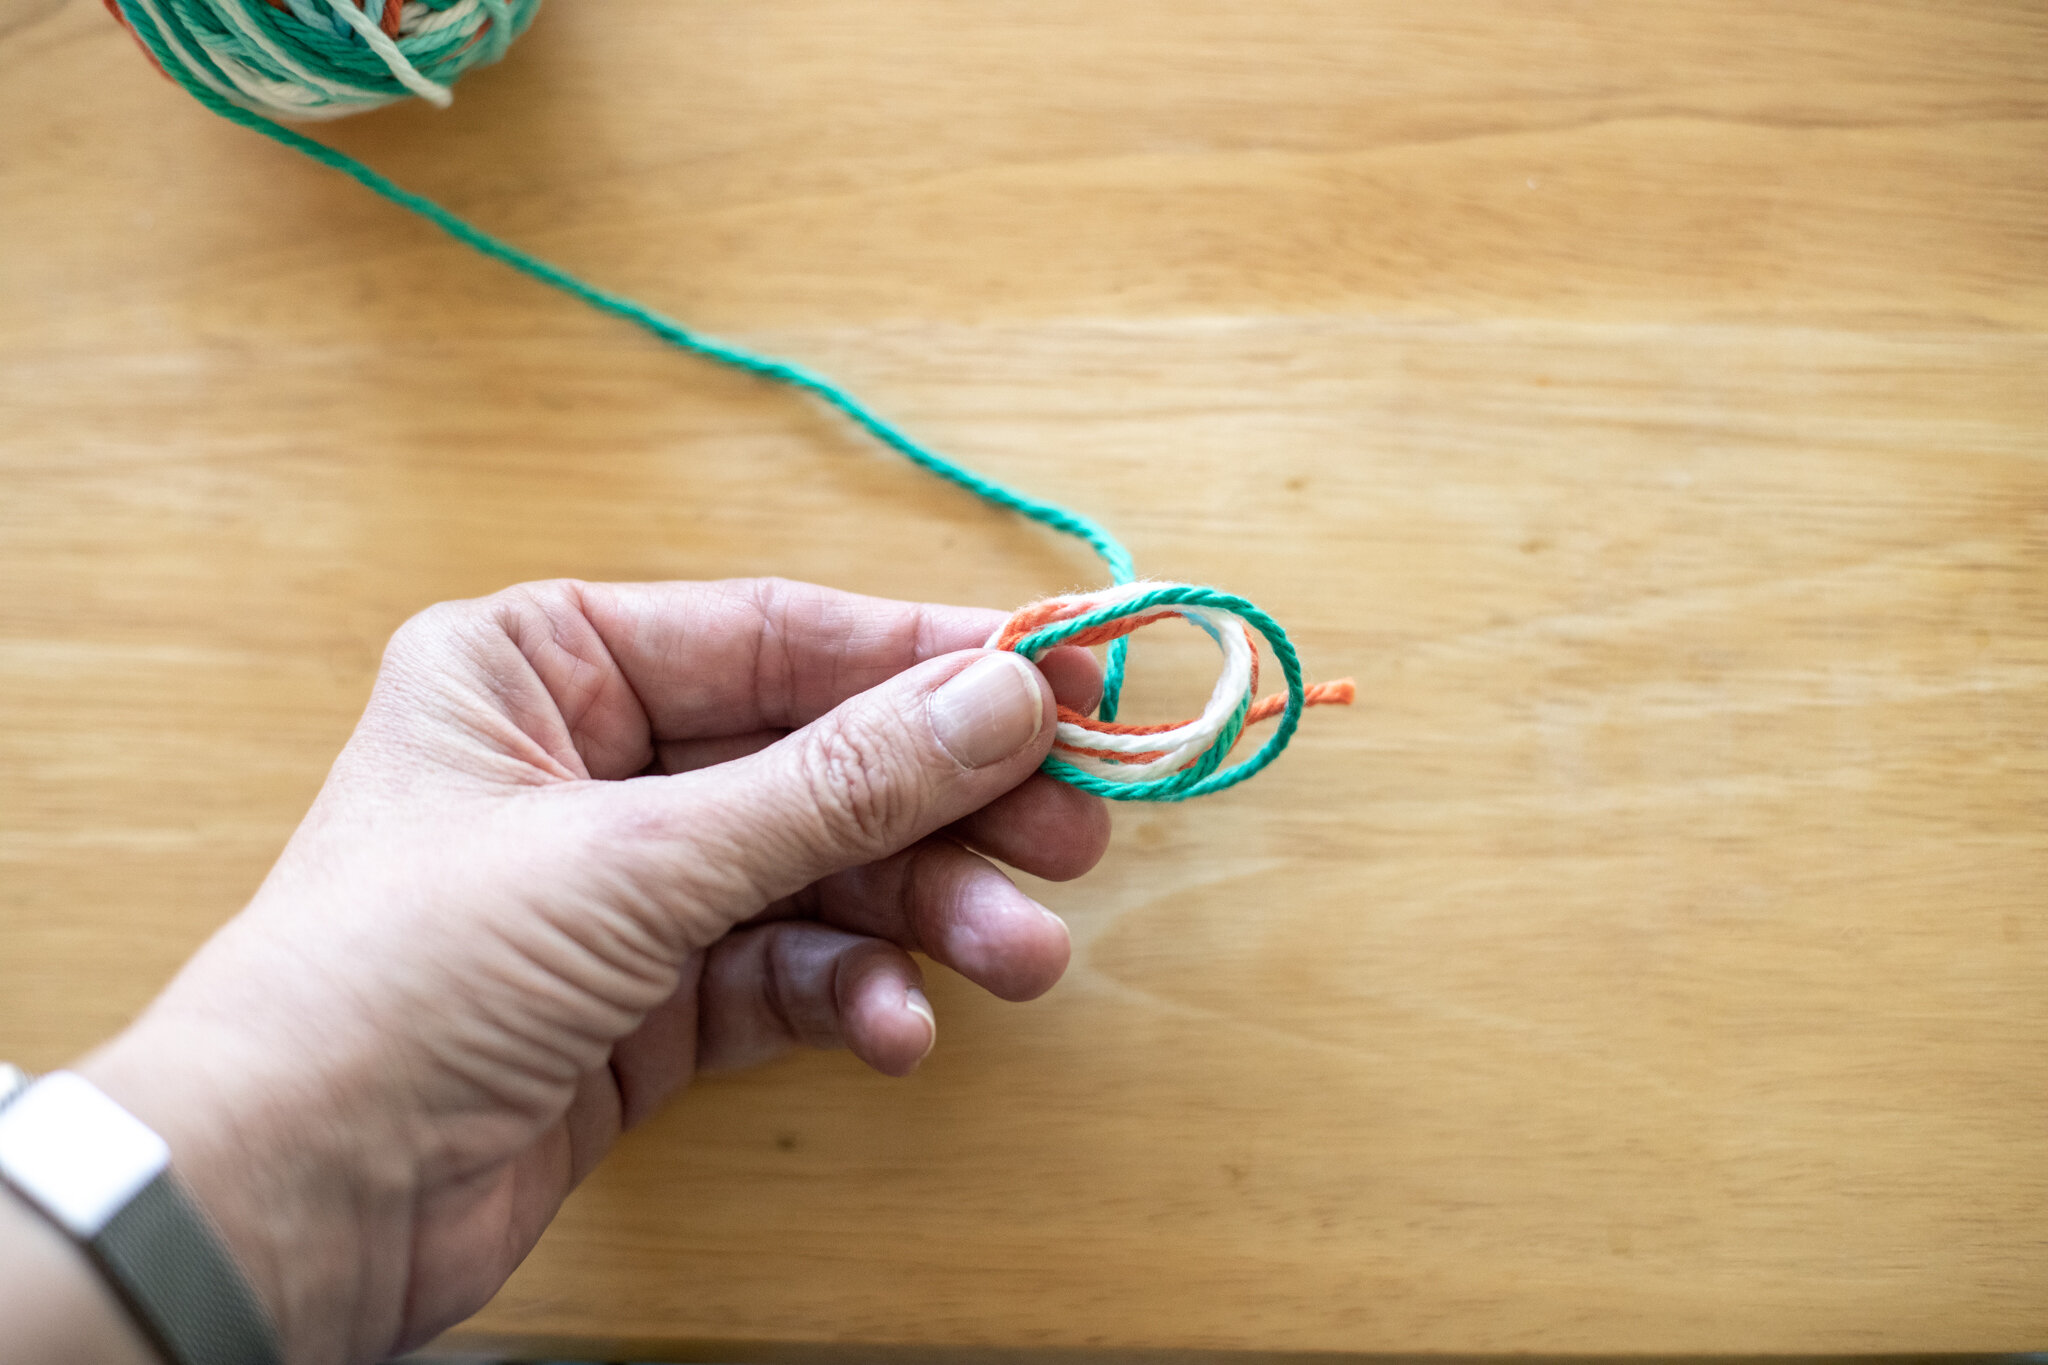
Another Way to Wind Yarn Balls
As promised, here’s another way to wind yarn balls. This way is quicker if you are making a pile of yarn balls, such as for a summer camp or basket of yarn for children to choose from. This technique doesn’t give the same level of fine motor skills, though, and it’s harder for little hands to control the yarn from slipping off of their fingers. So it’s a friendly version for adults or older children. But the other way gives children more winding practice around their fingers. Choose which one feels easier for you.
The beauty of handwork is that we all get to choose what works best for us. And I’m sure there’s even more ways to start winding yarn. It may be a worthy experiment to teach both methods to children and then ask them which way works better for them. The results may surprise you!
Onward to another way to wind yarn balls :)


For young-young children, you can start the ball, then hand it over to them once it’s past the super-fiddly-fall-apart-if-you-let-go phase of creating them. They enjoy winding the yarn around and around. You can work towards a point where they can then use your hand to start the yarn ball. So you would hold the yarn between your fingers and they wrap it around your fingers for the first step. Eventually, they will develop the skills to hold and start the ball all on their own. It’s tricky to do two different activities with different hands.
If you know how to make a slip-knot, that’s another way to start where children' won’t pull the tail loose during the very first step. If you make a slip knot that can fit over a finger, that would hold the yarn on their finger for the first step.
The other trouble-spot that children fall into is winding the yarn way too tight around their fingers, which makes it difficult to pull off for the next step. Learning tension is a big skill. With this mistake, it’s pretty simple to unwind and start over. It’s best to supervise until they have the hang of it on their own.
We hope these techniques help you tame your yarn collection so children can easily select different colors for different projects. The calming winding of yarn is a lovely way to pass the time. You can even wind yarn balls while reading or watching a documentary. Children love to see their yarn in a tidy collection.
We hope this week finds you healthy and inspired. And, if productivity is a struggle, that’s okay too.

Make a Yarn Ball
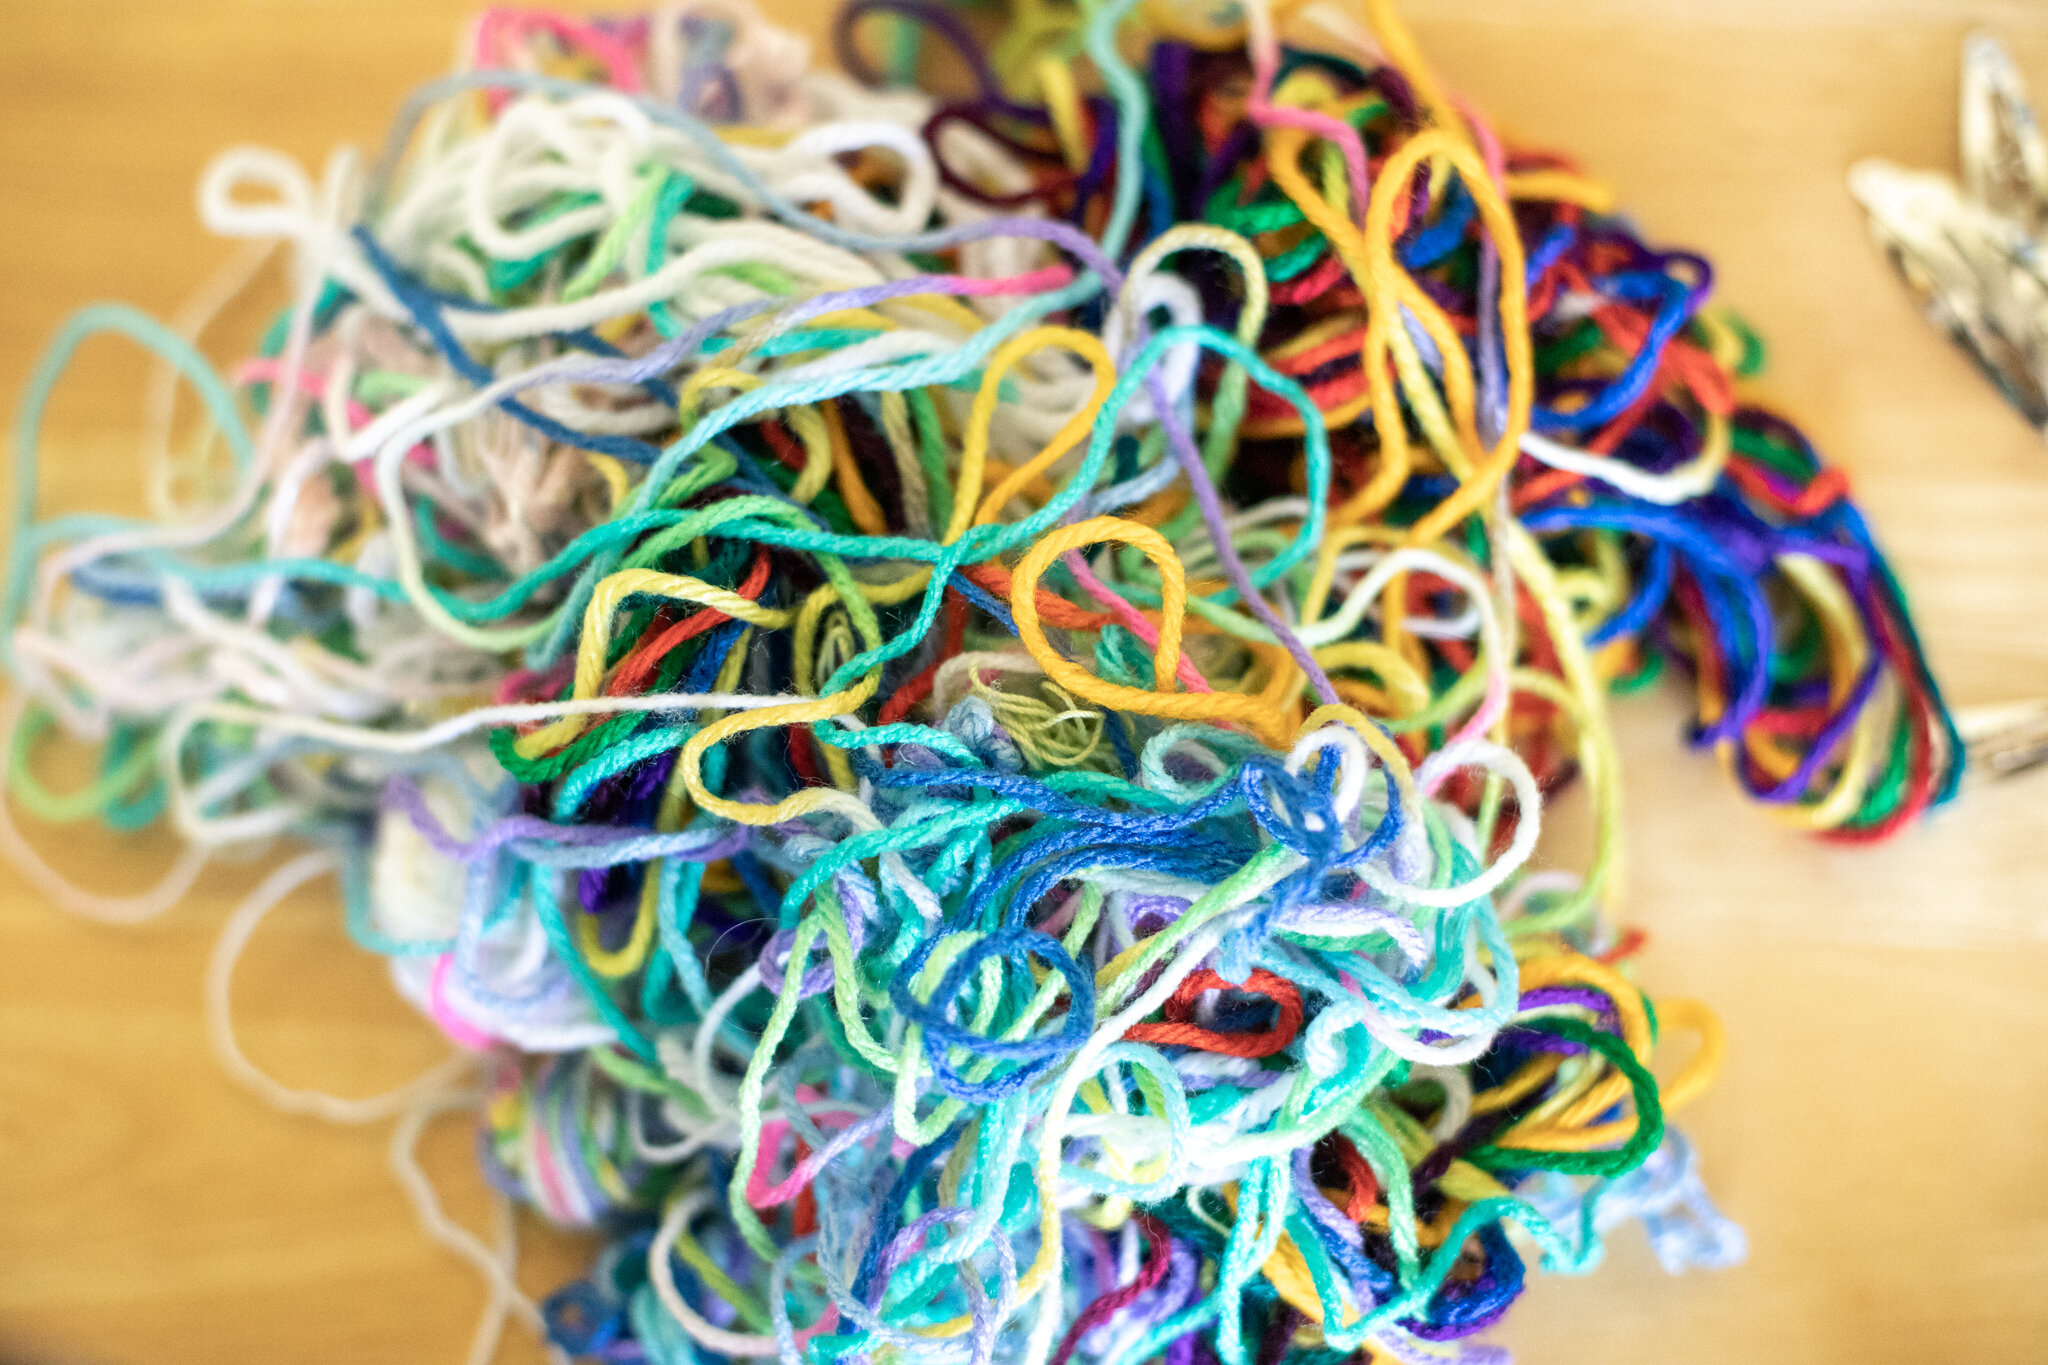
Anyone that has enjoyed yarn projects with children (or as an adult) knows this pile of tangled yarn all too well. An easy way to avoid this headache is to wind the skein of yarn into smaller balls. This can be especially handy if you work with different children, because then one skein of yarn can easily be made into many balls of yarn.
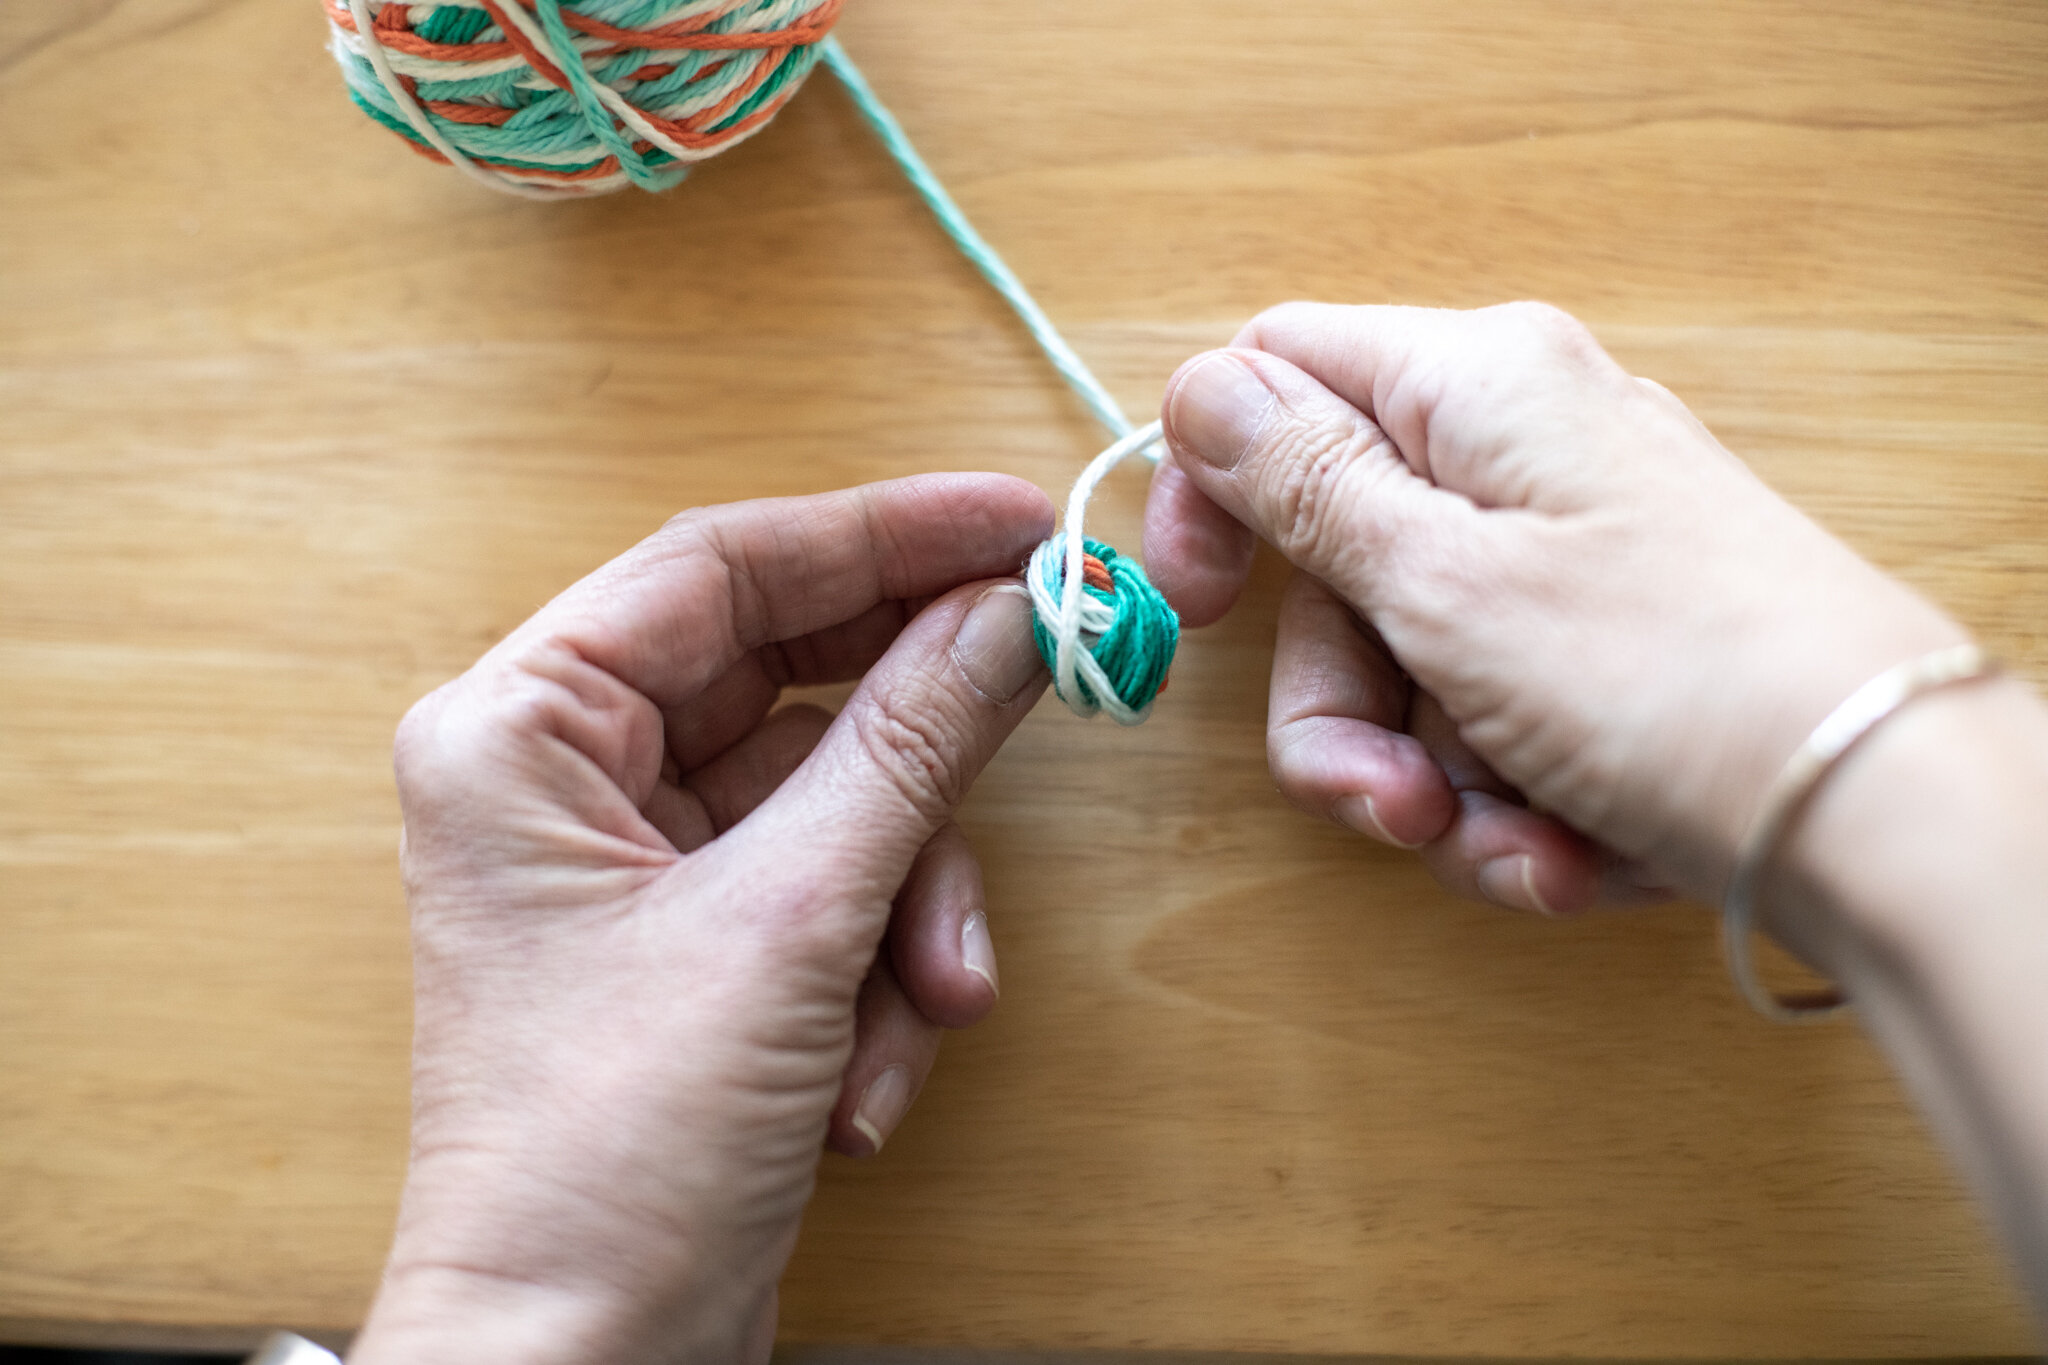
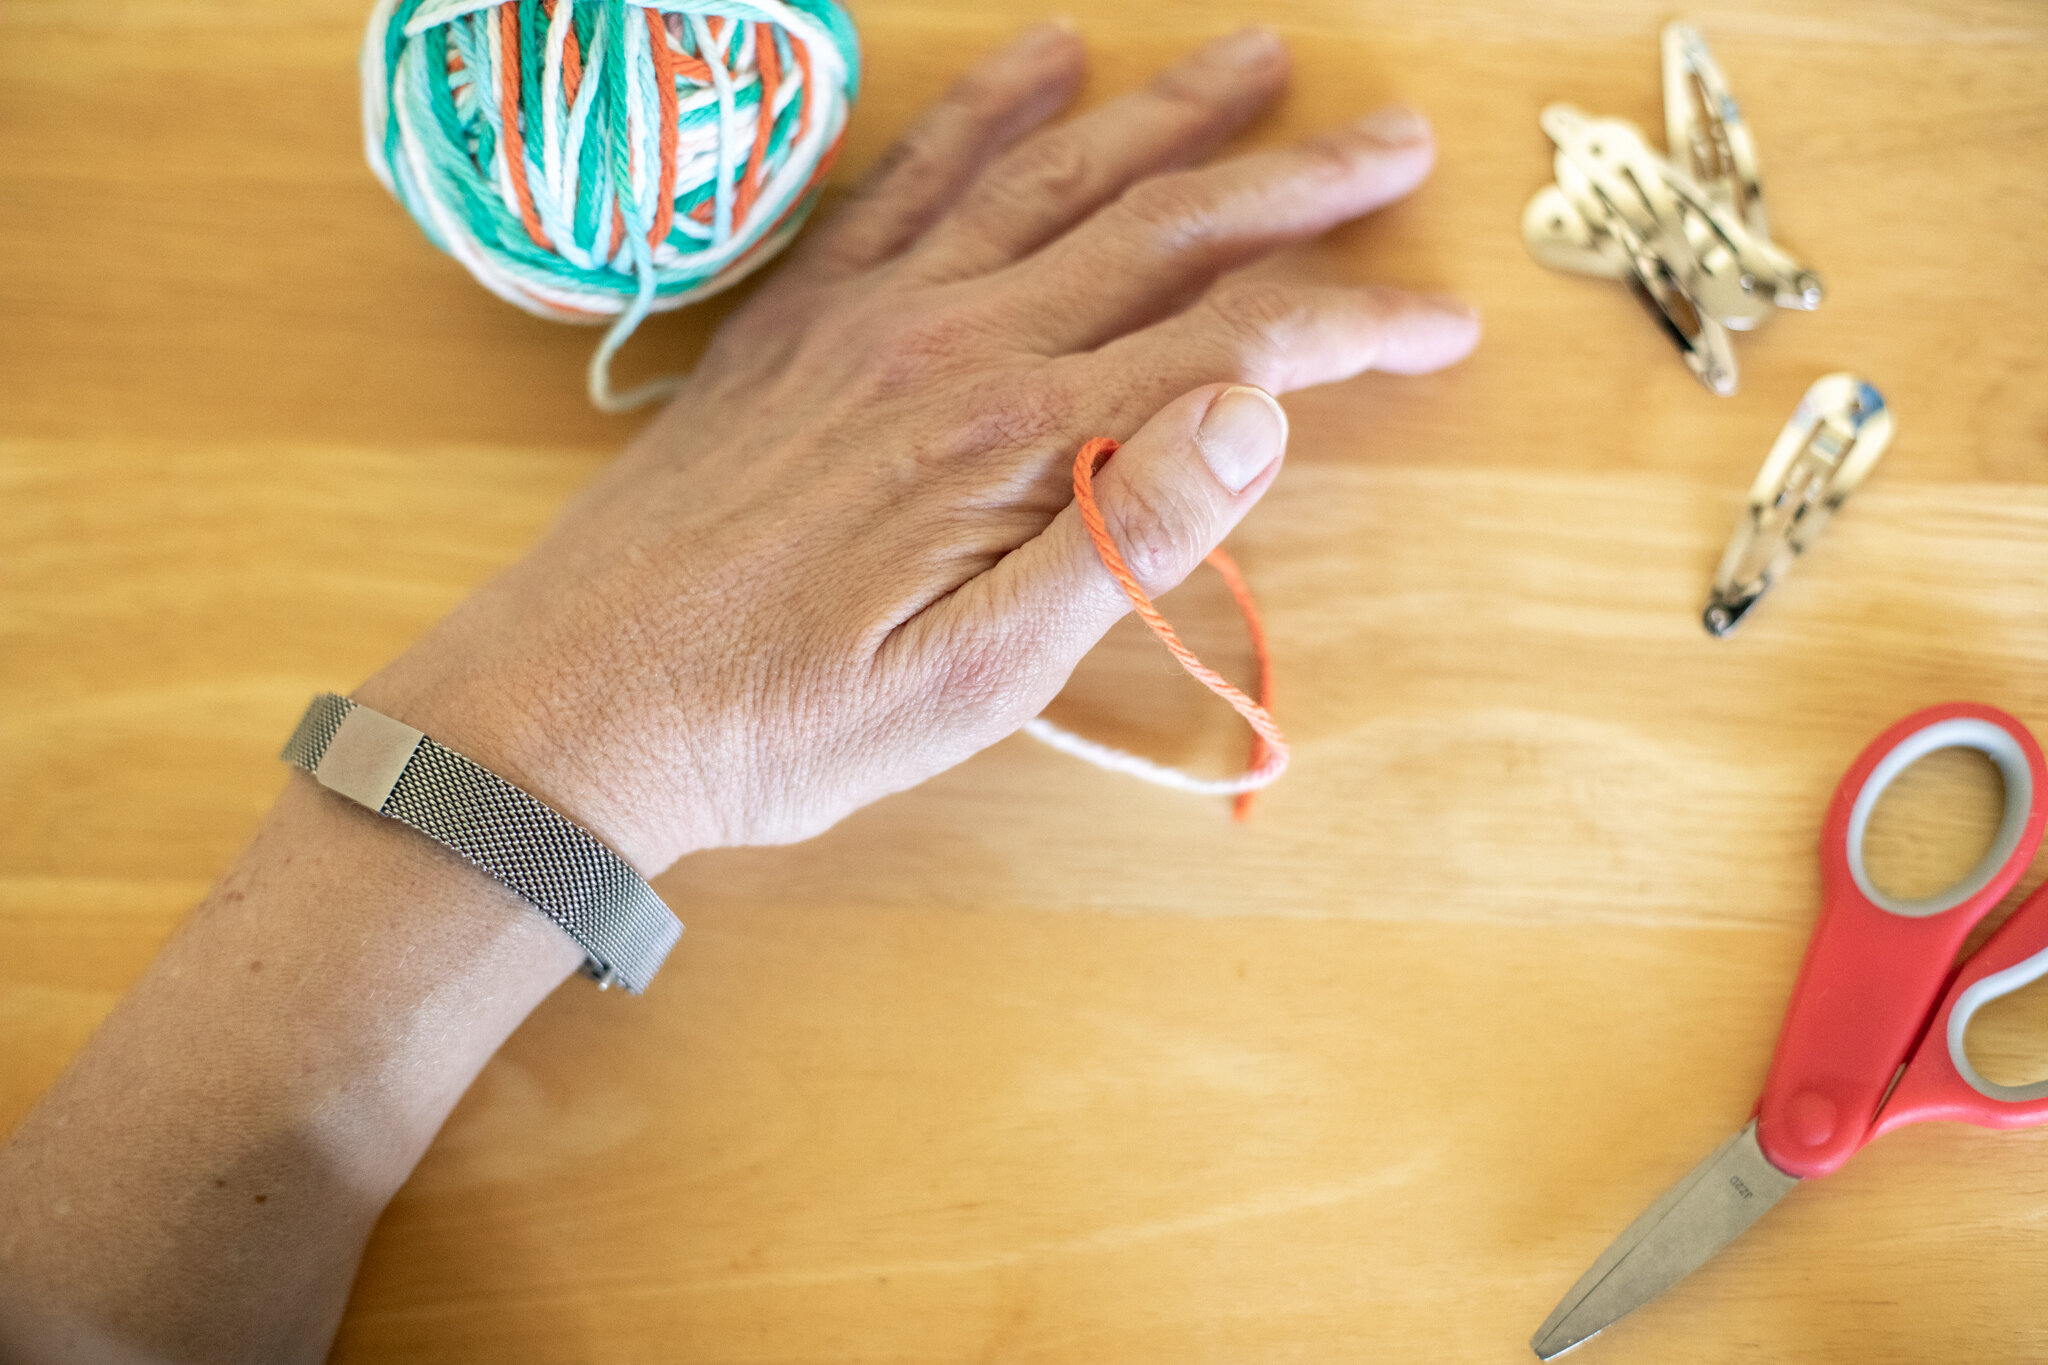
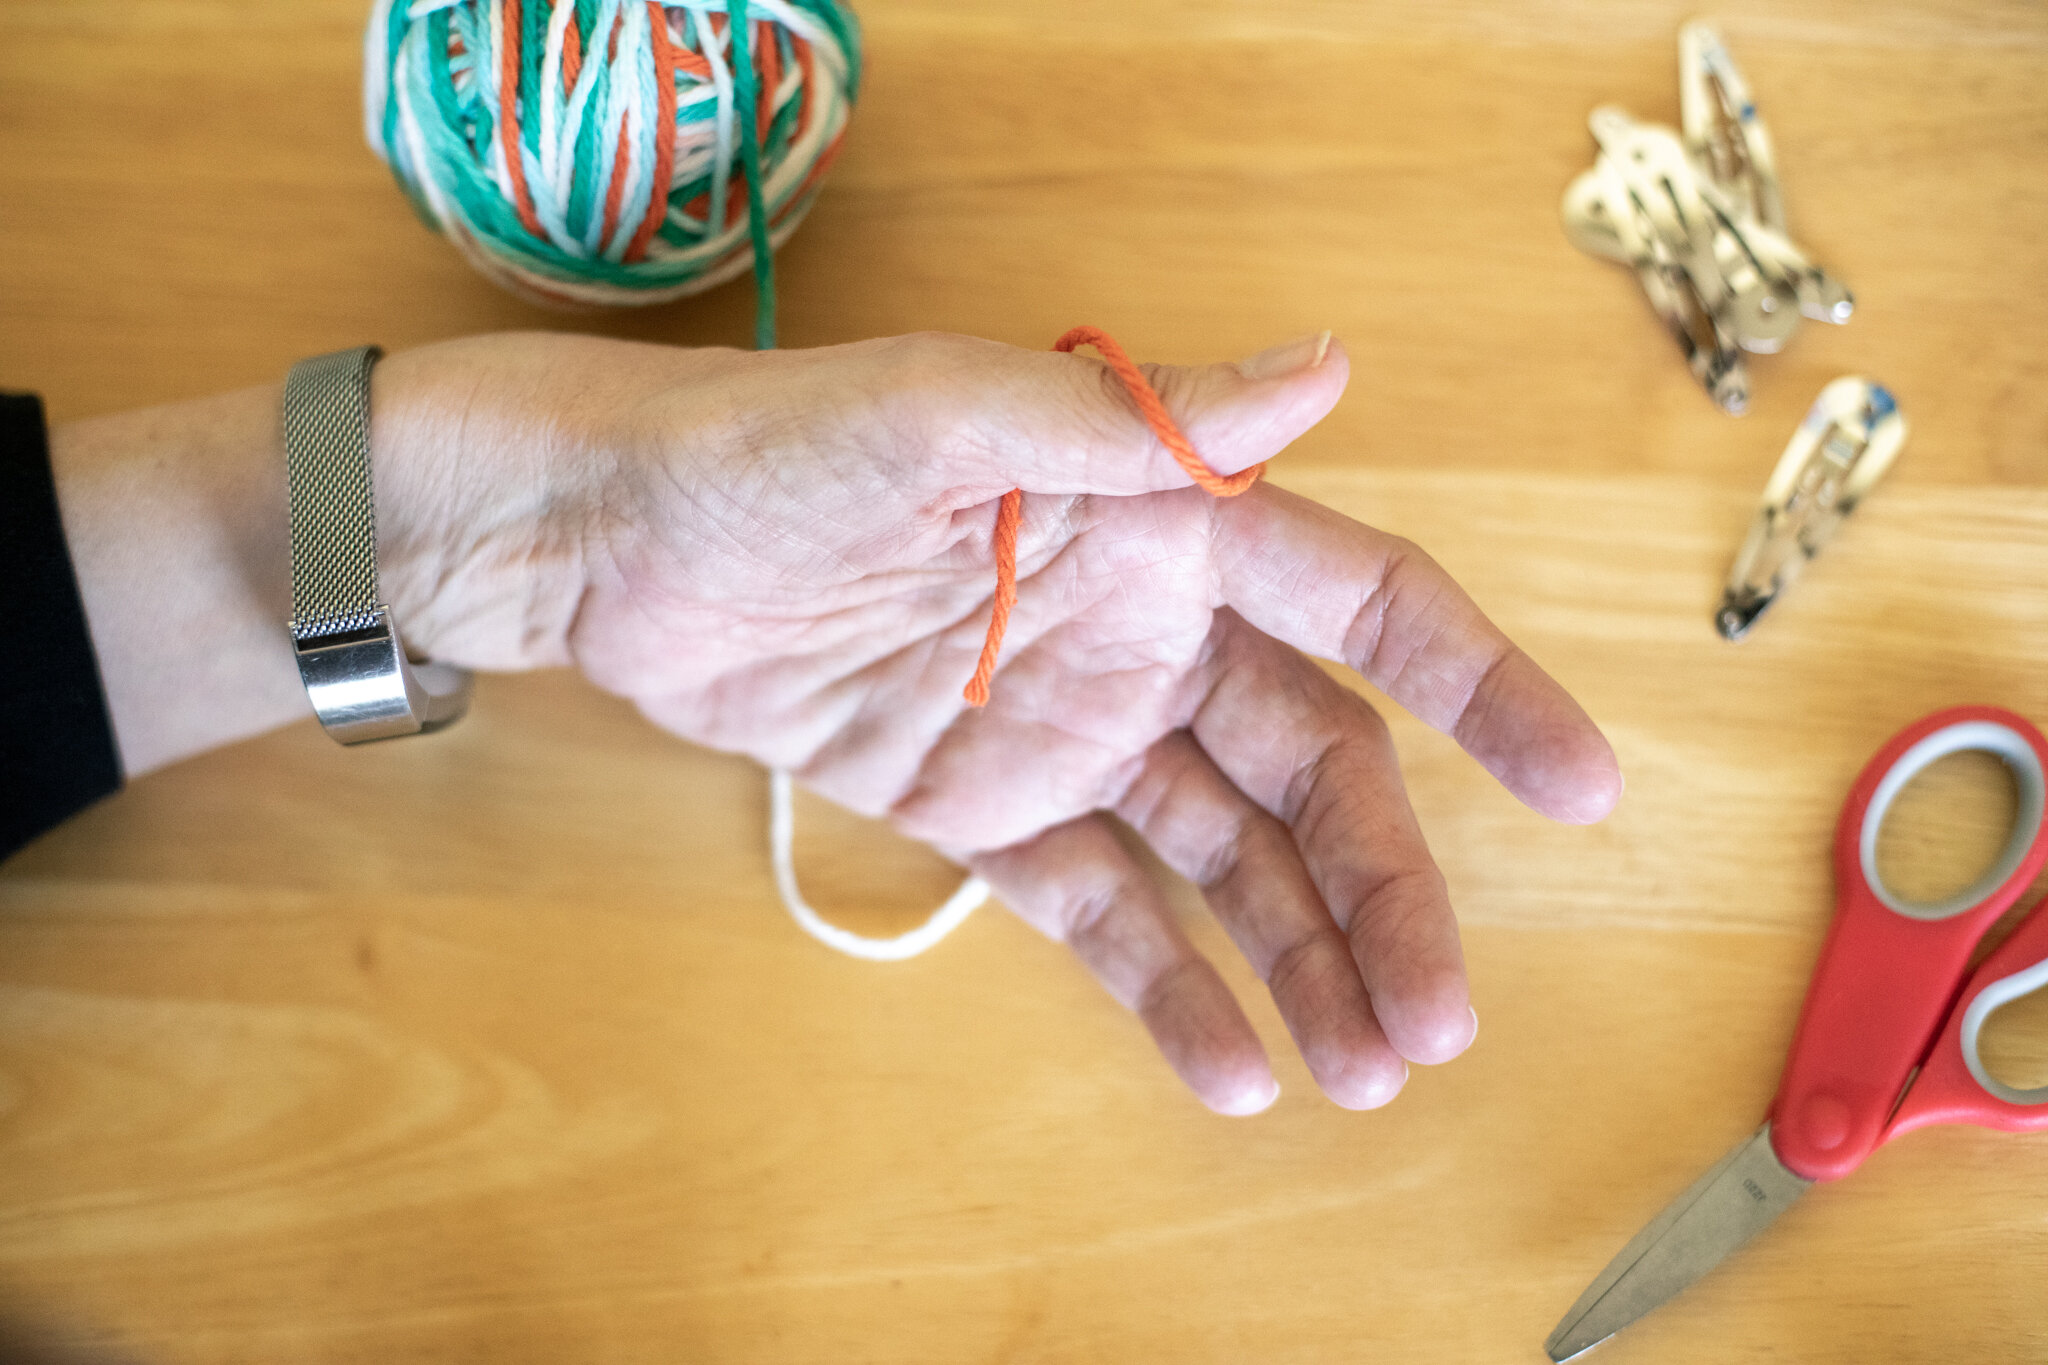
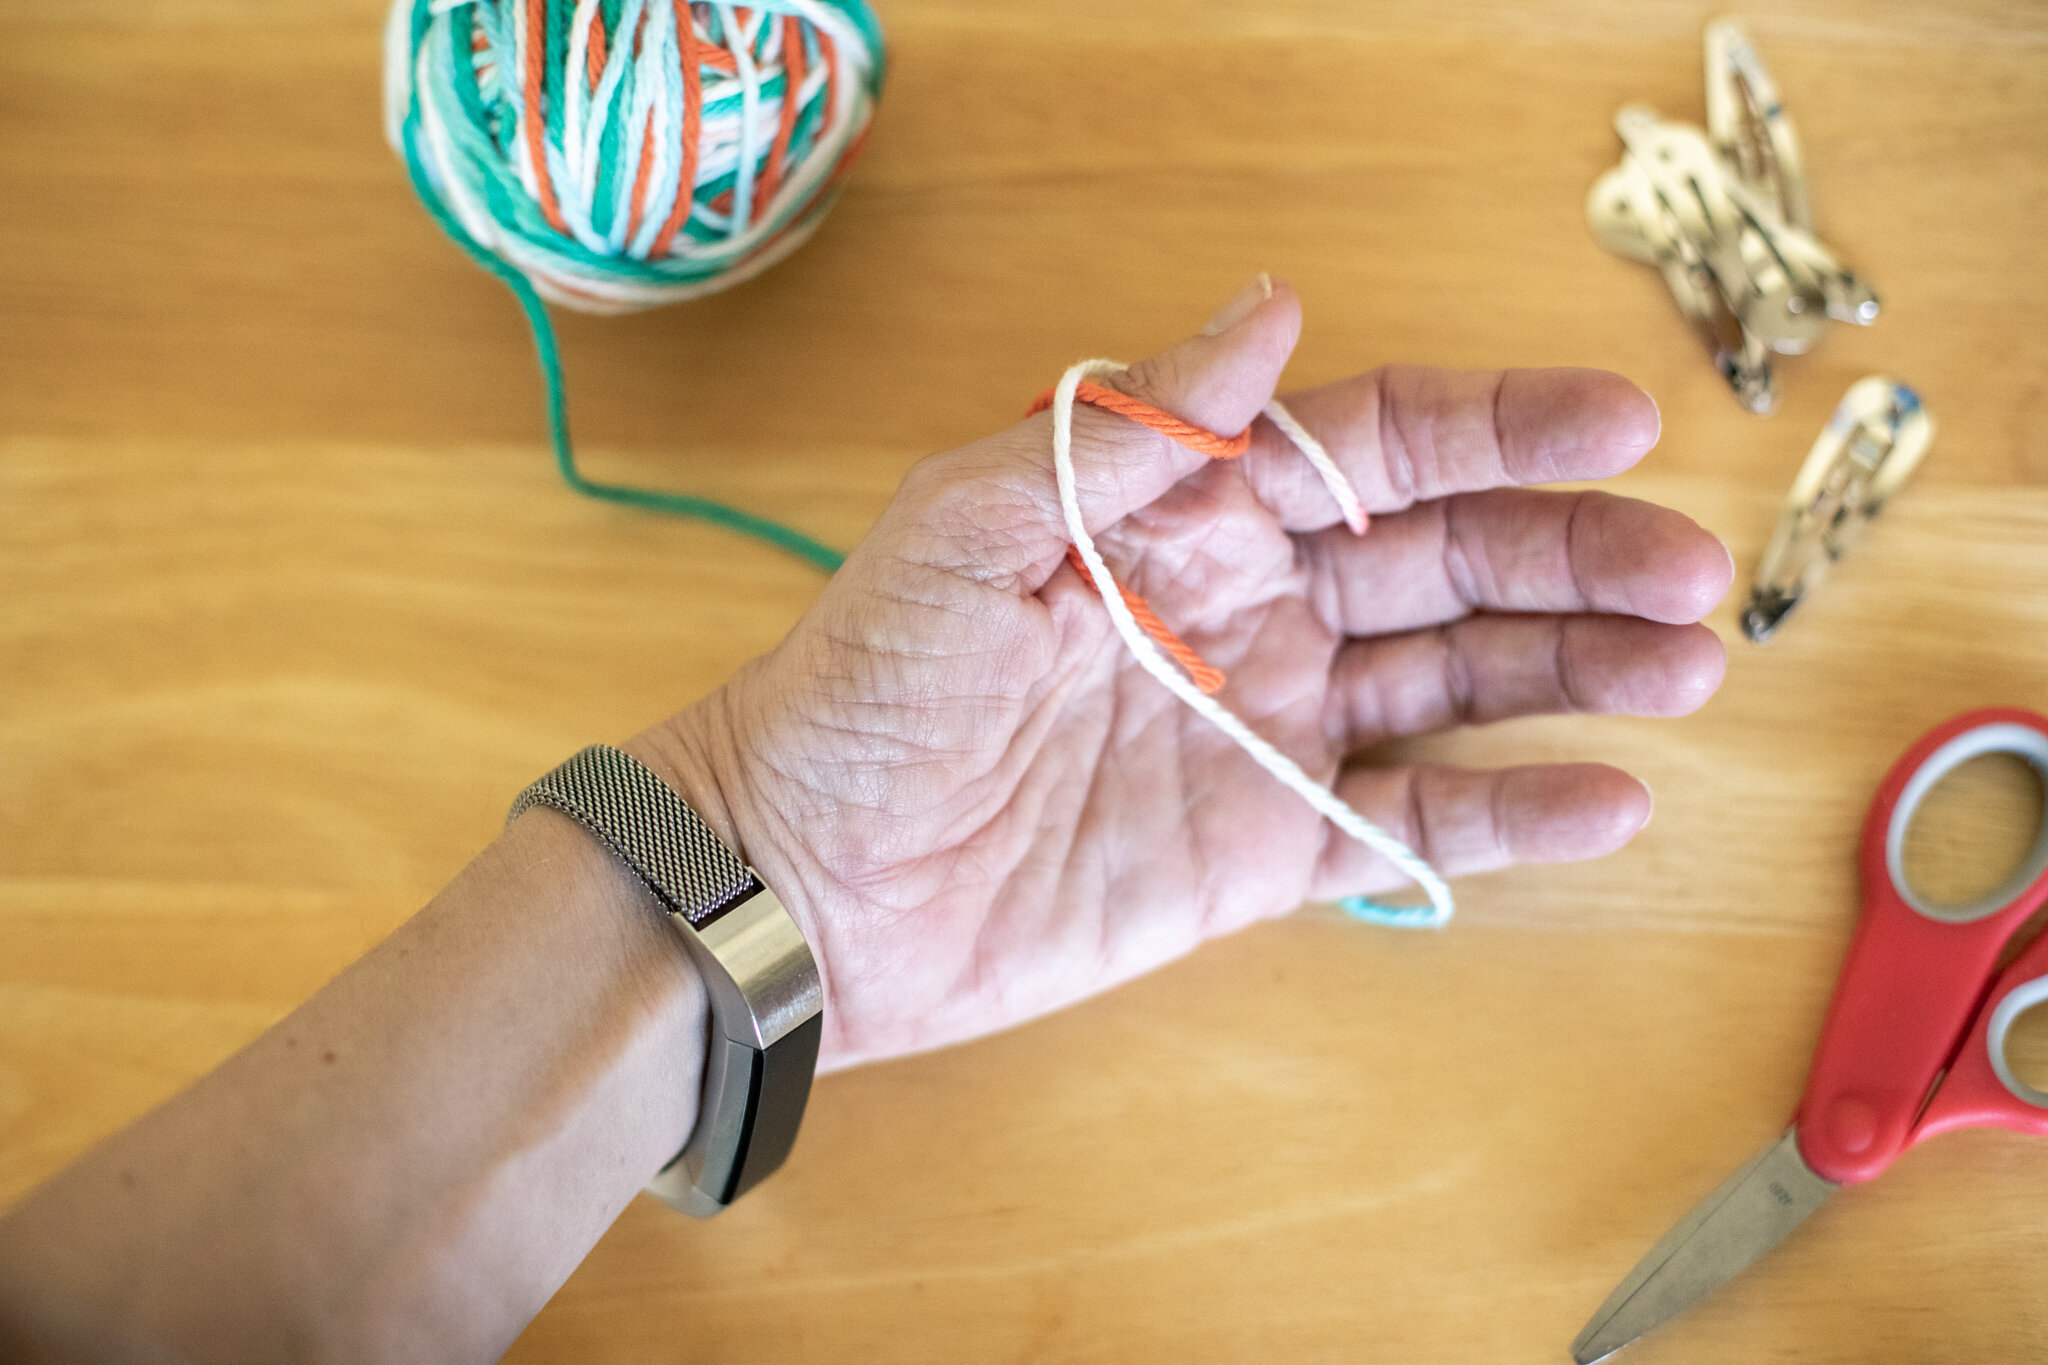
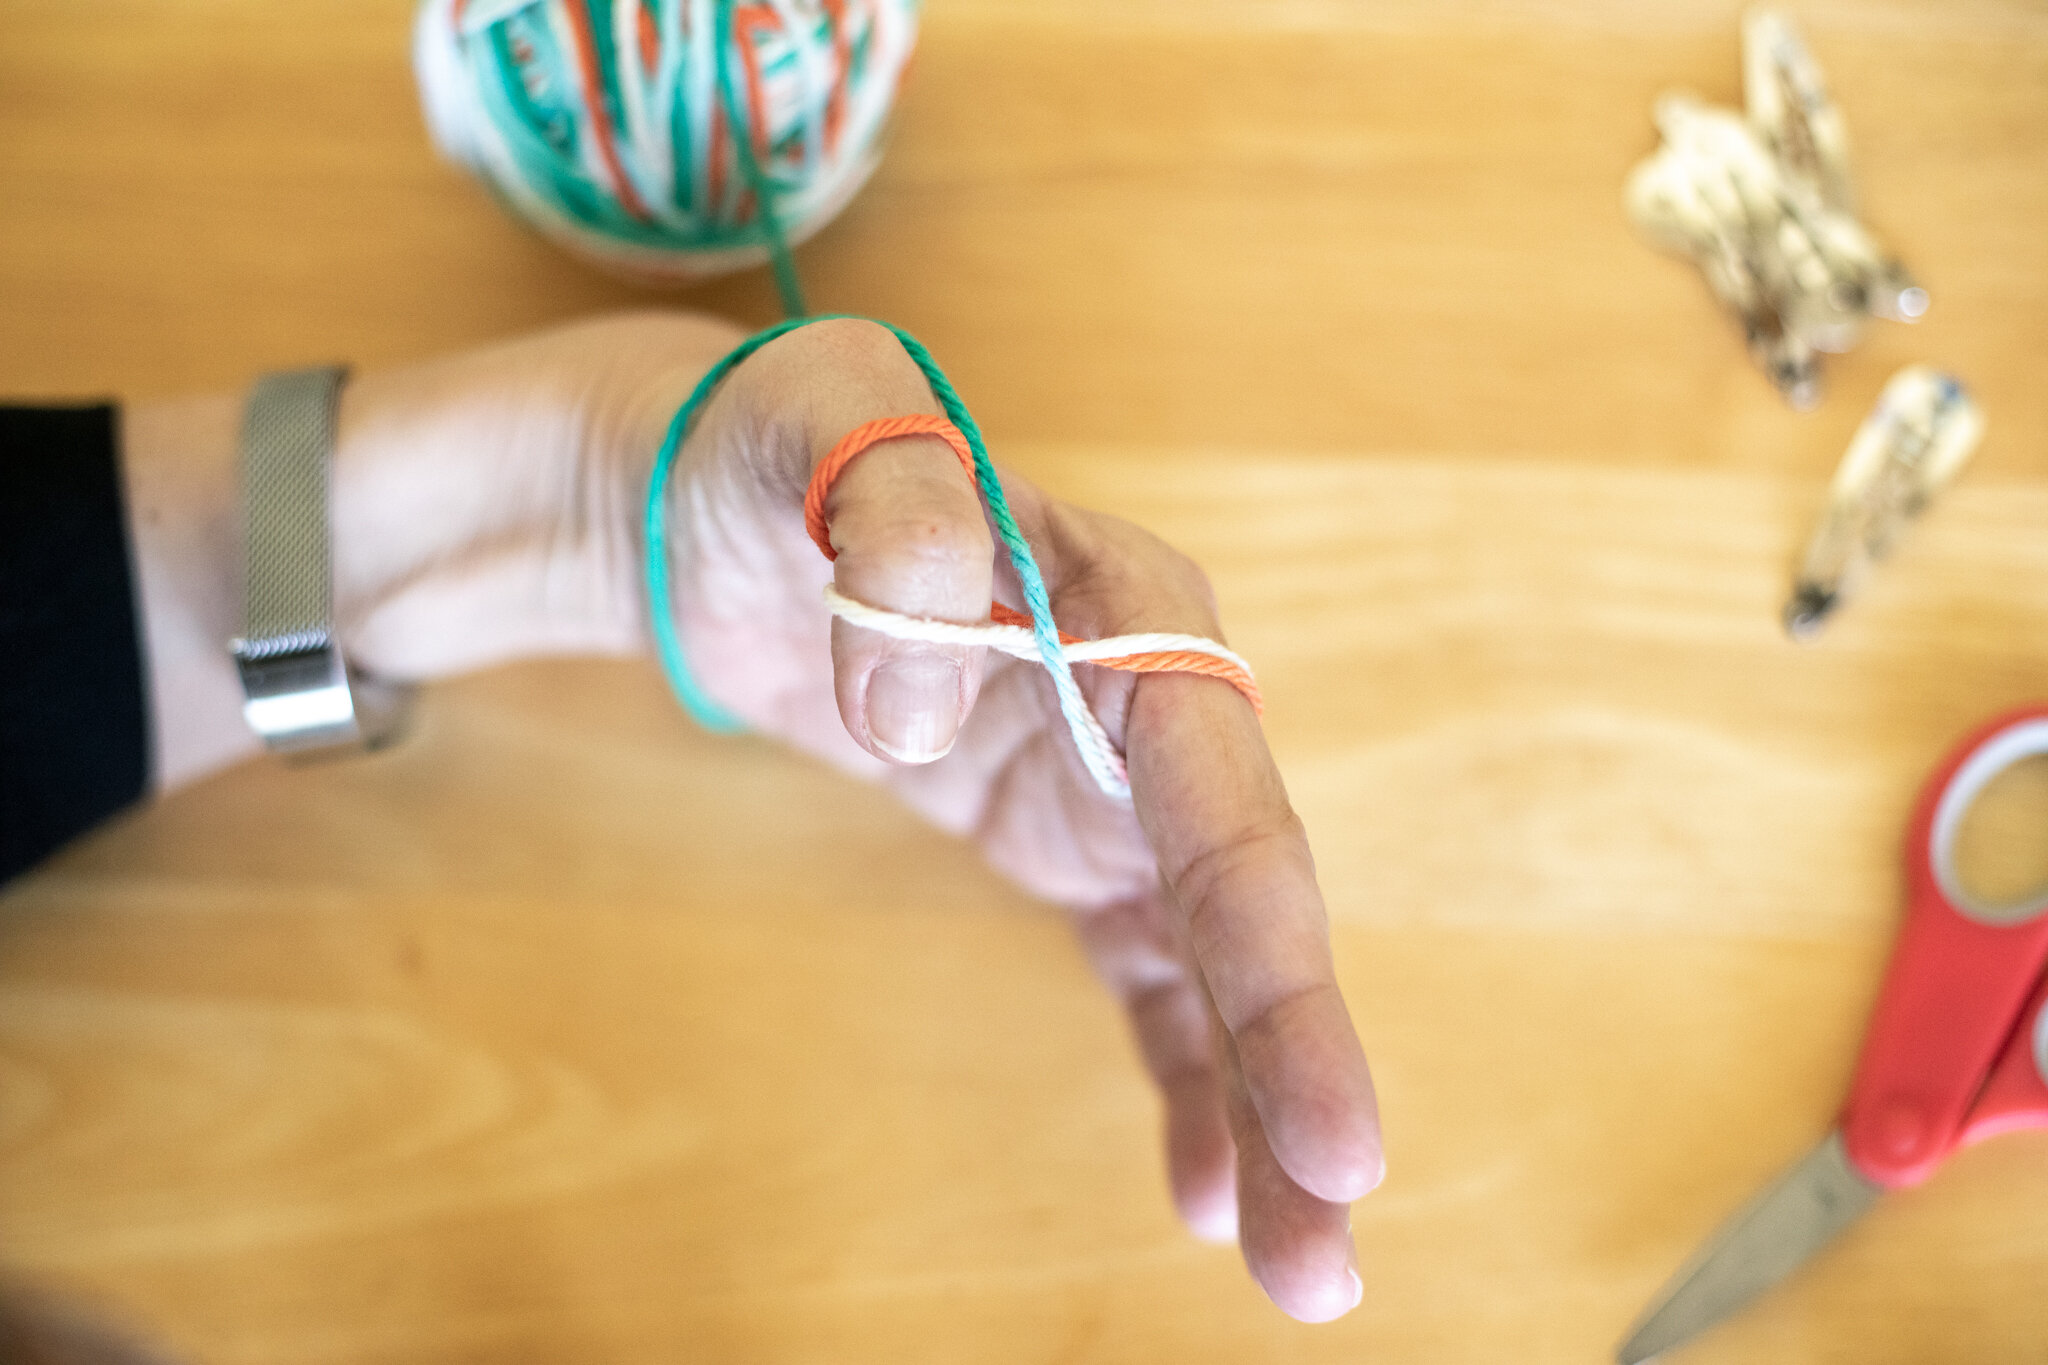
And children love making yarn balls. It’s a soothing and satisfying process. When you make them soon after bringing new yarn home, you can avoid the tangled mess photographed above. I have two different ways to start the yarn ball. You can try each and choose the way that’s easier for you. We would teach “granny’s glasses” (the first way) because it was a little easier for kids to start the ball after they figured out how to get it around their thumb and finger successfully.
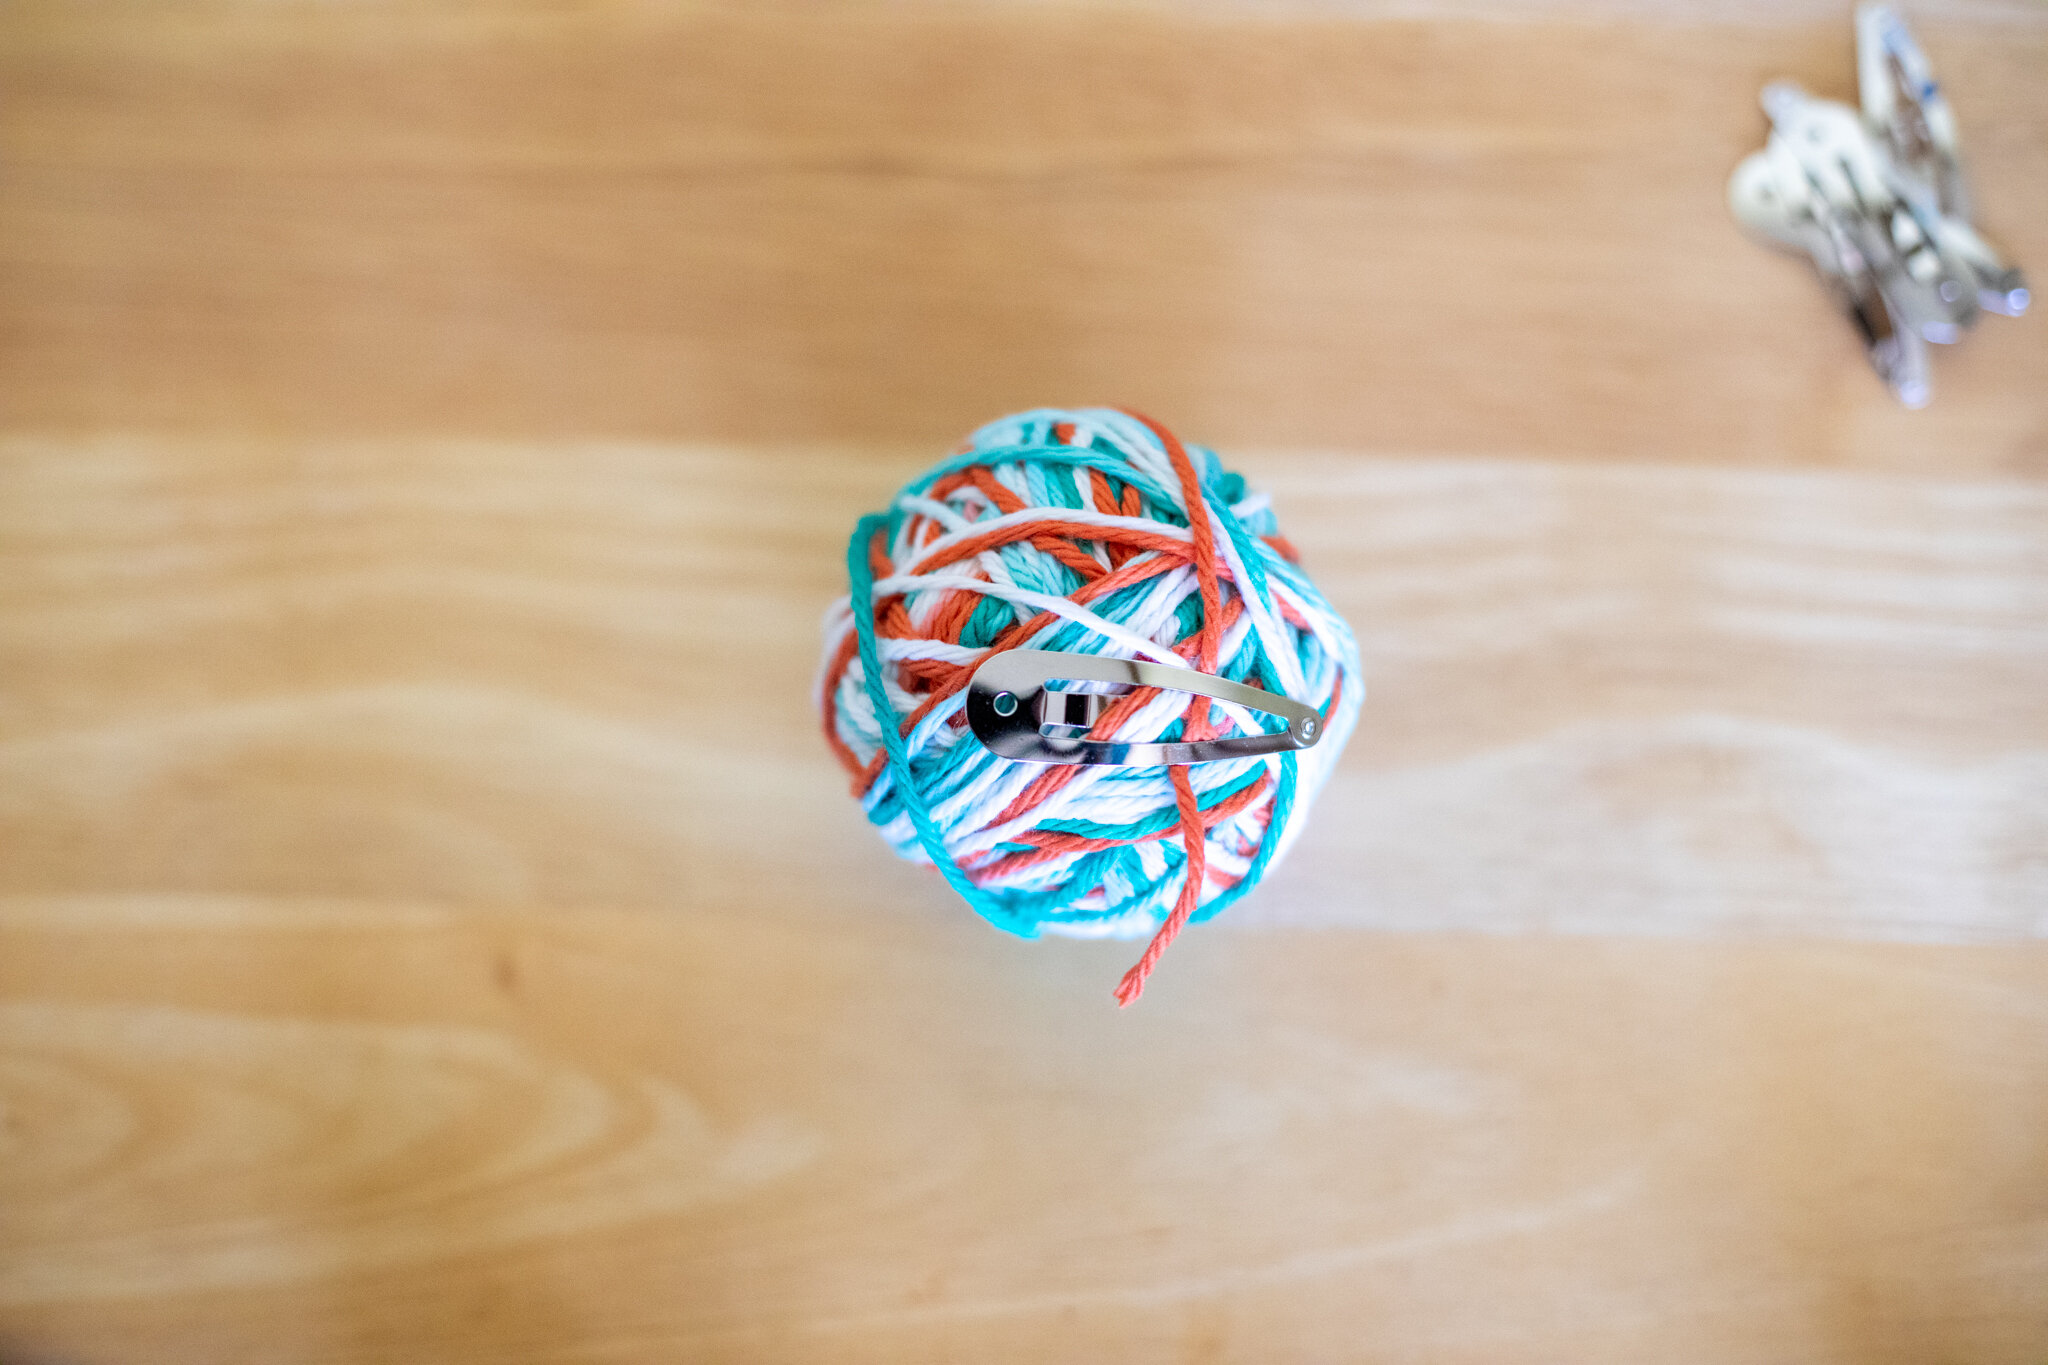
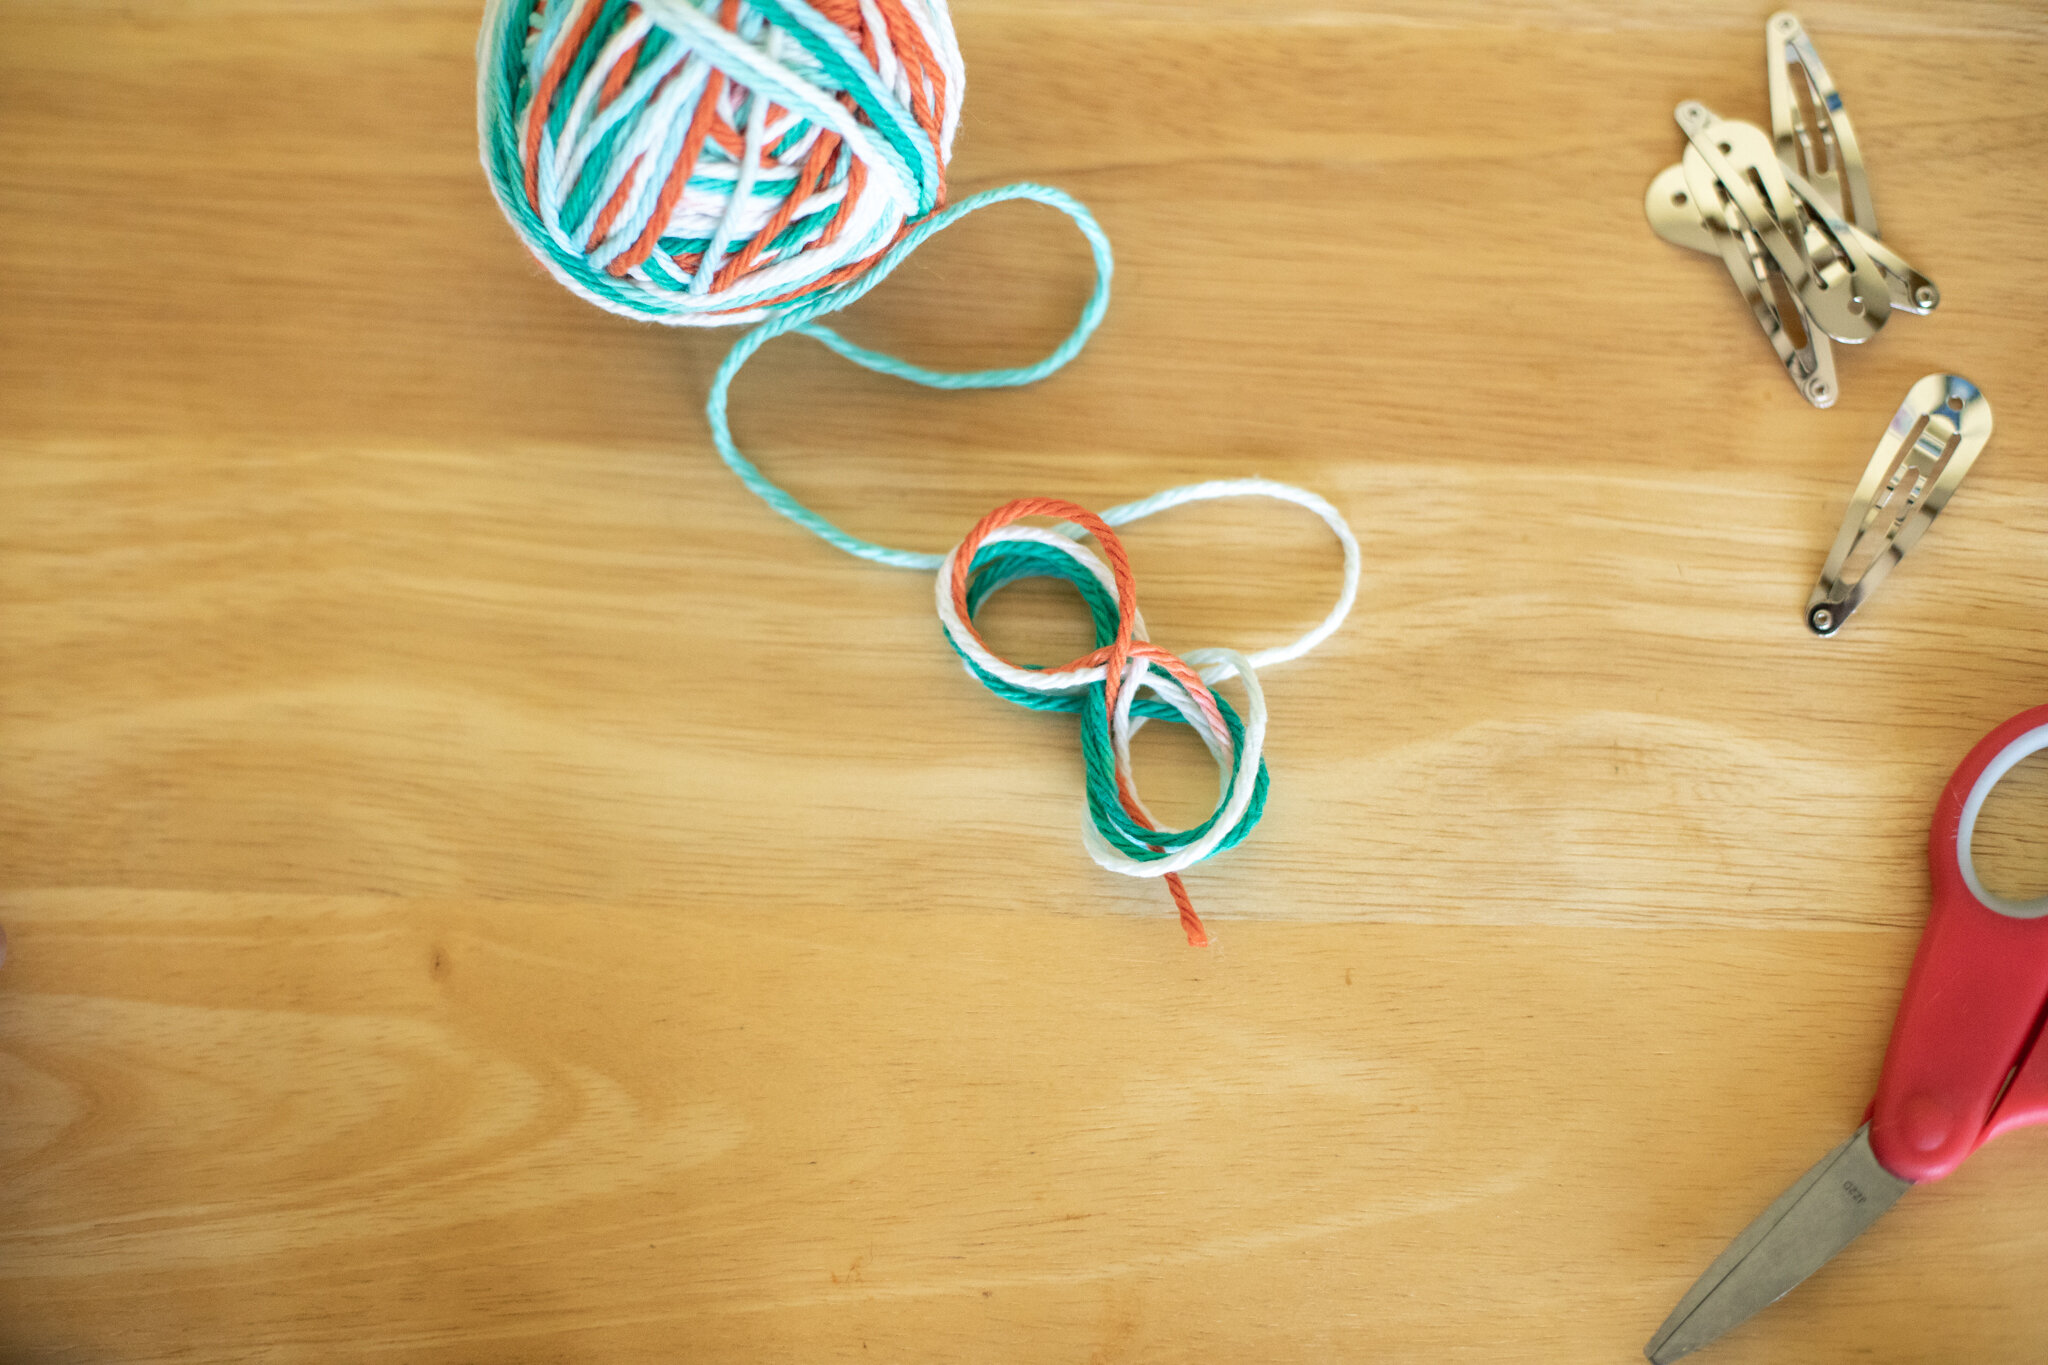
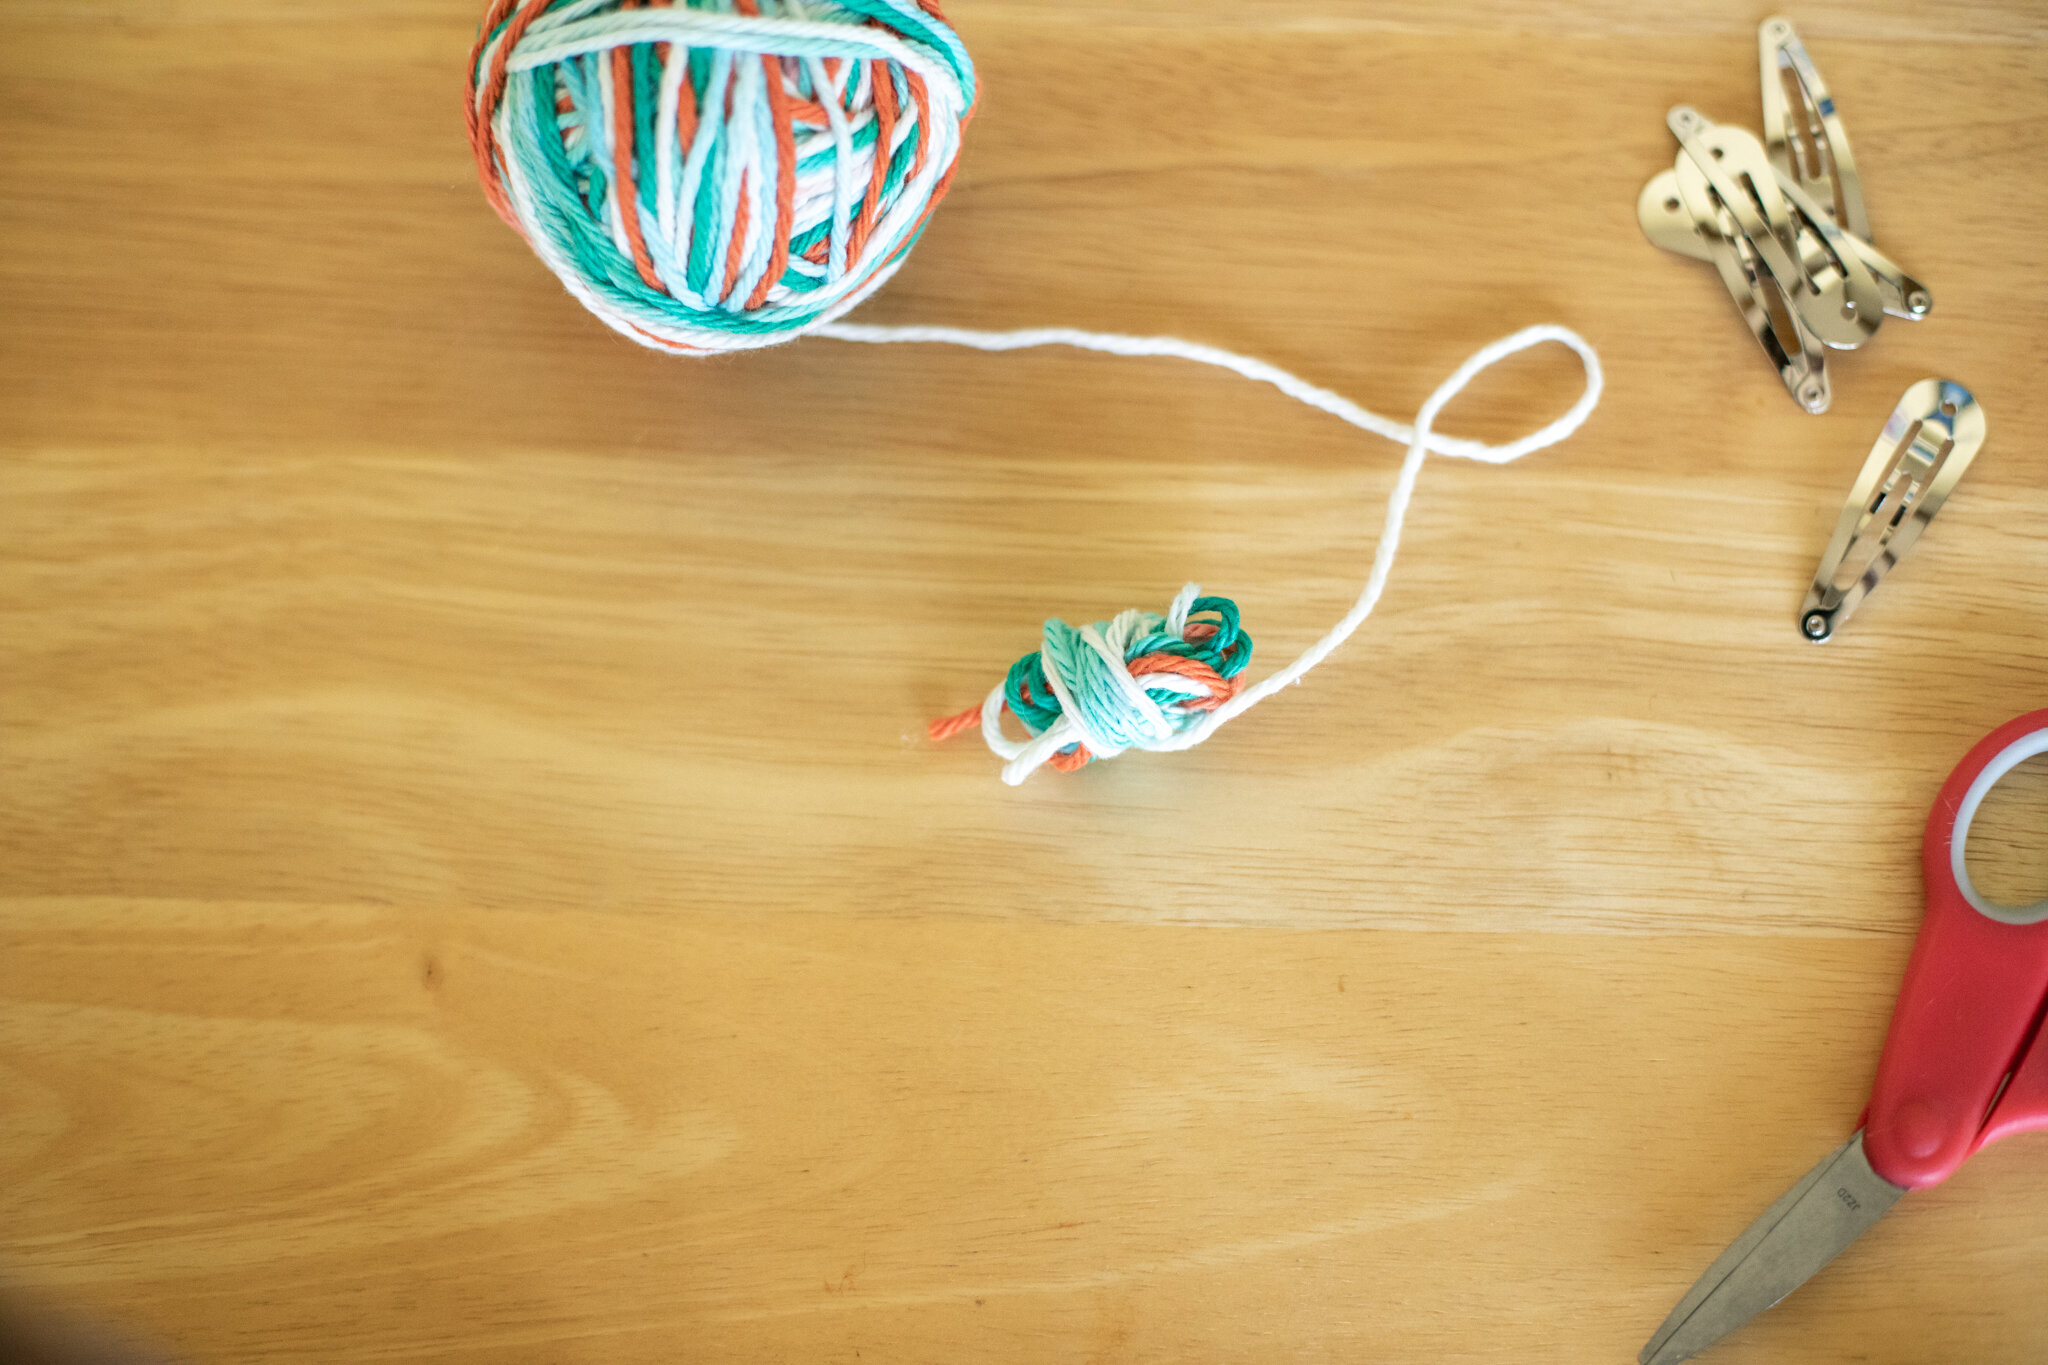
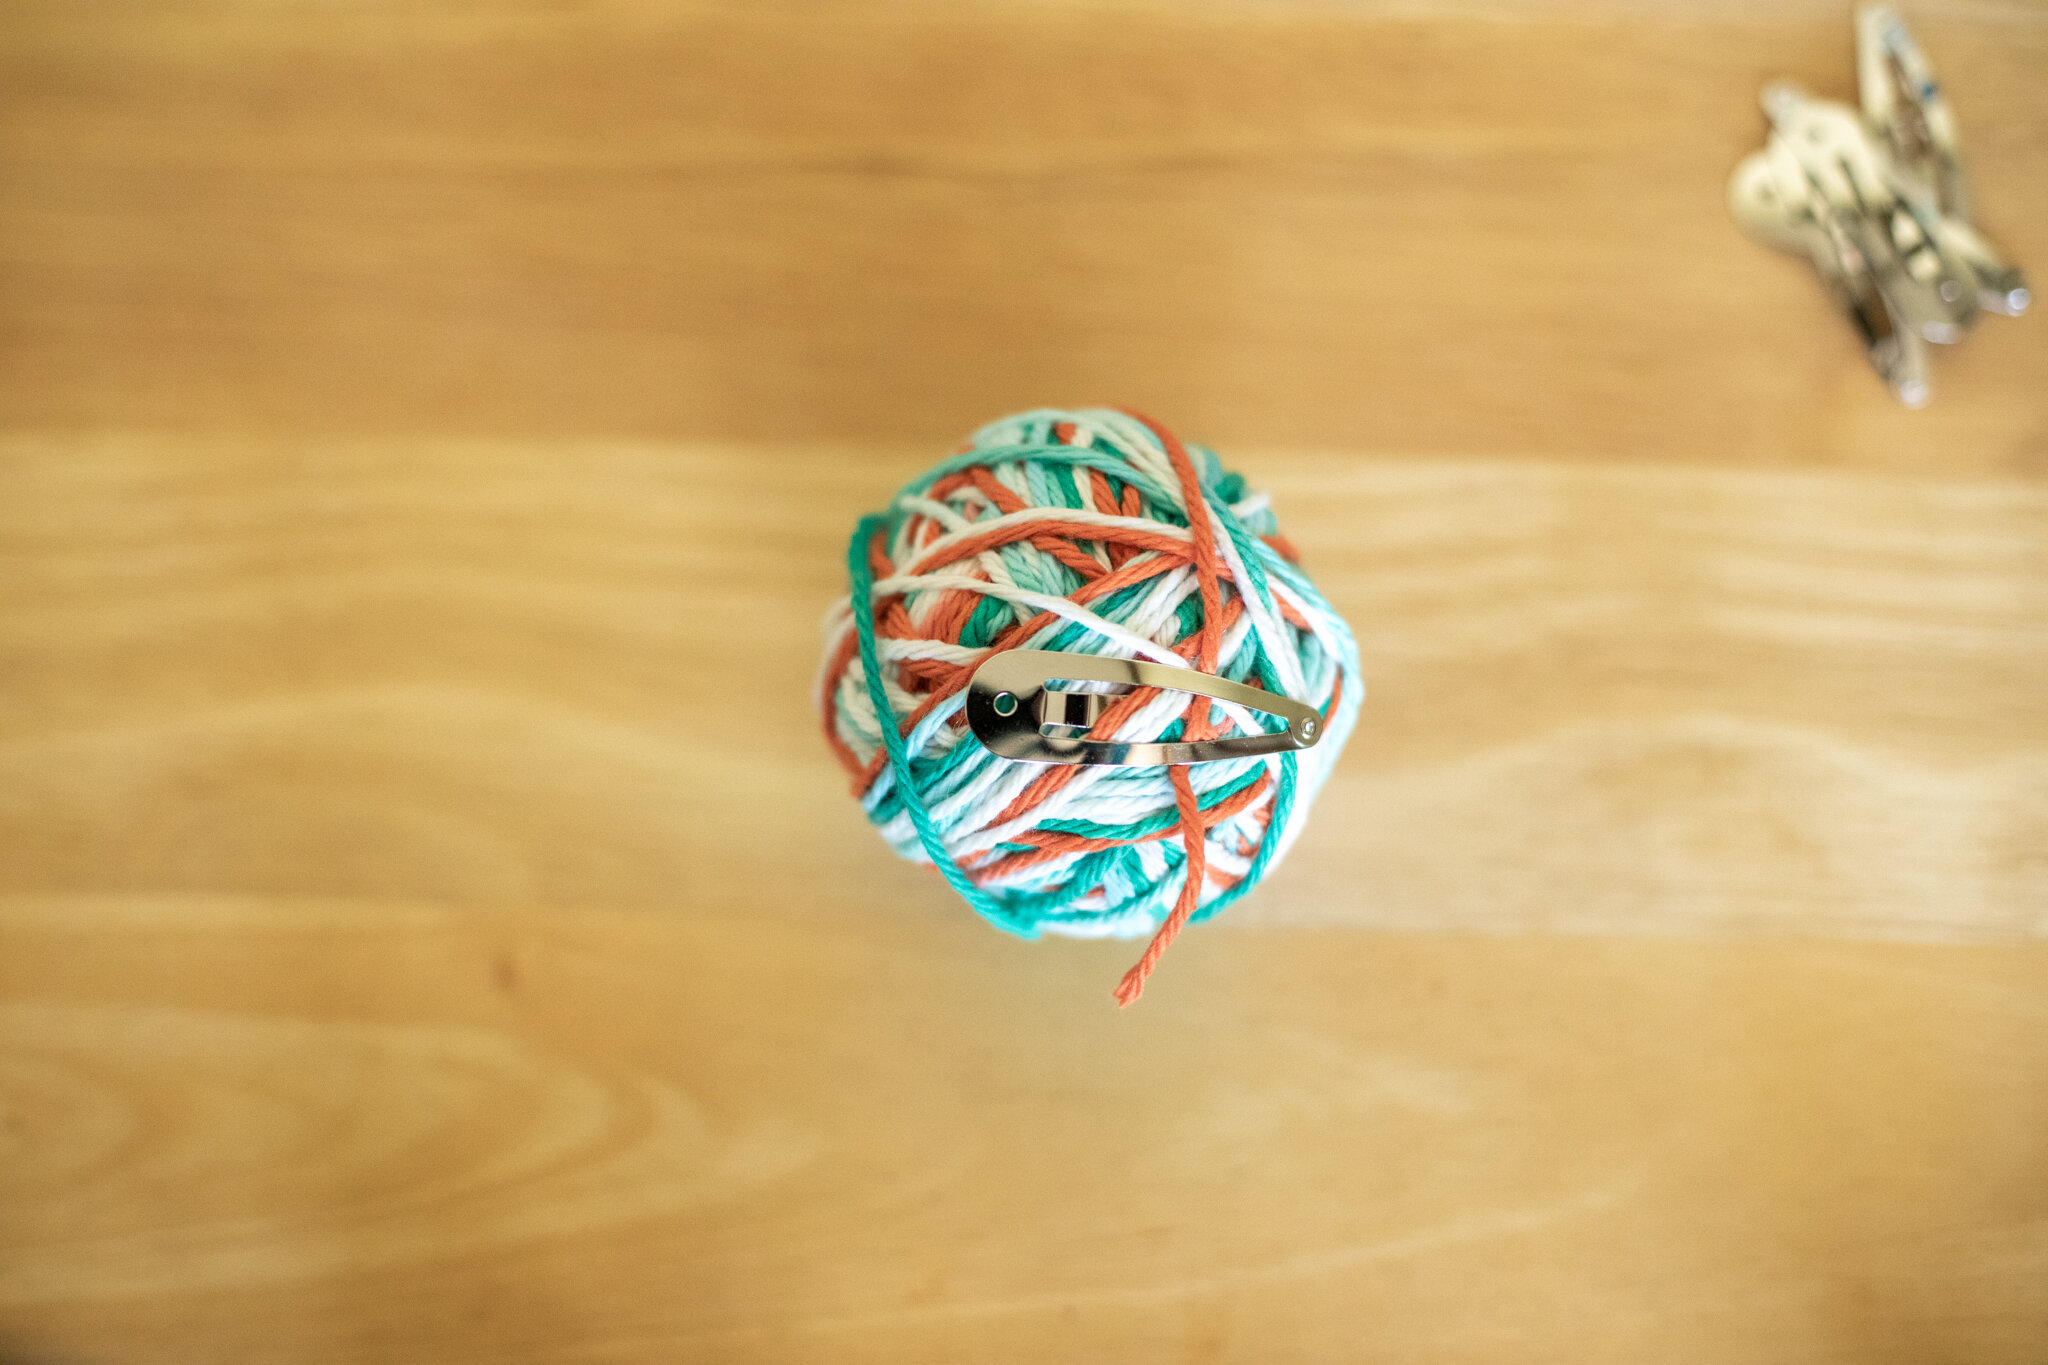
For young-young children, we would start the ball for them (because the first few steps require the most fine motor skills), and then hand it over so they could wind it bigger. For classes, we would make the ball a few inches wide (not very big) because projects didn’t need very much yarn and that way no one monopolized a color for very long (ten smaller balls was easier in a classroom than 1 giant ball). At home, I wind the cotton yarn for fairy hair into one big ball because I don’t need to share (and fairies only need a little). You can stop the ball anytime. Simply clip the yarn and secure it with a bit of tape or a springy hairclip so they won’t unwind and tangle in a basket.

Supplies:
Yarn
Scissors
Optional: springy clips or scrap of tape to hold down the “tail” of yarn when finished

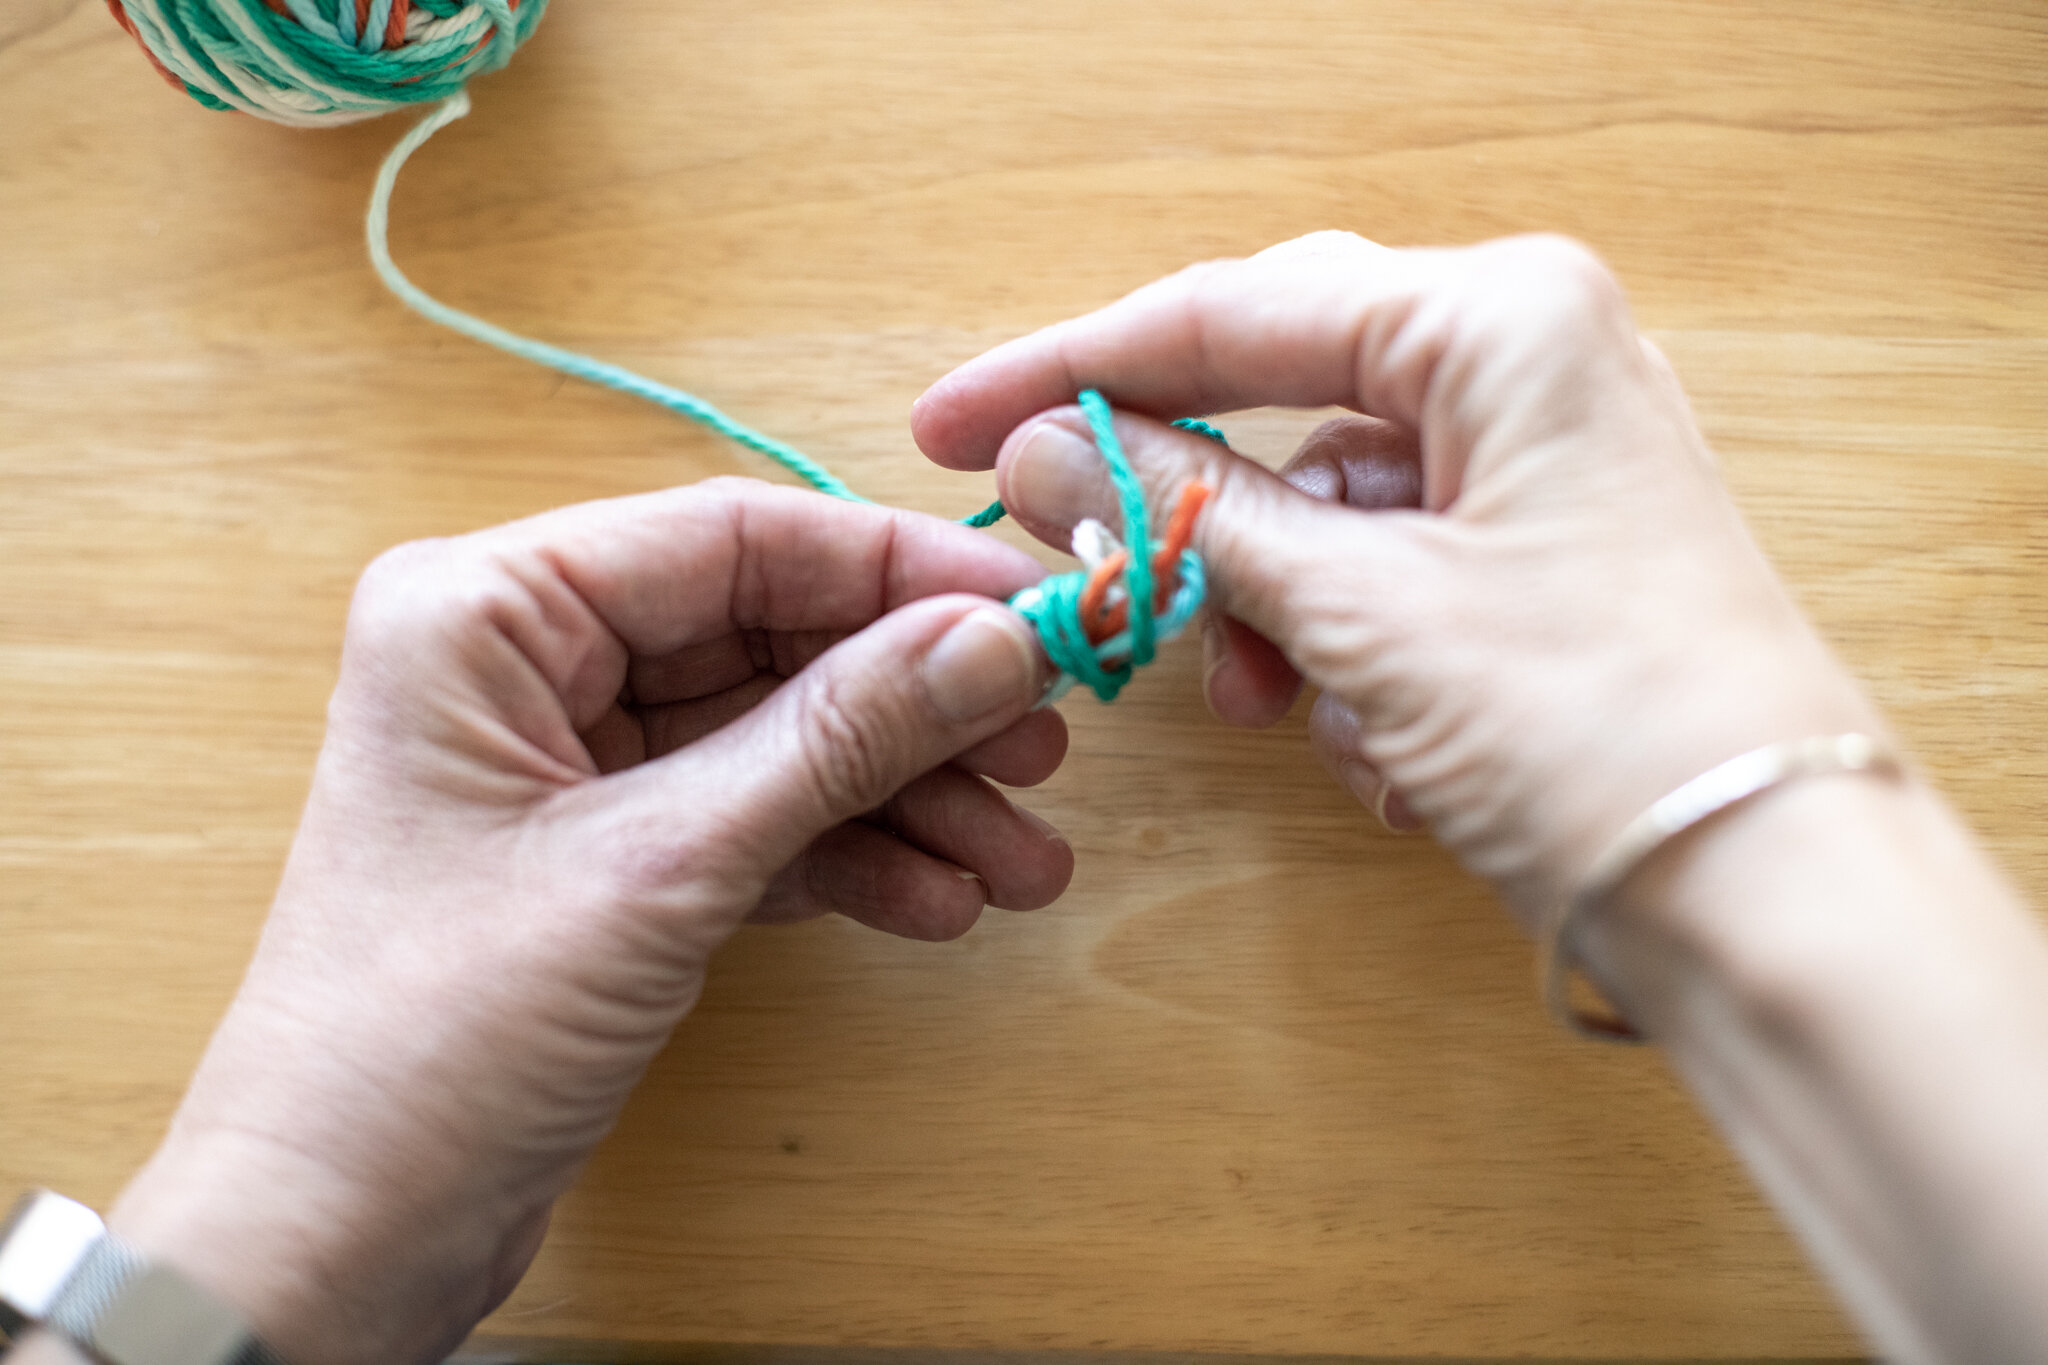
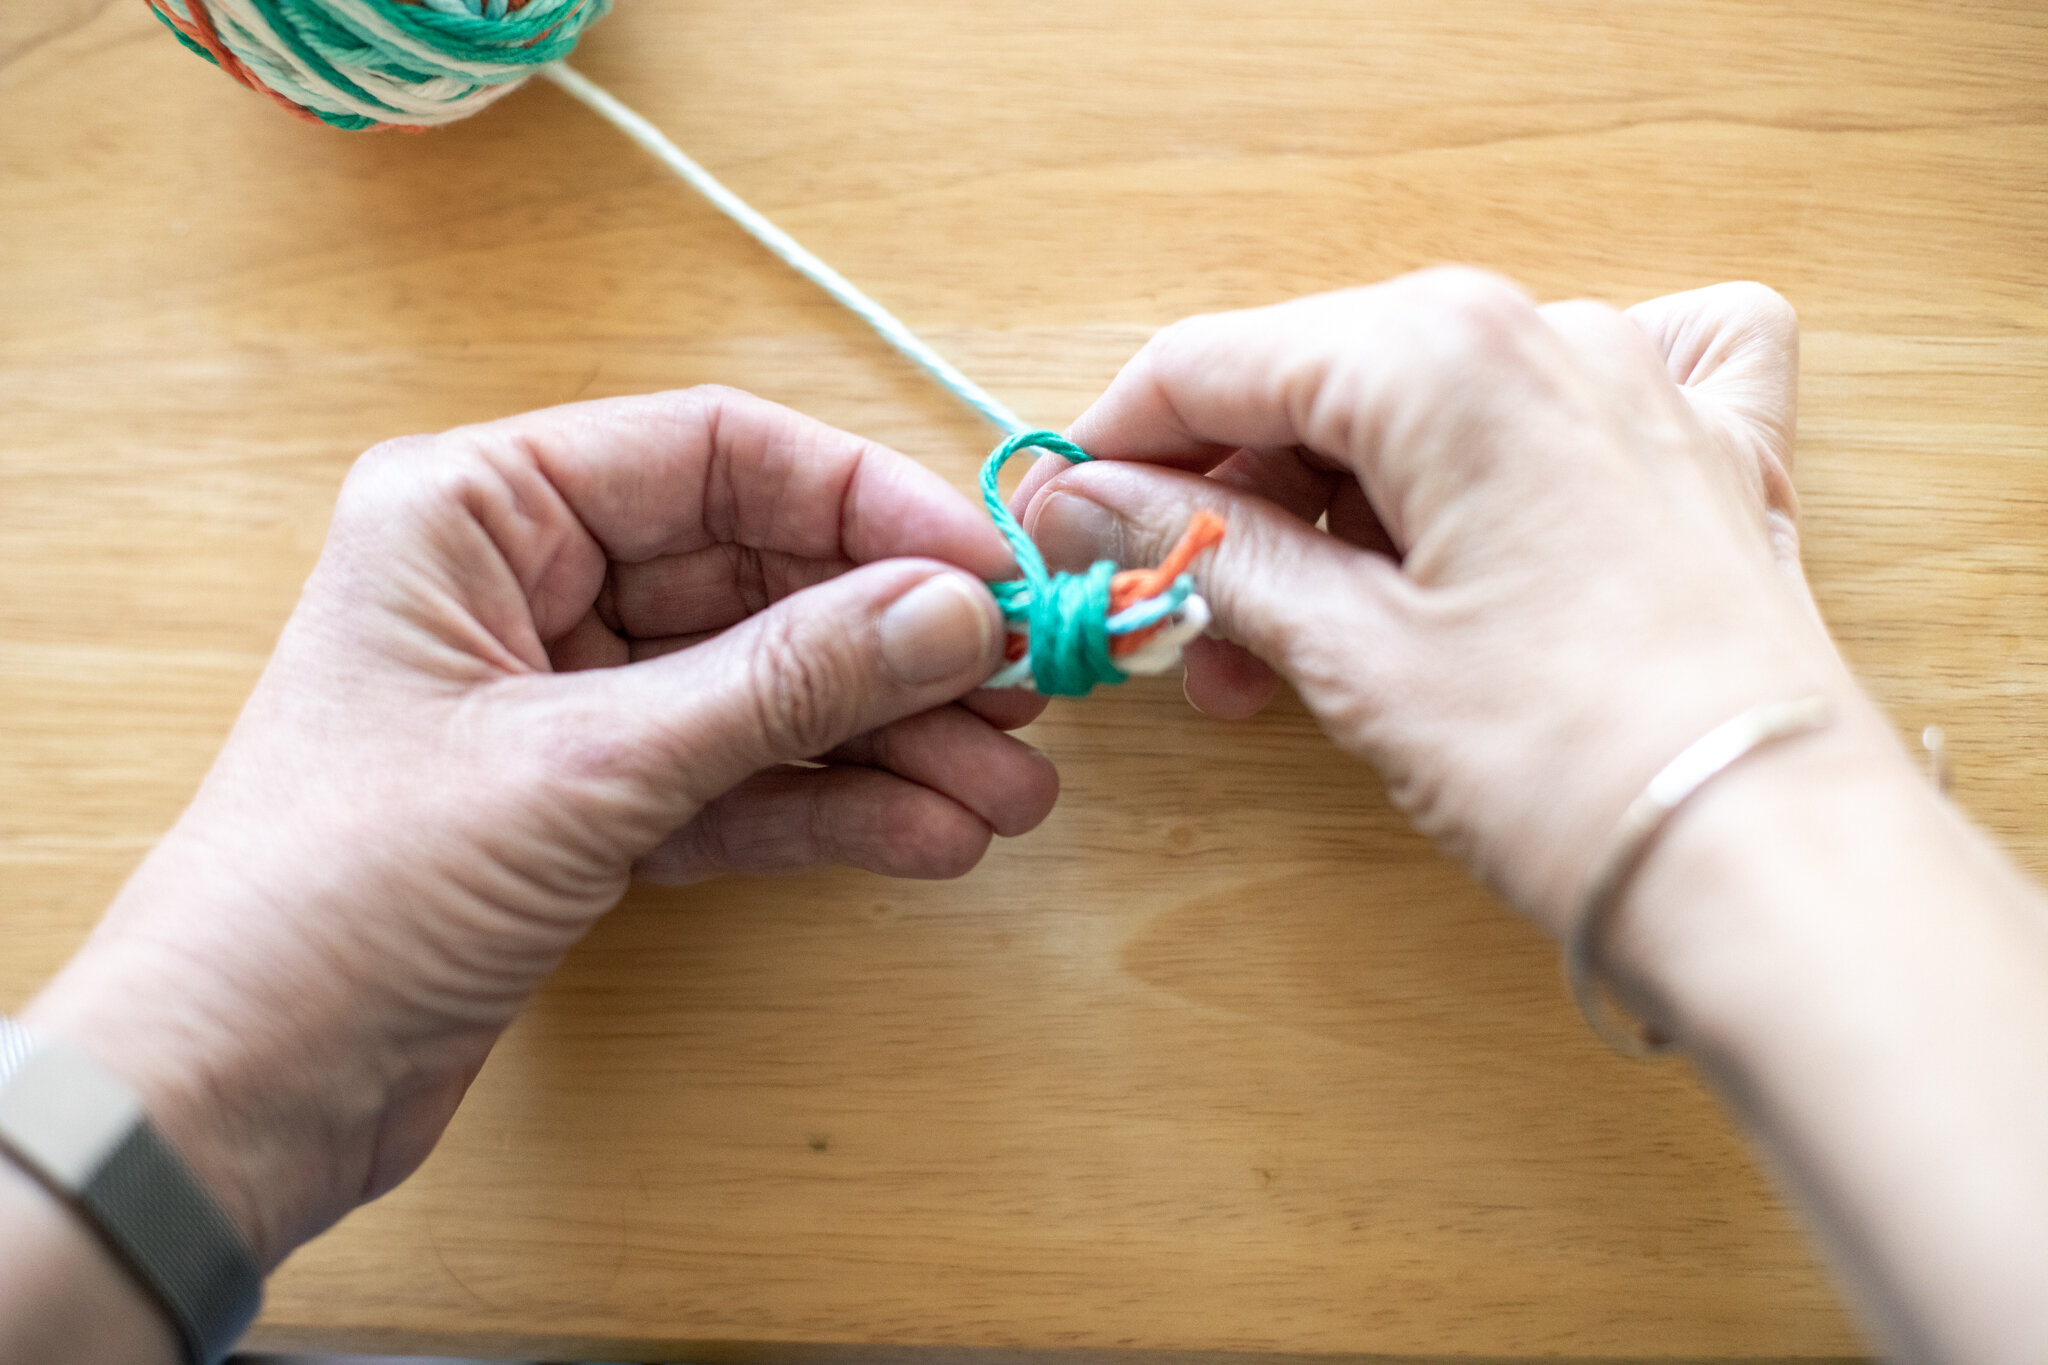
To start, tuck the yarn between you thumb and finger. I am right handed, so I hold the yarn with my left hand. You can try different hands to see which hand works better for you. Hold the yarn so it doesn’t come loose. The second photo shows the end of the yarn between the thumb and finger. The end can be fairly long so it doesn’t come loose too easily.

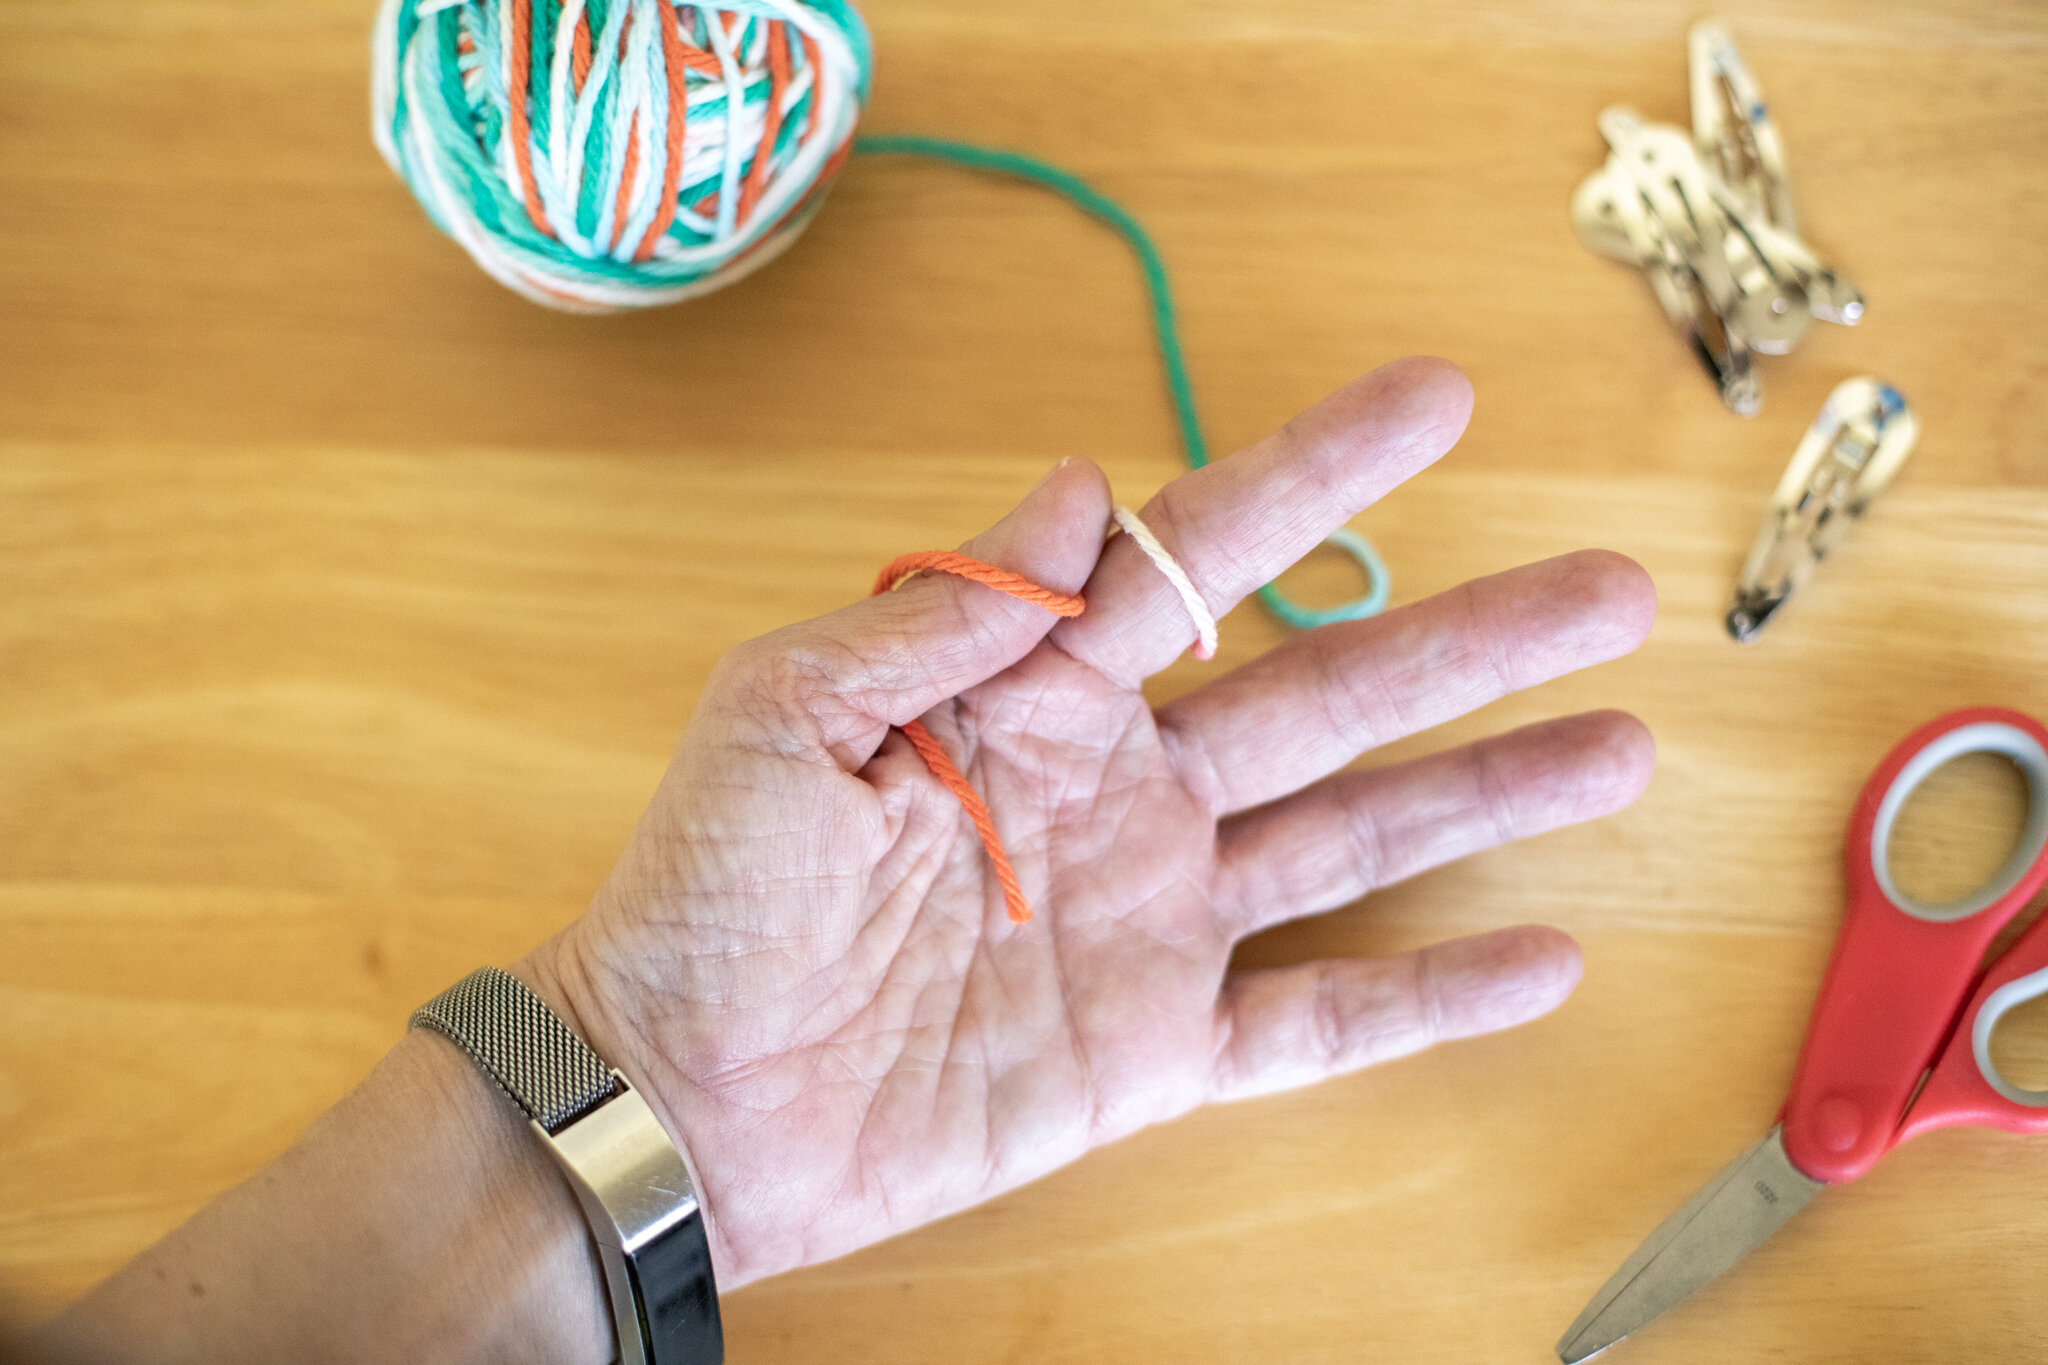

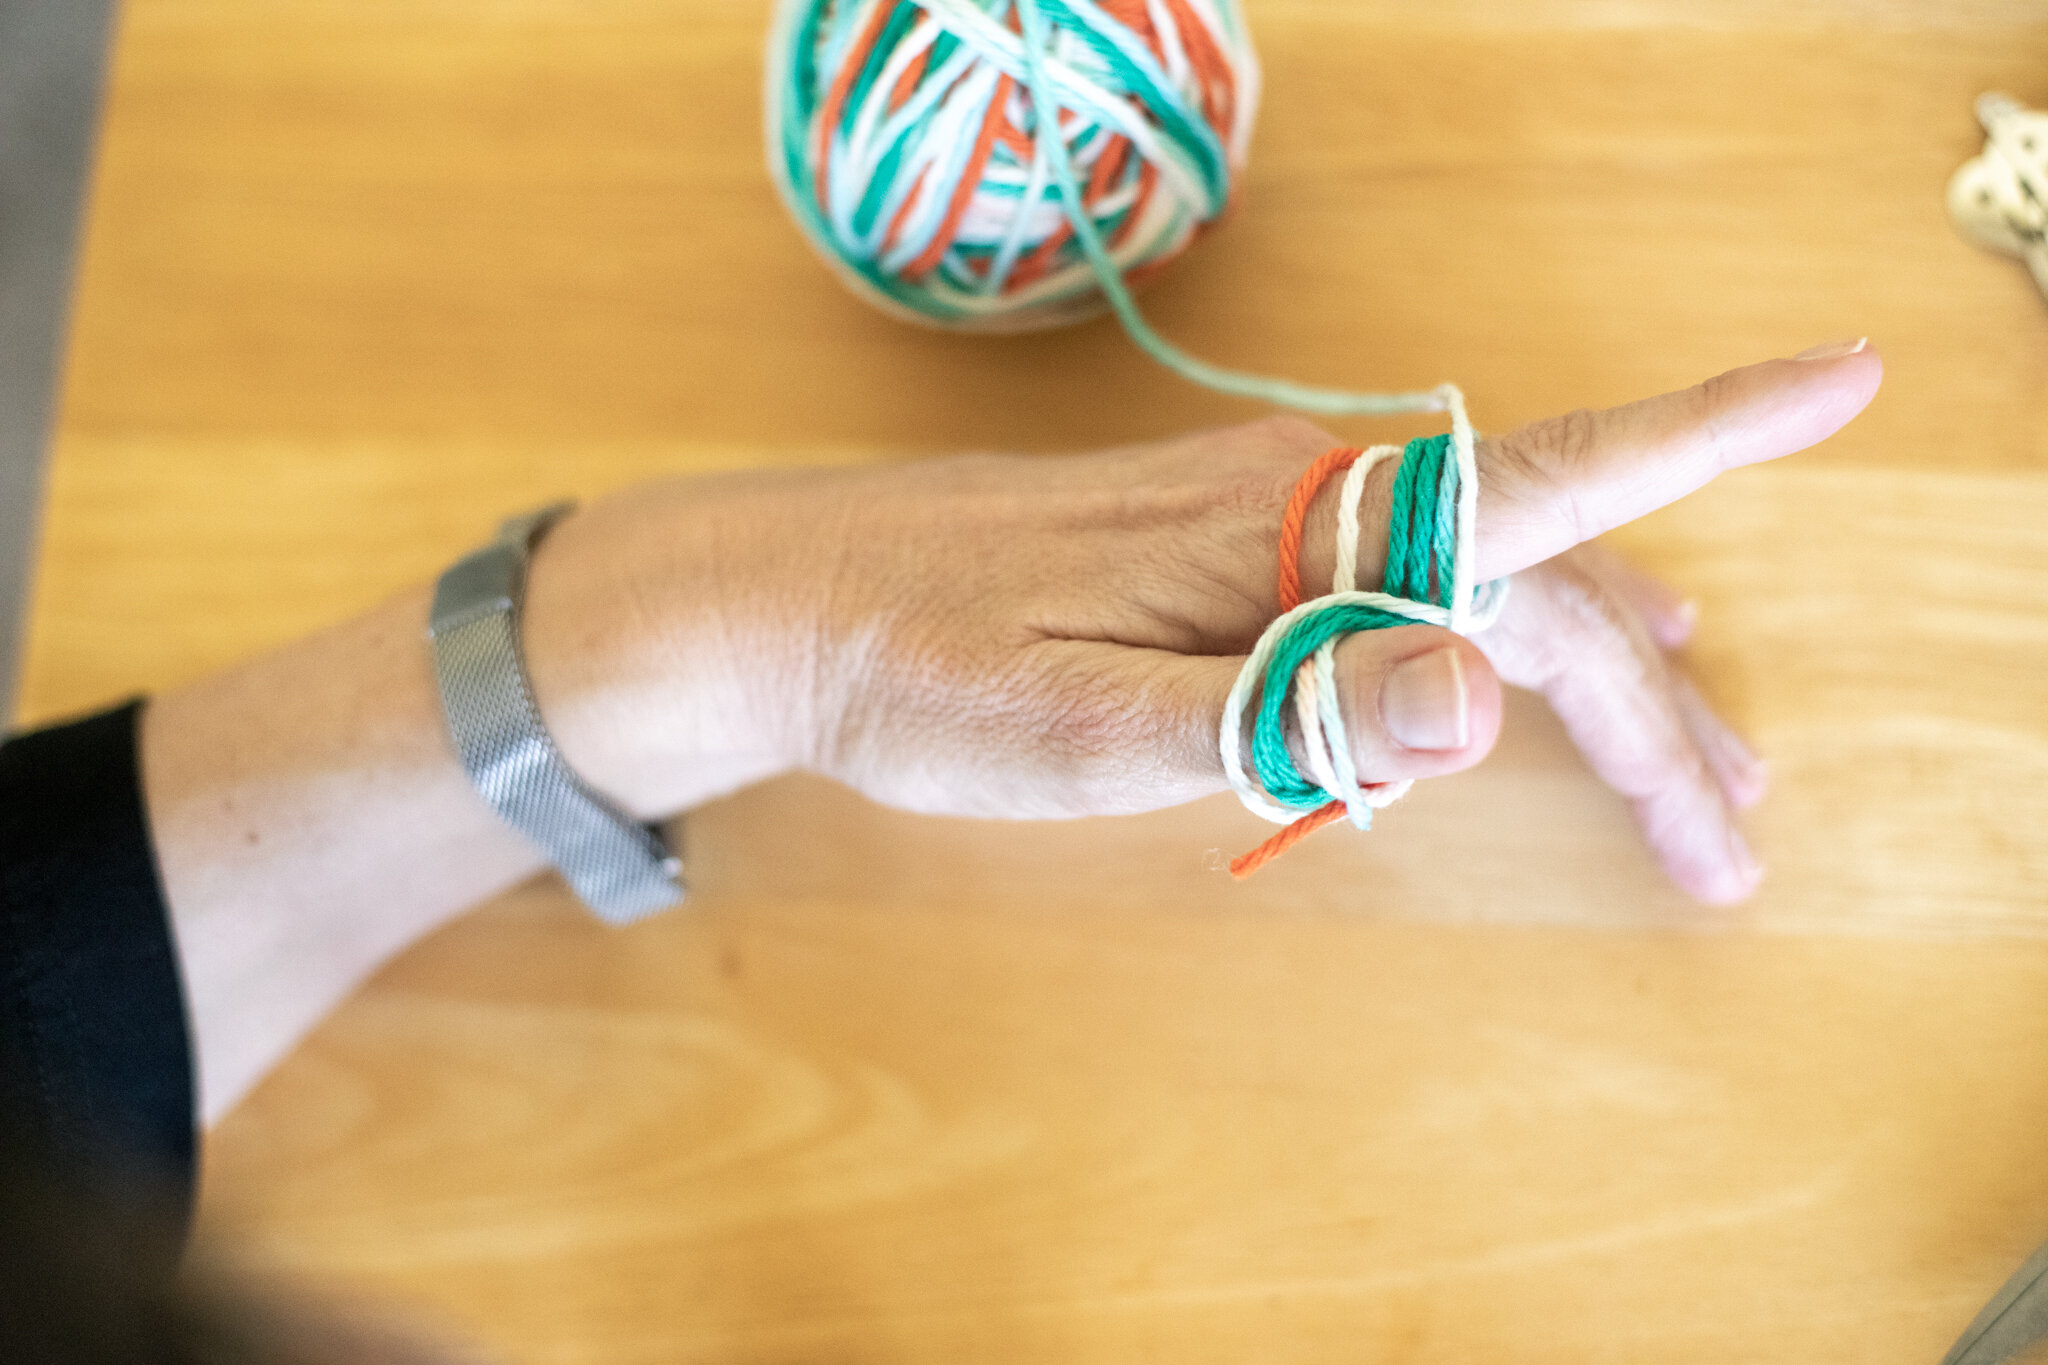
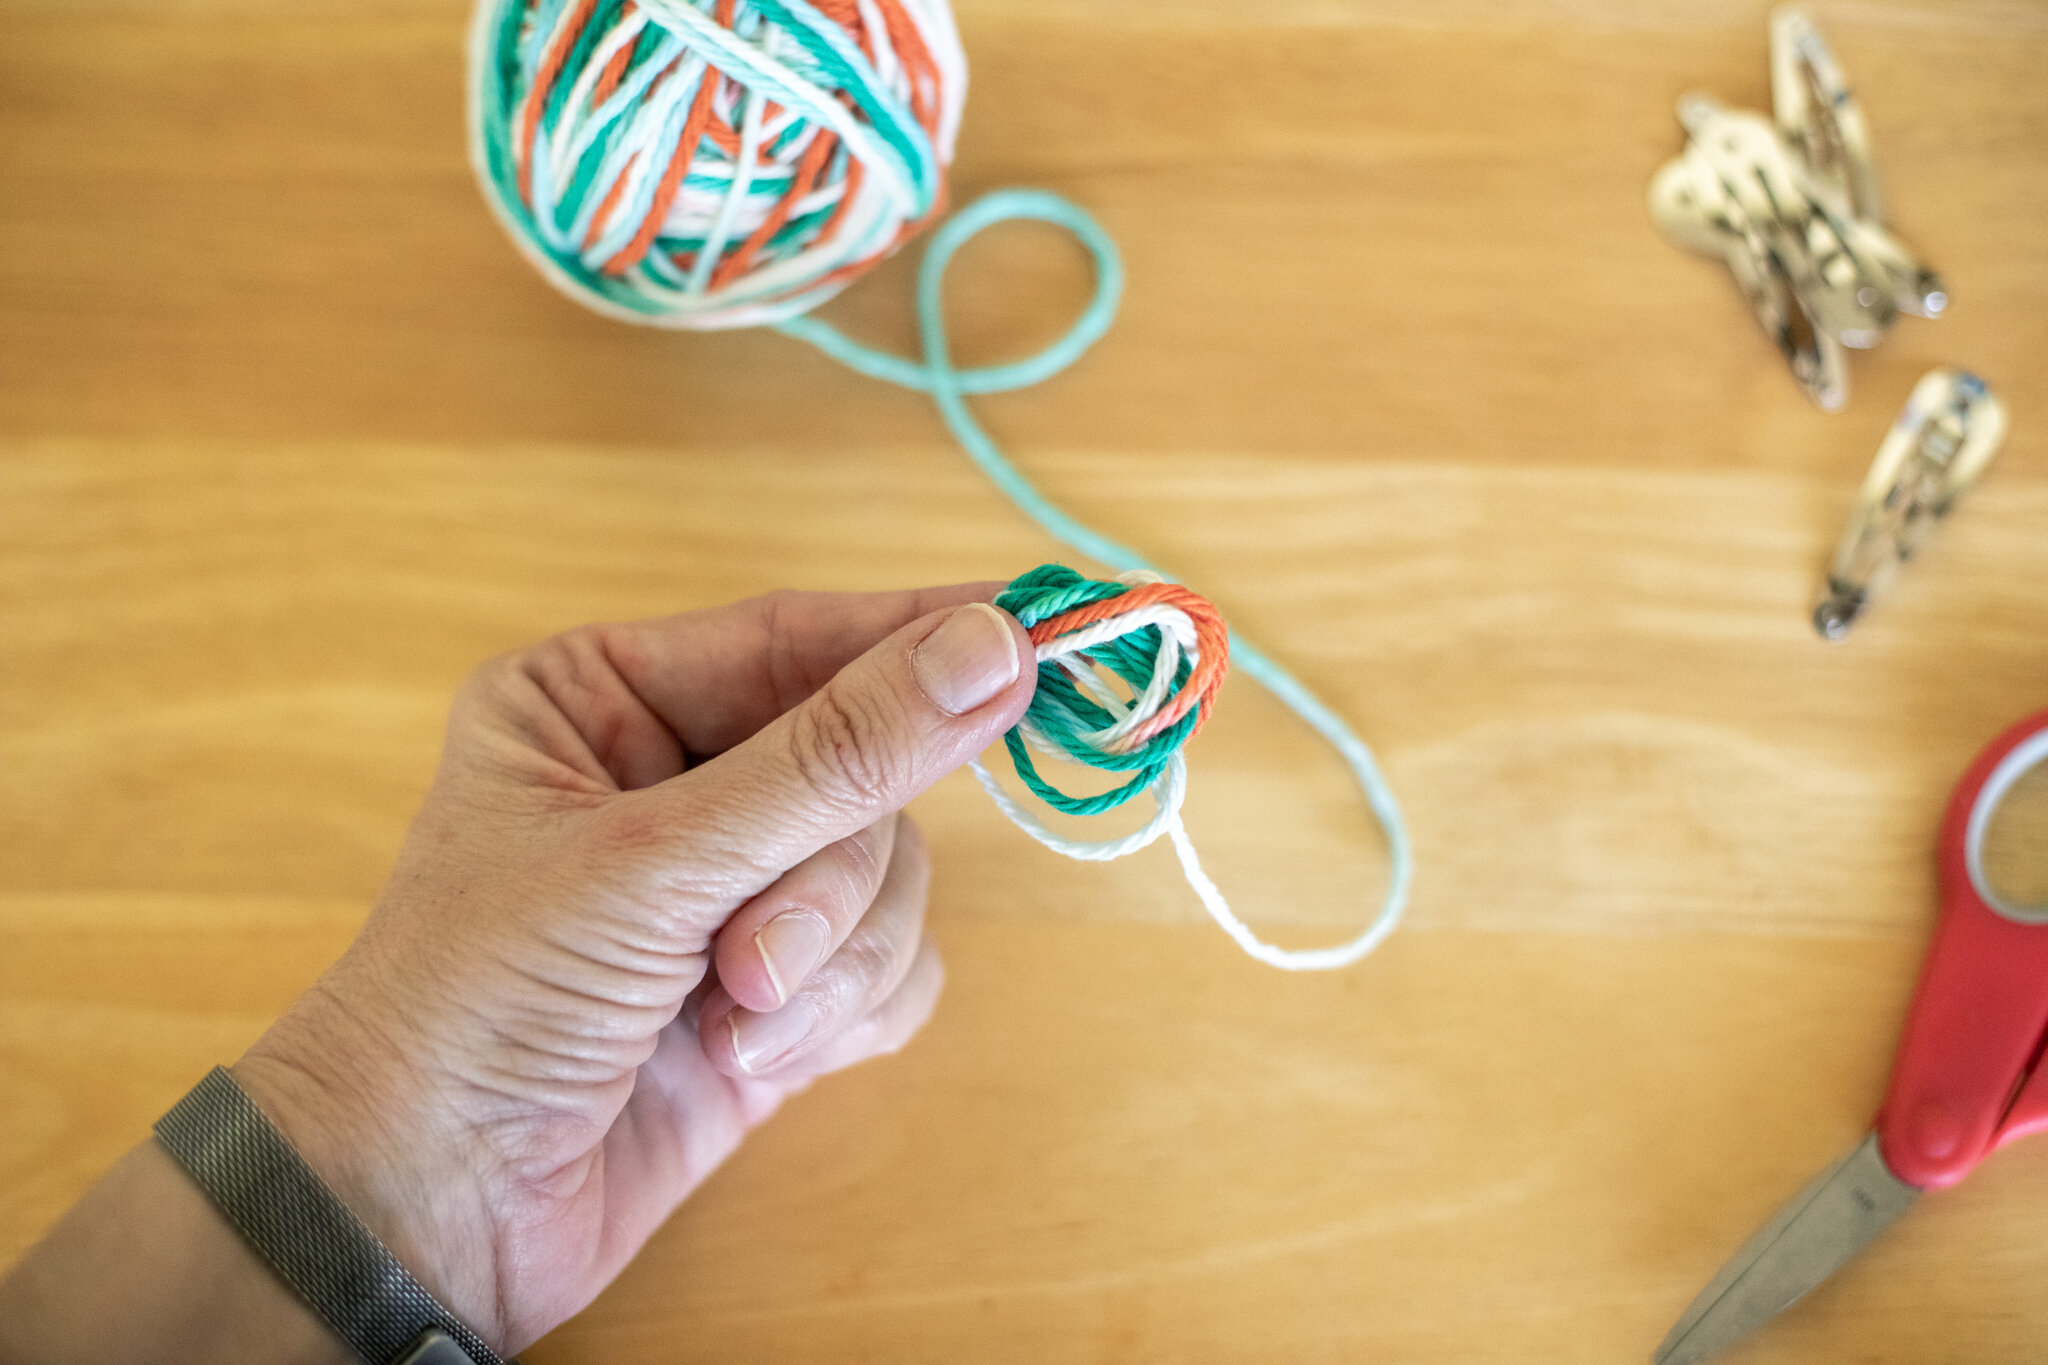
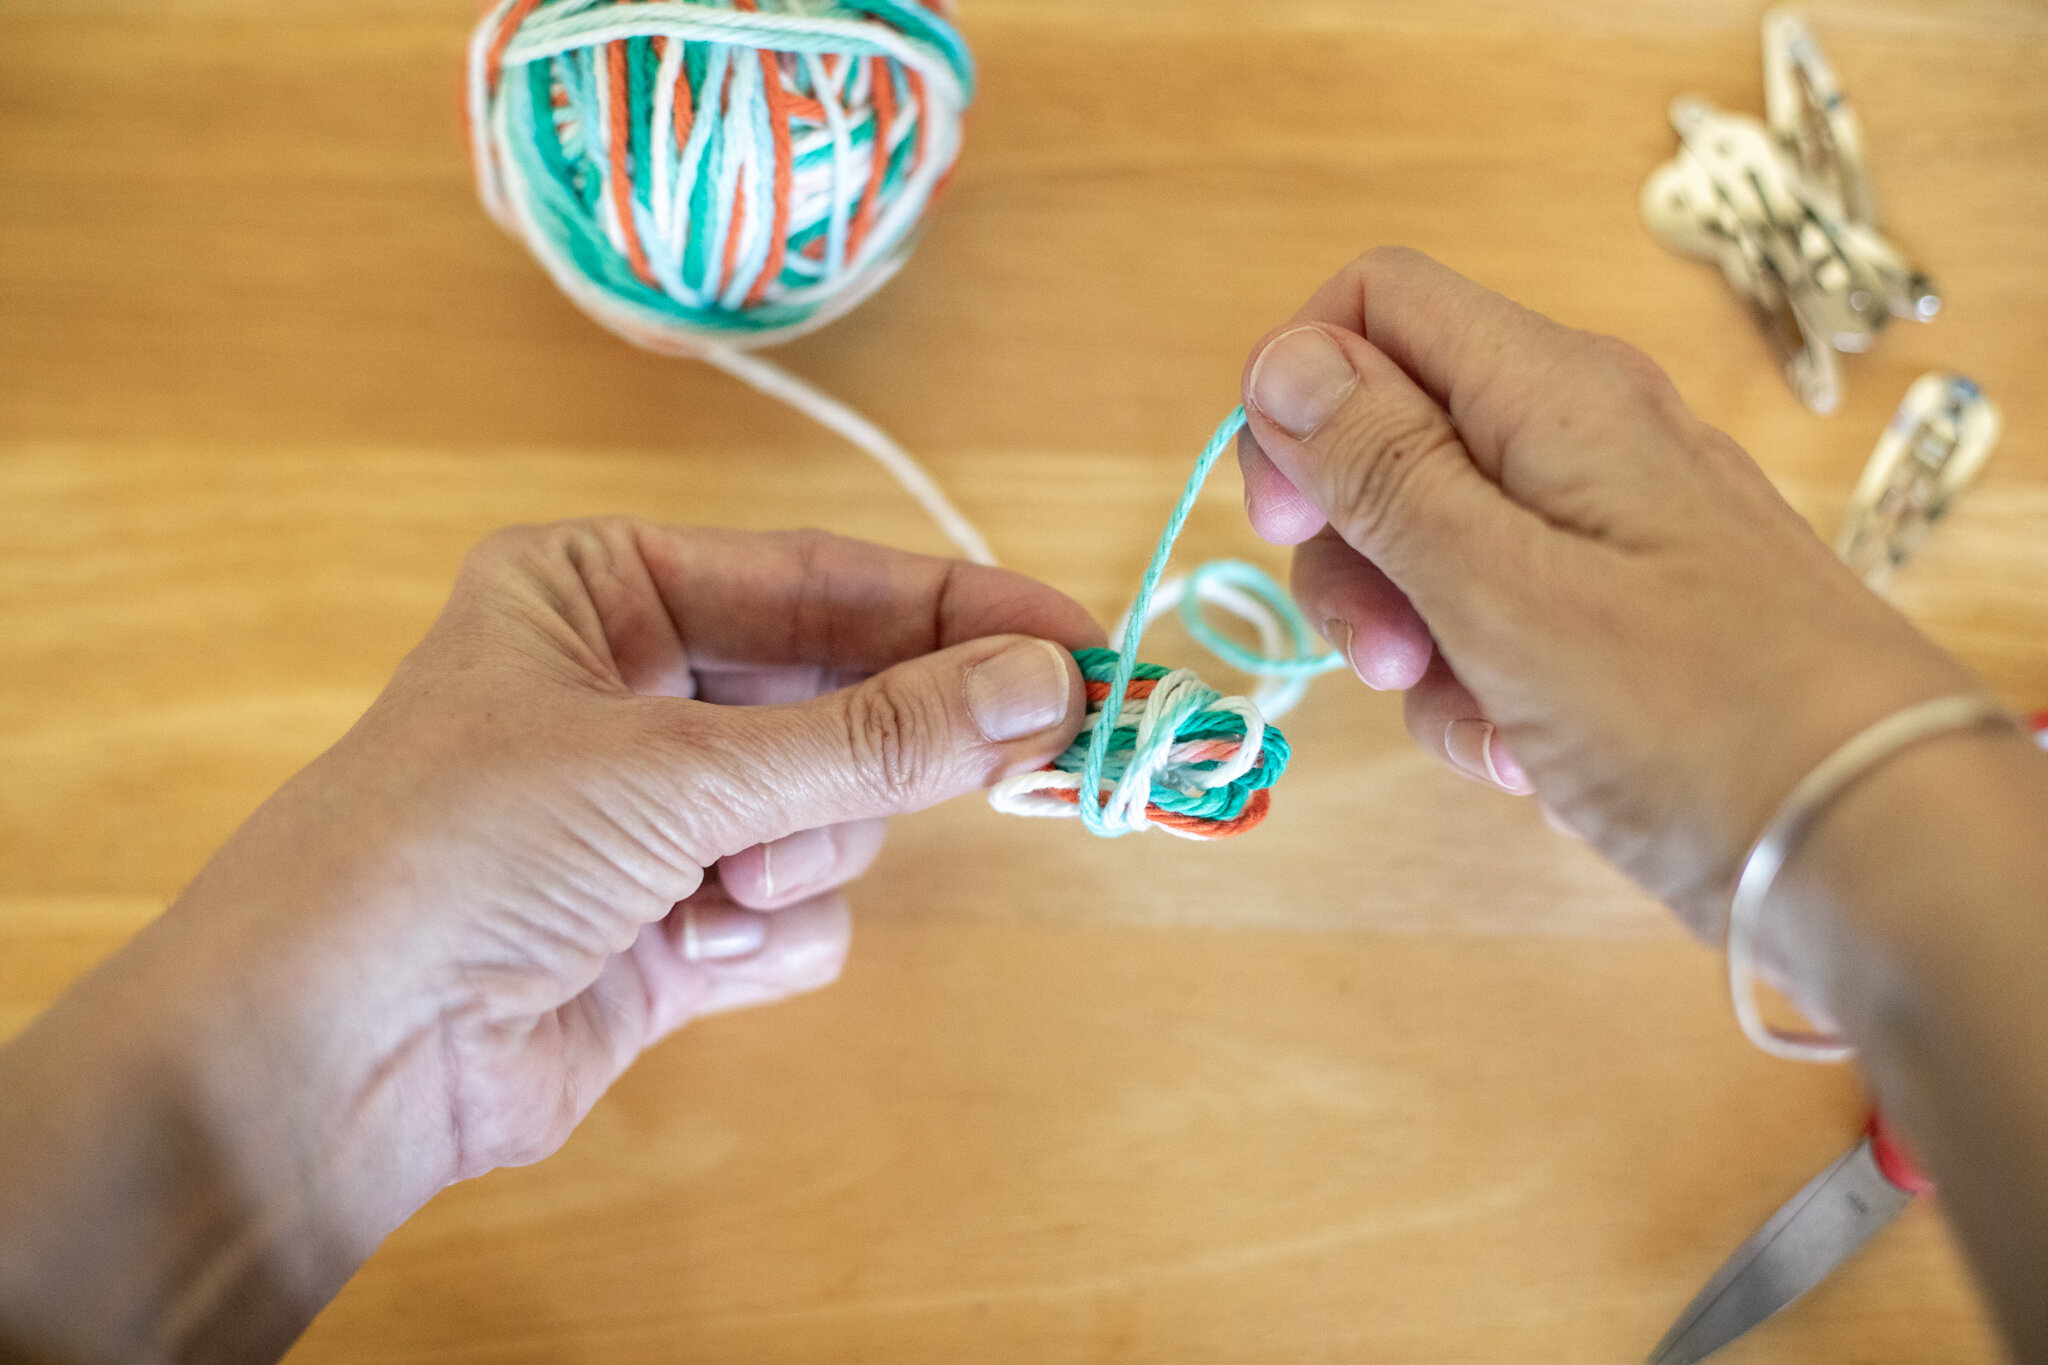
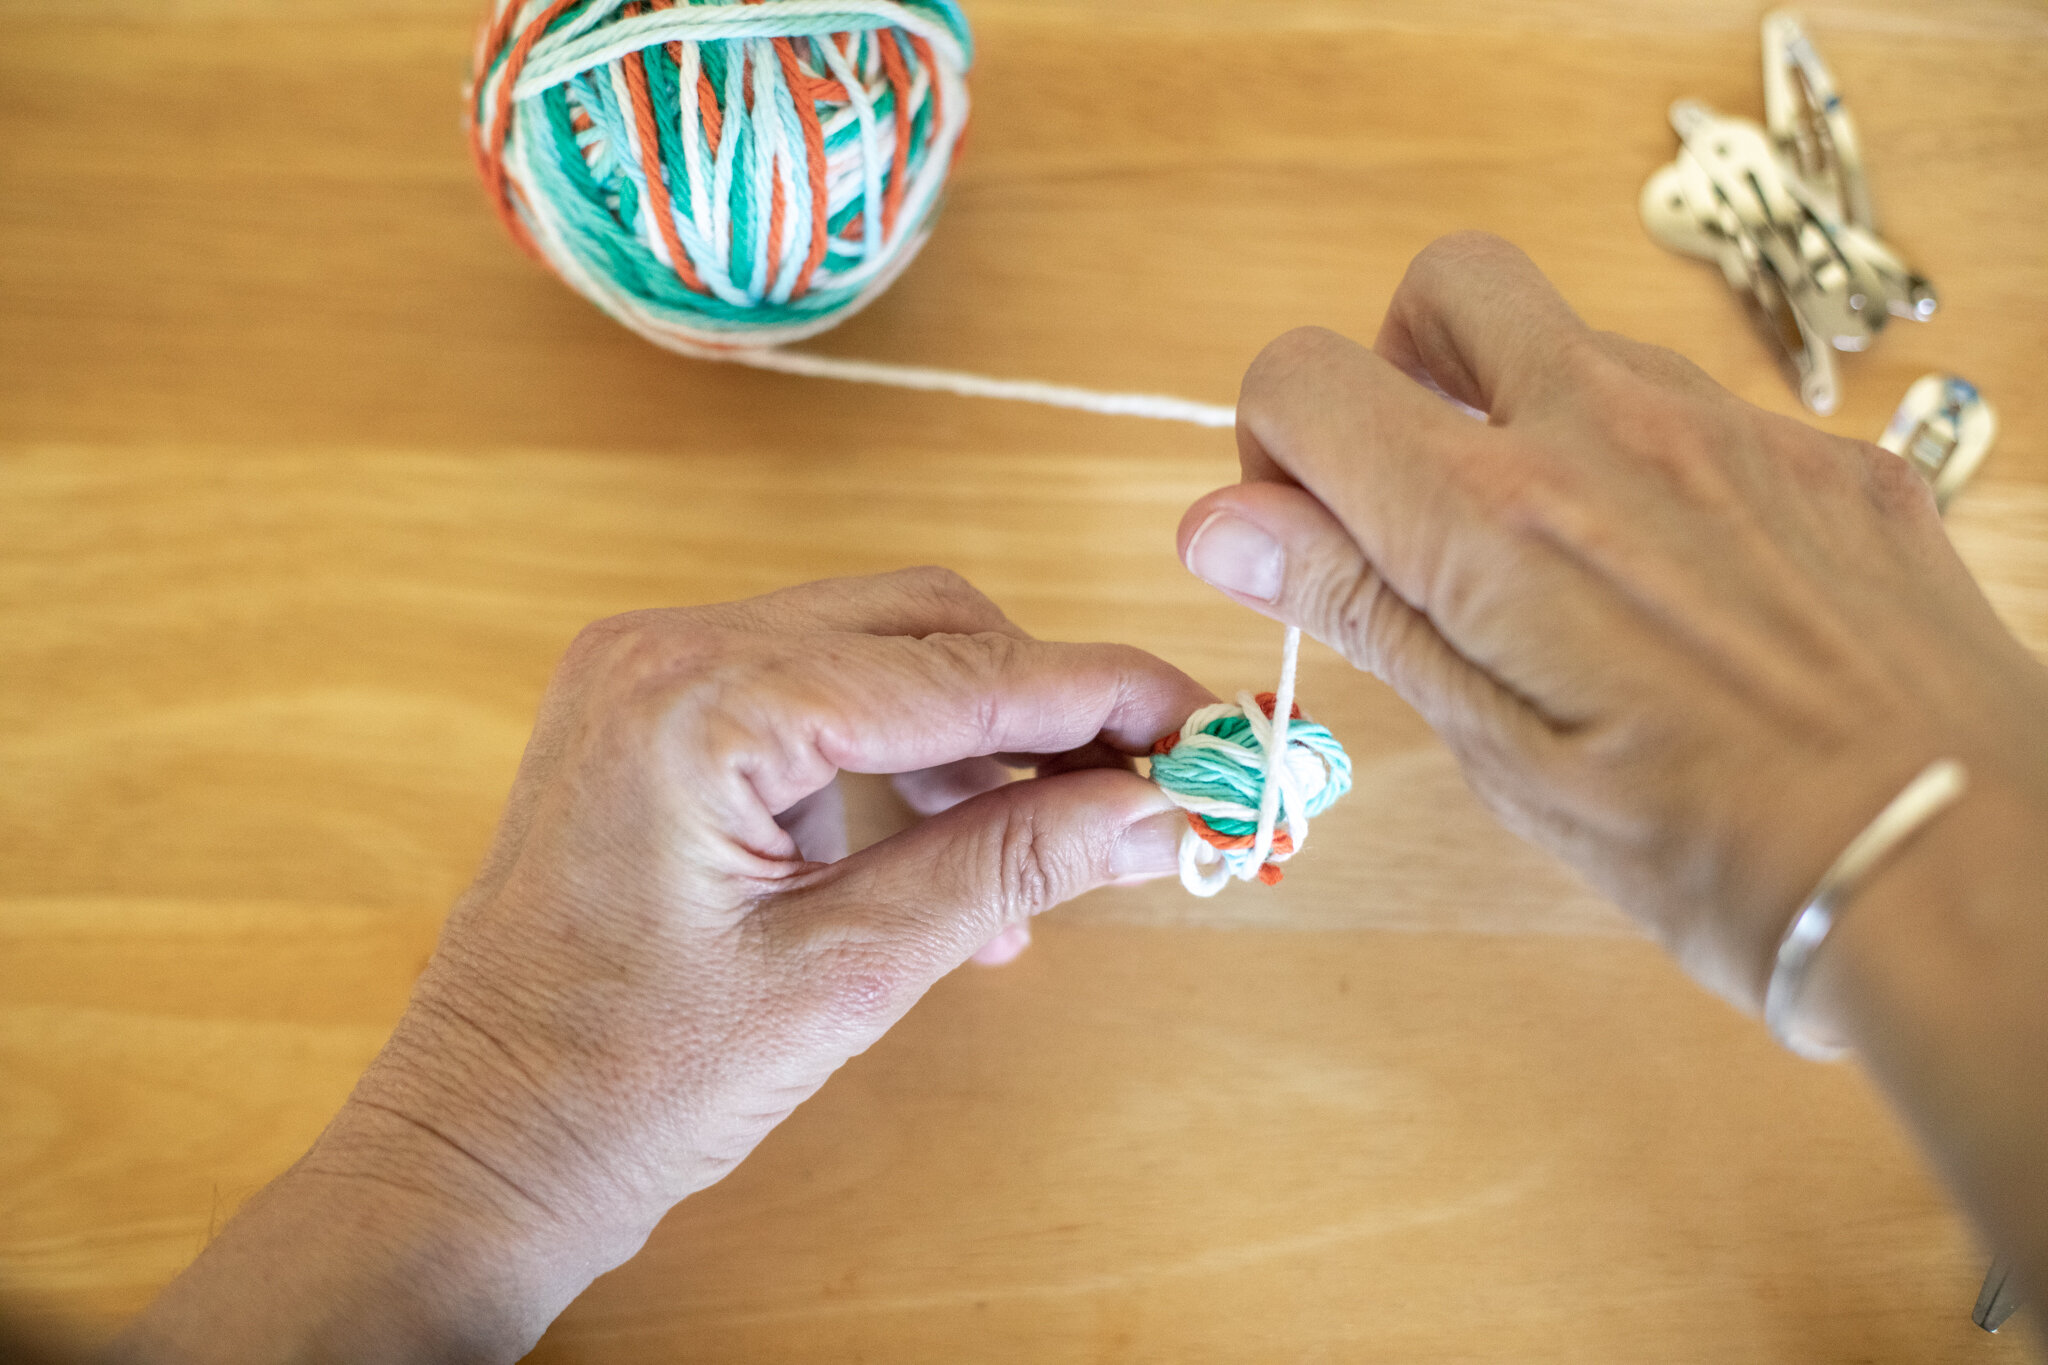

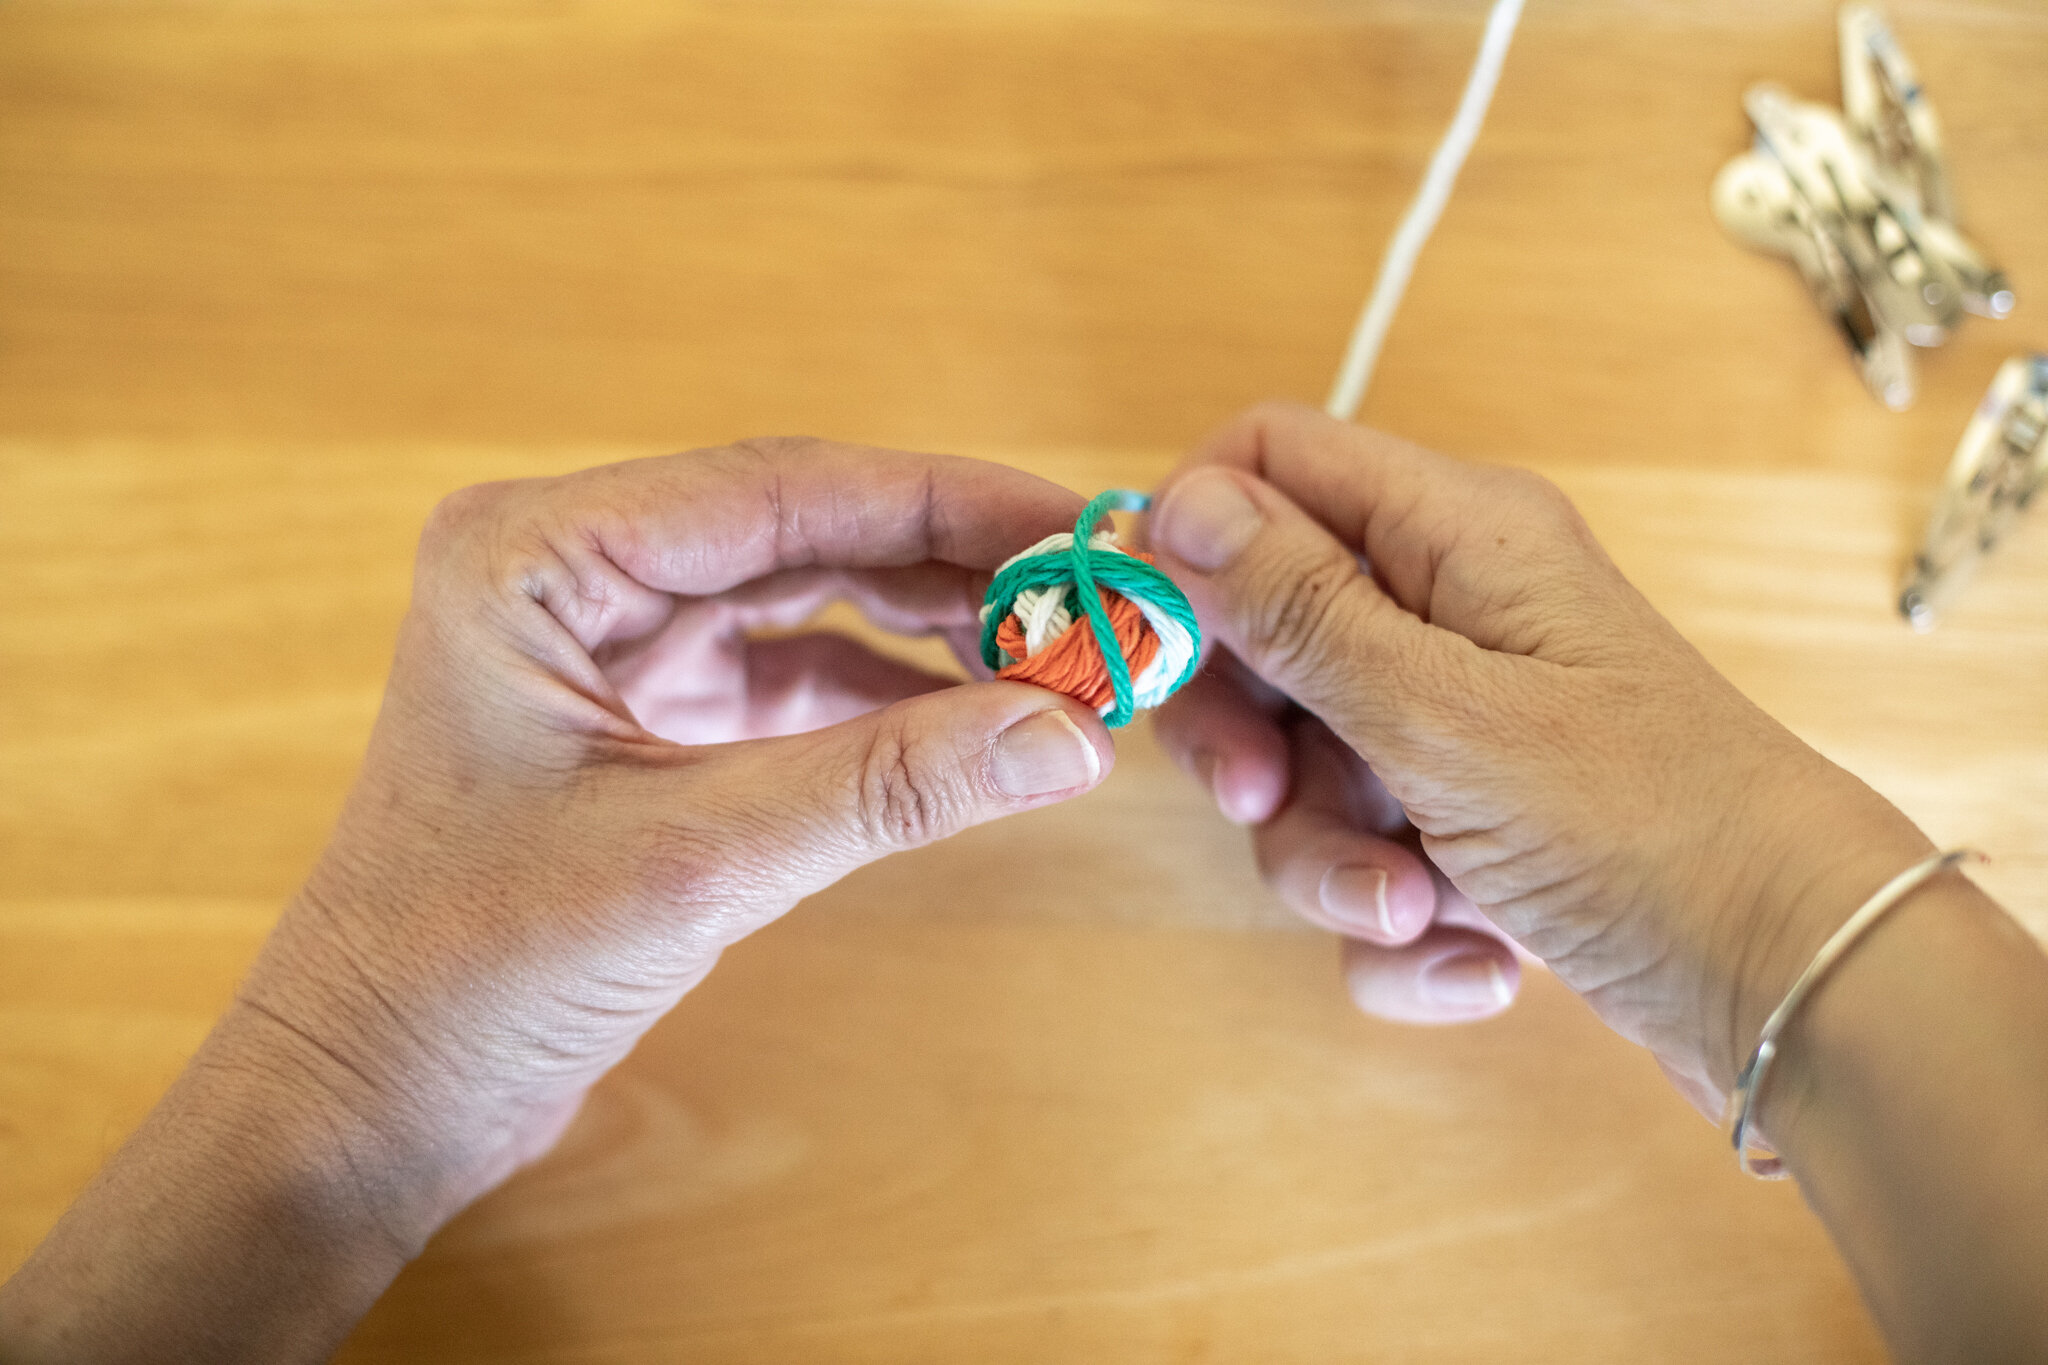
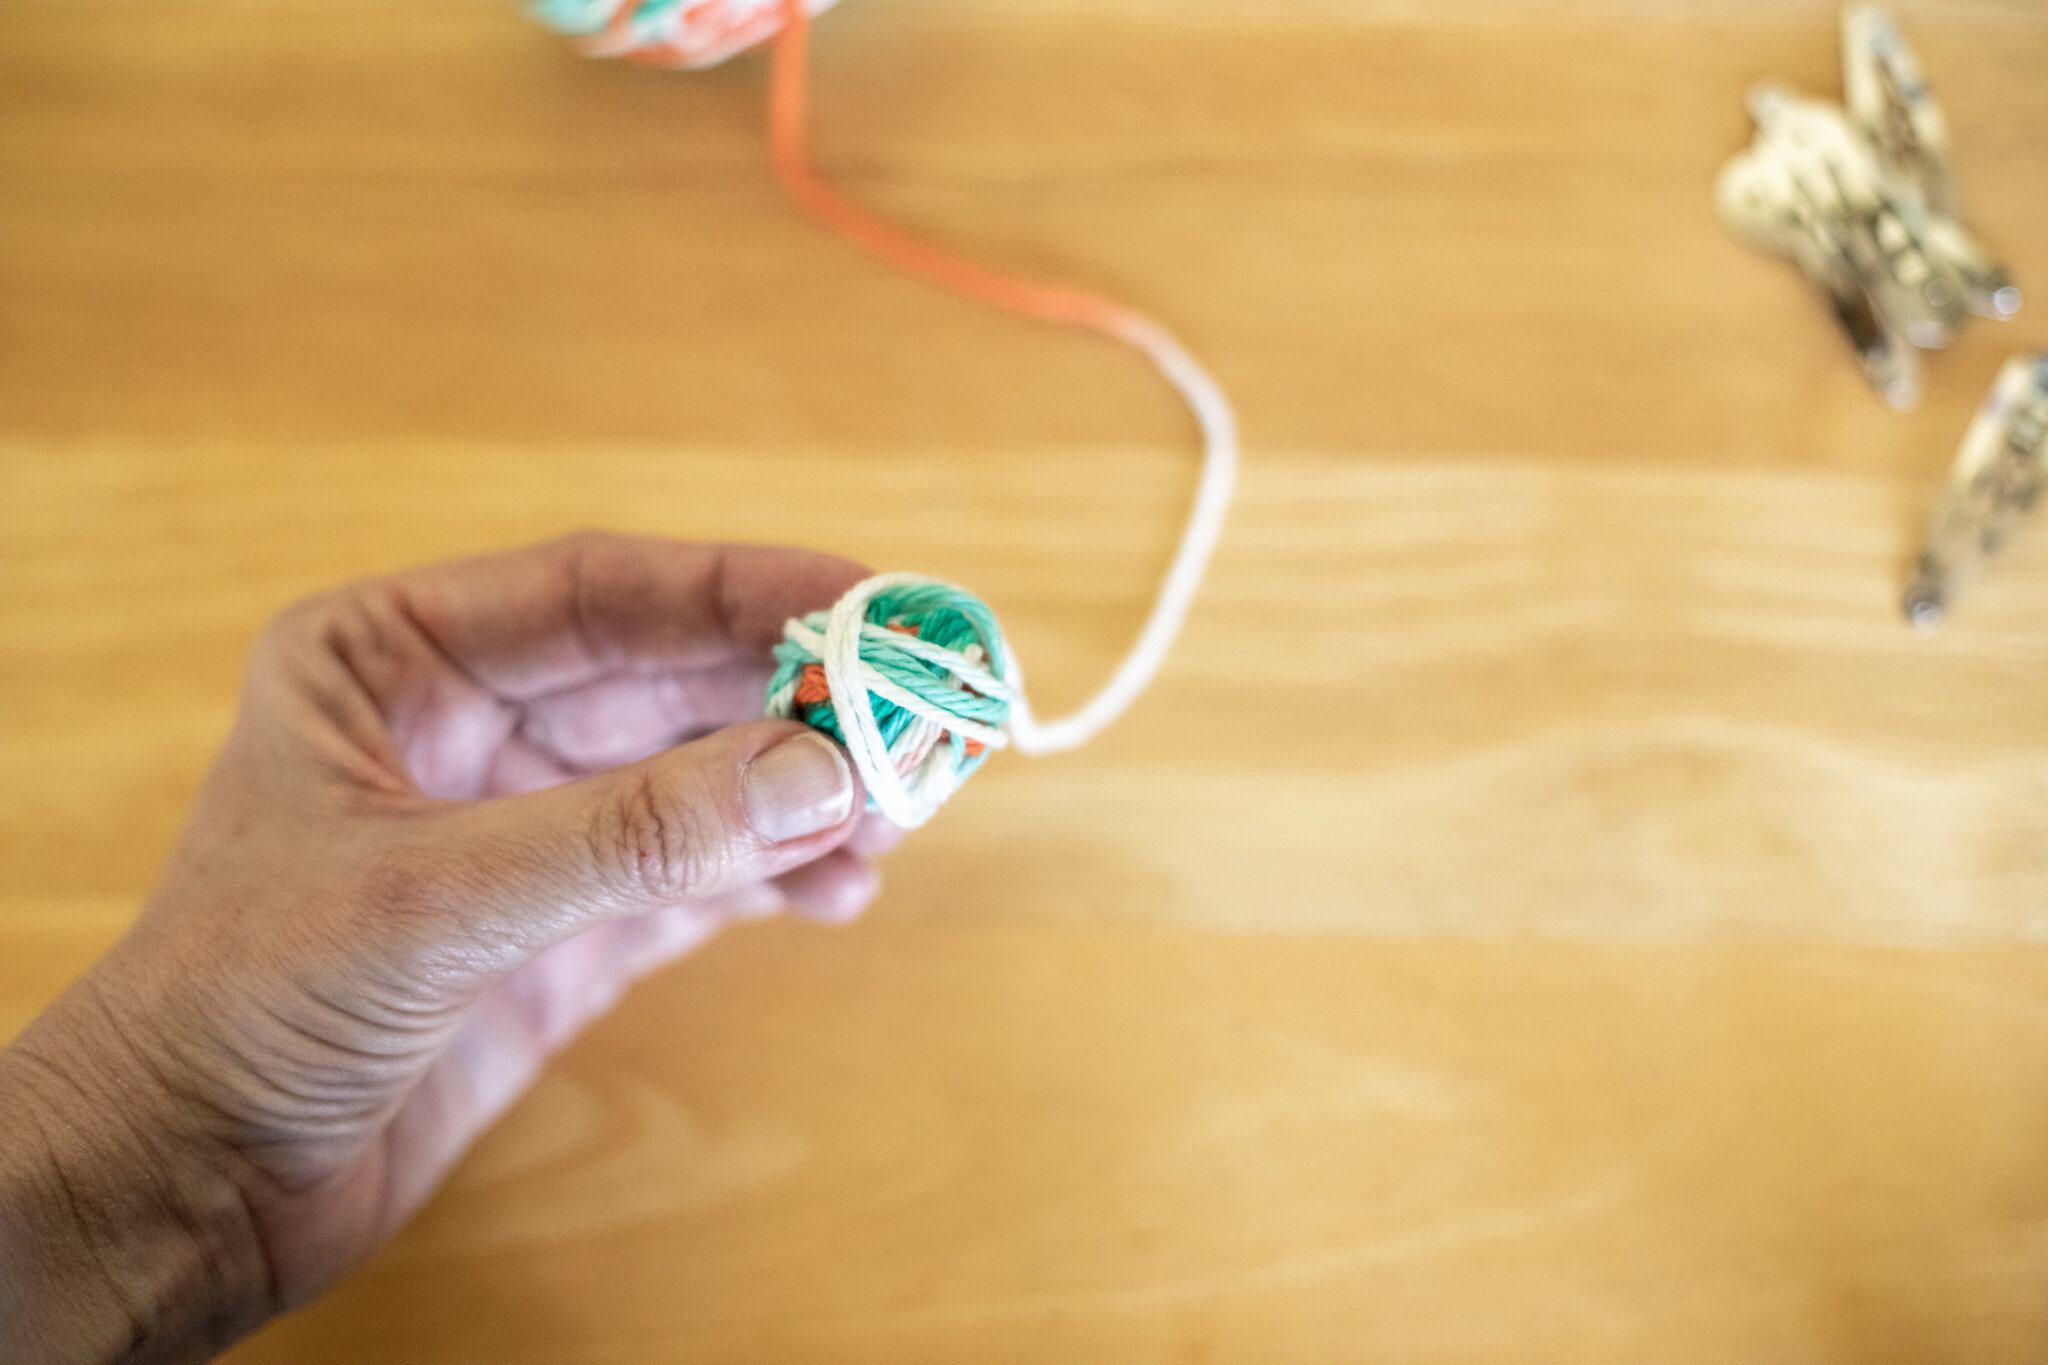

You can choose how big (or small) to make your yarn ball.
Supporting kids: If your child is frustrated with having to control two things at once- pinching a tail while winding yarn, you can always show them how by using your hand for the “glasses”. So you pinch and hold the tail, then hold their hand to guide them with the yarn into going back and forth, back and forth between your finger and thumb. When they have the hang of it, you can let them continue adding loops on your fingers independently. You may notice that they pass the yarn from their one hand to the other as they wind it around your finger and thumb. This is a developmental stage where they need the hand closest to the “action” to be in charge. So reaching across is harder for them than handing the yarn to the other hand. One day it stops because they made the “leap” developmentally, so don’t worry if you wonder how is passing the yarn back and forth between left and right hands possibly efficient.
You can also reverse this teamwork asking the child to pinch the tail between their finger and thumb, then you wind the first few loops so it’s not so easy to pull loose.
You know the children best so do whatever helps them (and you) feel successful. The more that they make, the easier all the steps become. And it’s ok to start over! Crafting is all about adjusting and learning and trying again. Let them practice resilience :)
You can also start the most fiddly beginning part of the ball and hand it off to them when it’s manageable for them.
I also highly recommend practicing on your own before trying to teach children. It’s so hard to be “hmmm, what is happening here?” while a child is eagerly waiting for progress. If you’re comfortable, it’s easier to coach them through the process.
With this said, it is good to model learning a new skill with children, so feel free to dive in together if you want to learn together.
Phew, photograph turotials are more time-intensive than I remembered :). So I’ll make a post soon with the second way to wind a yarn ball.
I enjoyed sharing this idea for creating a tidy collection of yarn that’s easy to share. This process project is a great way to organize. And then you’re ready for the next epic project using your yarn balls!
PS- many children choose making yarn balls over and over and over. They don’t necessarily need more projects :). You could even make little collections of yarn balls to gift a neighbor or family member or send in a care package. They’re fun to make and share. Enjoy 💕
We hope this week finds you healthy and inspired ✨
Click here for the second way to wind yarn balls. Which way is easier for you?

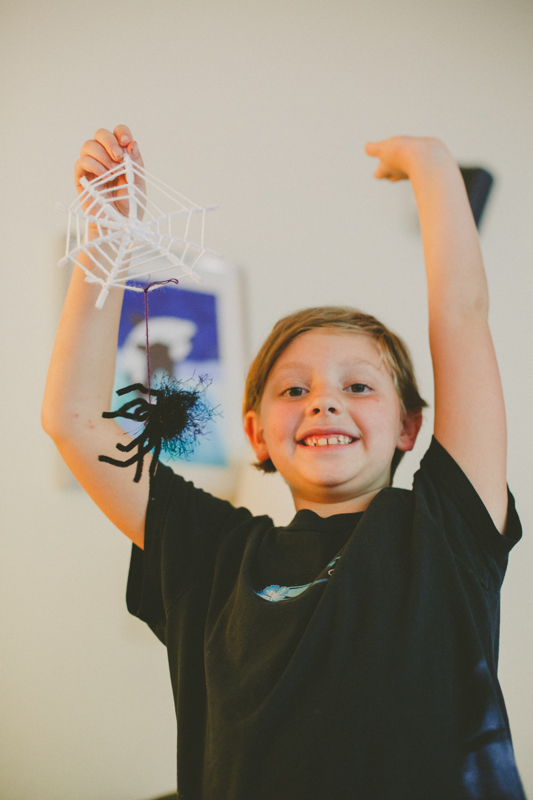
Spiderwebs and Spider Craft
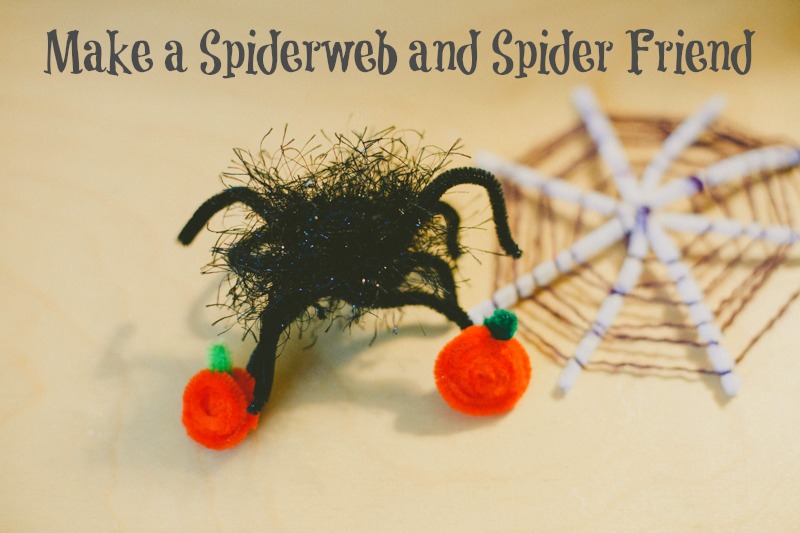
My girl and I love Halloween! As we brought out this year's decorations, she really really wanted to decorate her room. In our family, that means creating new goodies!
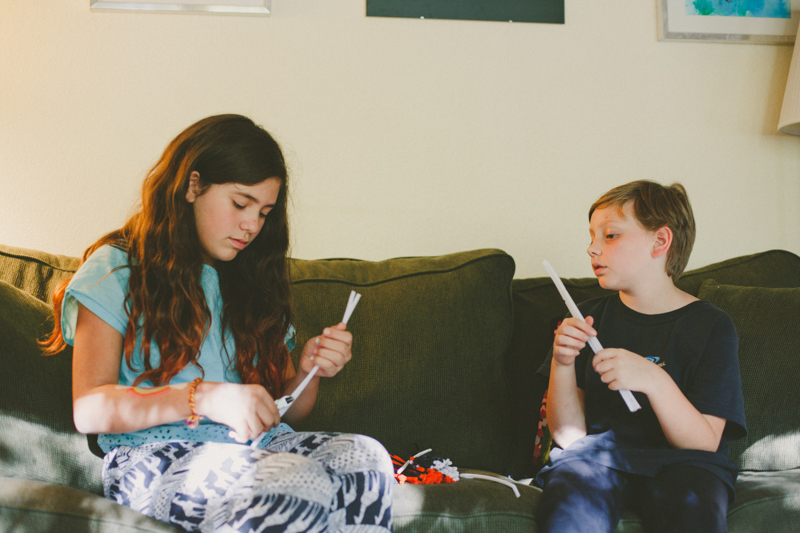
She wanted to create cute spiderwebs and spiders. They're fun, easy, and quick. My niece visited and she had just finished reading Charlotte's Web so this craft especially inspired her. That gave my girl the chance to be Teacher, which is always fun.
Along the way, we learned more techniques for different looks. We hope you enjoy!
Supplies:
- Pipe Cleaners
- Wire Clippers (or scissors if you don't mind possible nicks in the metal when cutting wire)
- Yarn
- Fuzzy Yarn (we used Festive Fur)
The Making:
Clip three pipe cleaners in half so you have six in all. If you don't clip the pipe cleaners, they get weak towards the outer edges of the circle. I've also seen this project made with dowels which lets you make larger spiderwebs. The fuzzy pipe cleaners are easier for the yarn to stick in a spread out design.
Lay them them down and tie a piece of yarn around the middle. Spread them out and start winding the yarn around the center to hold them together.

The yarn can be white or black or purple (or any color). You can tie the pipe cleaners together while they are straight and then fan them out. My daughter insisted on tying them while they were all spread apart, which is trickier but still doable.

Start wrapping the yarn around the pipe cleaners, going around one, then the next one and the next one. Give yourself a little space between each layer as you go around and around the spiderweb. It may take a few passes to get the hang of it, but even spiders must practice making their webs (don't they?).
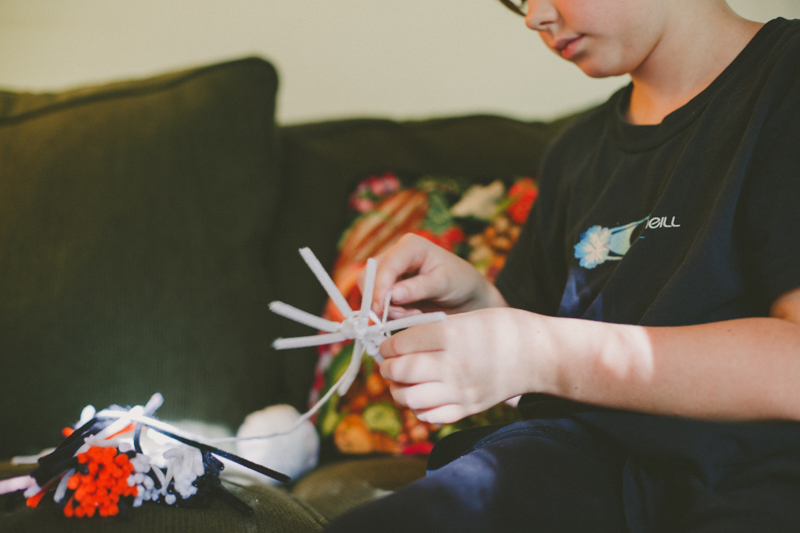

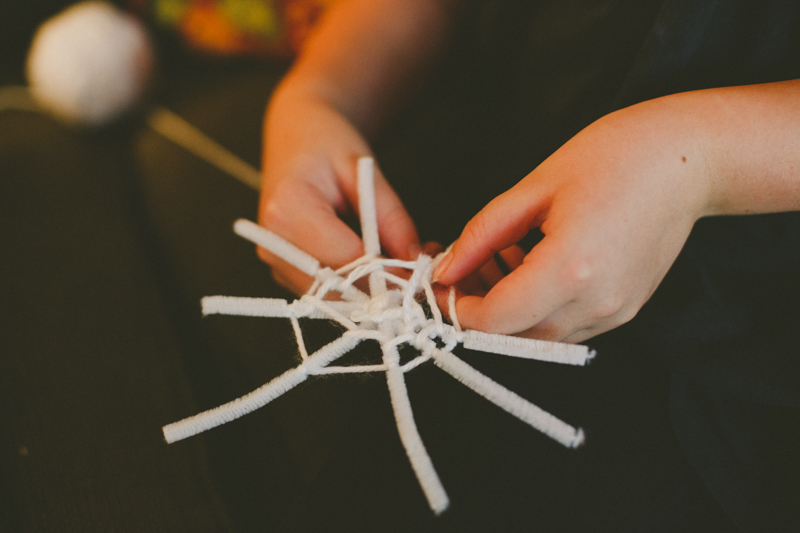
Continue to the outer edge of your spiderweb. Clip the yarn and tie around a pipe cleaner. Leave a little extra that you can use to hang the web.
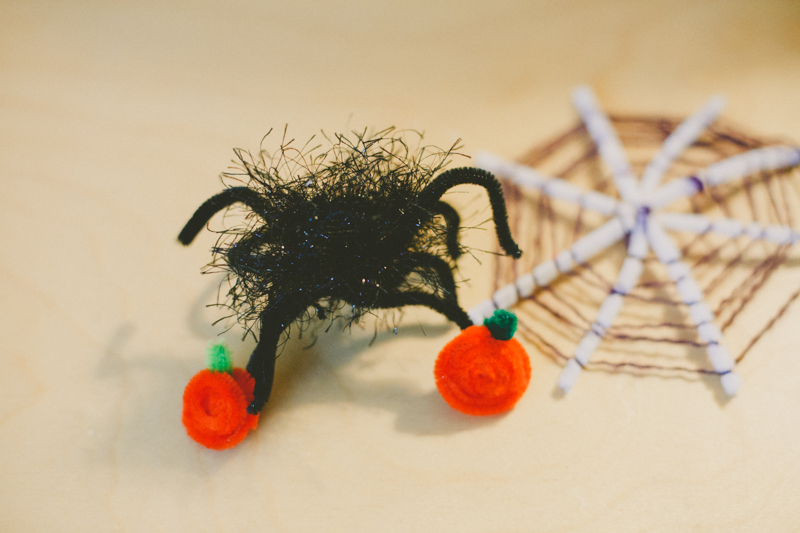
For the spider, clip three pipe cleaners again to make six. The fuzzy yarn is a little tricky for little hands, so I helped with making the first spiders. We tried two ways that both worked.
First, we wrapped the fuzzy yarn around three fingers a few times. We clipped a length of plain purple yarn and tied around the middle. After our little fuzzy ball was secure, we tied it again around the middle of the three pipe cleaners to give our spider six legs.

Spread out the legs and bend to give your spider personality.
This version of the spider was a little flopsy (which was totally fine) except it inspired us to try again.
This time, we wrapped the fuzzy yarn into a ball. To learn how make a yarn ball, you can visit here. Basically, wrap the yarn around a few fingers, take off your fingers, wrap a few times in another direction, and again, and again. Once you get the hang of it, yarn balls are simple and fun.
Once the ball was about the size of a grape, we laid the three pipe cleaner legs across and wound around them too. Now we had six legs. We could fan them out and wrap the yarn between the legs. This technique made the spider more durable.

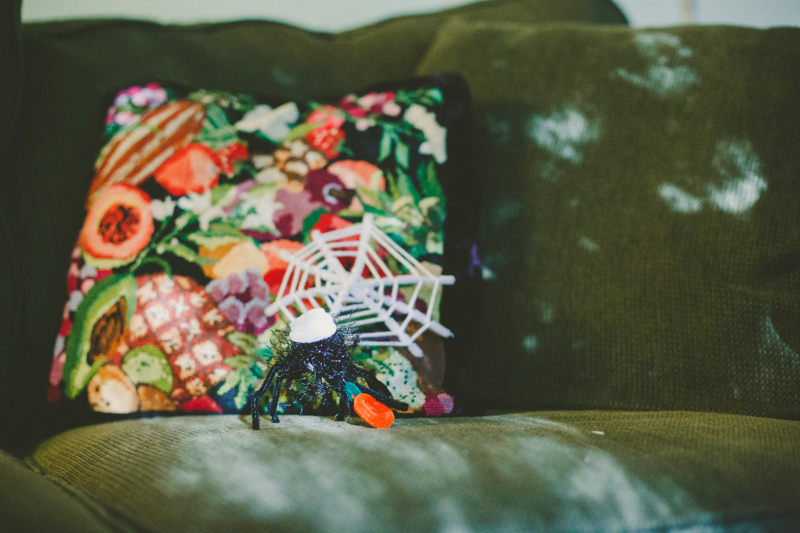
Isn't she cute?
Once our spider was nice size, we tied the yarn around the middle to secure it. The nice thing about fuzzy yarn is that it hides all the knots and loose ends. We tied a strand of plain yarn around it to give a thread/web for hanging.
Hurrah! The excitement kids show when they love their creating gets me every time!
Meanwhile, the girls realized they could spin a piece of orange pipe cleaner in a spiral to make pumpkins! So many pumpkins! A tiny pice of green tucked into the spiral became perfect stems.

What lucky spiders getting decorations of their own!
Then, my favorite part of creating! The kids took off with their own ideas. My niece spiraled a white piece of pipe cleaner into a hat.
And my girl realized white pipe cleaners and white yarn can make an awesome ghost. Little pieces of orange pipe cleaner tucked into the yarn made perfect eyes.

Sometimes, all we need to do is give children the opportunity (and supplies). I am constantly amazed!
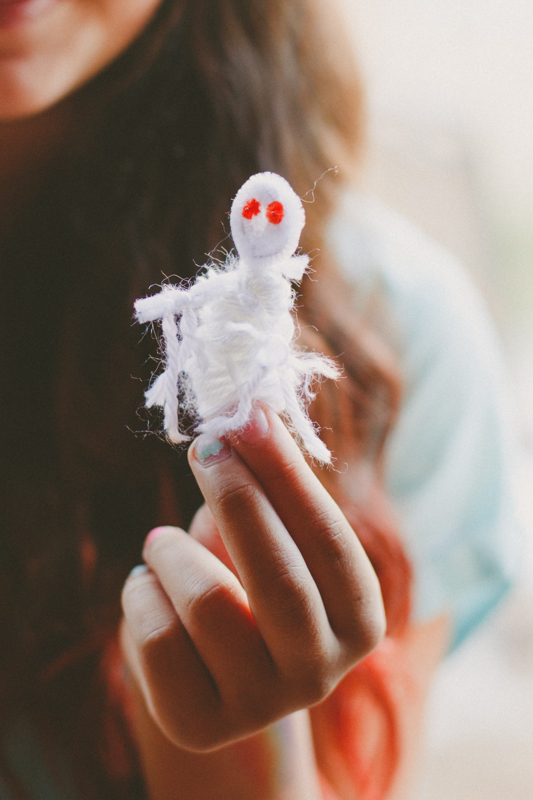
What a darling little ghost!
*I might need to write a tutorial for her ghost because I'm so curious how she made it :)
I hope these inspire your own decorations. A few pipe cleaners and yarn sure gave us a fun afternoon. And now our house is pleasantly spooky!

Magic Wands with Yarn

So simple and so fun for the class today. I collected fallen branches about a foot in length. I brought sandpaper, yarn, and a few beads to class. Students chose the branch that "spoke" to them. They could use sandpaper to smooth rough patches. A few spent ages making their sticks all smooth.
I showed them how to tie a knot around the branch- the short end dives through the loop, wrapping around the long end. I showed them how to hide the short tail by wrapping around it. We discussed layering colors and adding beads. I said they could fingerknit then wrap the knitted chain. They wanted to engage quickly so no one tried that. Another day :)
Their wands went home with them today, all unique and beautiful! Just like the children :)
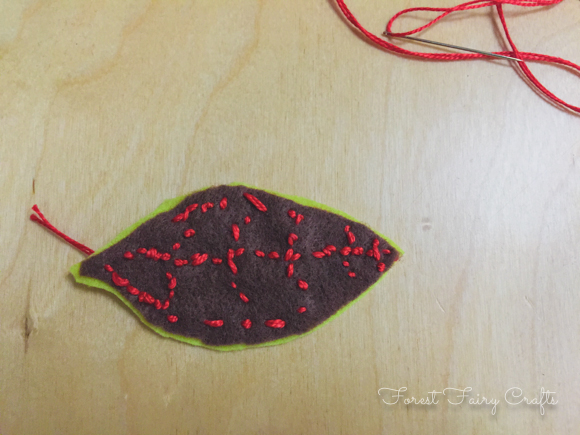
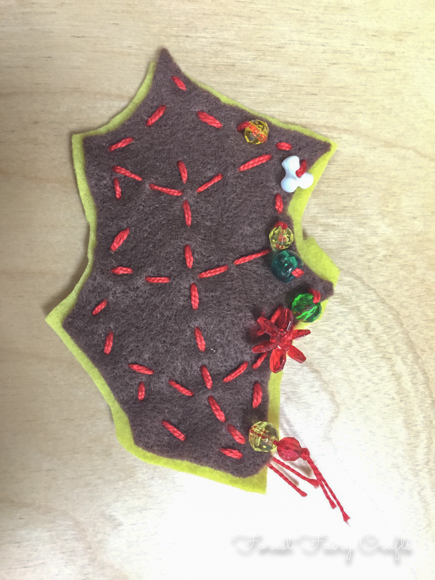
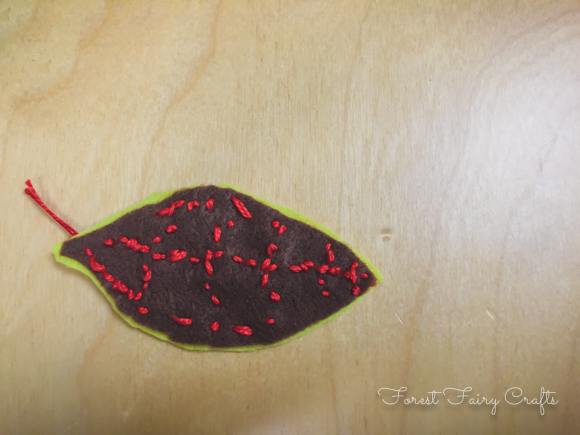
"Leaf" Gratitude
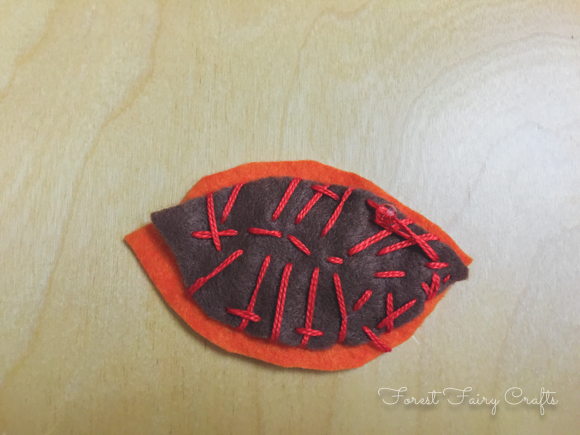
A student named this project. I wanted a way to treasure all the amazing things in our world. We were inspired by the many leaves turning colors and falling this time of year. What if we could sew a leaf where students could collect gratitude inside on slips of paper?
The leaf can become a decoration with a surprise. Students decided they might add gratitudes before Thanksgiving to share on the day. Or they might go around on Thanksgiving and ask everyone to add a gratitude on a little piece of paper to keep inside the leaf. Either way, they discovered these are the perfect way to 'Leaf' a gratitude!
Supplies:
- Two colors of felt
- Scissors, needle, and thread
- Decorations (beads and sequins)
I cut paper with this second/third grade class a lot. I hoped we could make the leap into felt (saving me a ton of prep time). So I brought in rectangles of brown felt. We talked about shapes of leaves and "cutting out" triangles or curves to create a leaf. Students often want to "cut around", twisting the felt and cutting things in half accidentally. We had mixed success. A few needed a second piece of felt, or the leaf was super-small, or not what they expected. We worked through the hiccups.
We talked about decorating one side of the felt. I did show them how to stitch so they could to embroider the veins of the leaves if they wanted. They all looked beautiful in their own way. Students chose the color for the back of the leaf.
At home, I cut the chosen felt bigger than the leaf. I made it roughly similar, but did not meticulously cut the felt to match. This way, if it wiggled, they had room to keep sewing.
For the next class, we talked about sewing up and down (running stitch) and traveling around the edge of the brown leaf like a little caterpillar. "Leave a gap," I said, "So your leaf has a secret compartment for gratitudes." They could add beads and sequins as they travelled around. Each leaf became lovely. We tied loose ends and children promptly planned how they would surprise their family with gratutides in the pocket. A few plan to add it to the Thanksgiving table. A few want to add a loop to hang their leaf. Lots of ideas.
Which is my favorite kind of project. A craft that inspires!
You can see the little gap on this leaf- a space without stiching so you can get inside the leaf.
Hurrah! Wishing you and yours a very thankful season :)

Sweet Gnome Homes
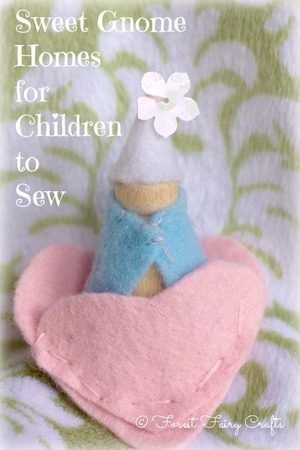
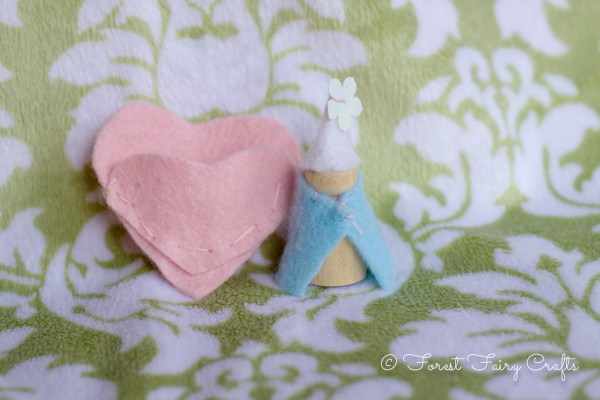
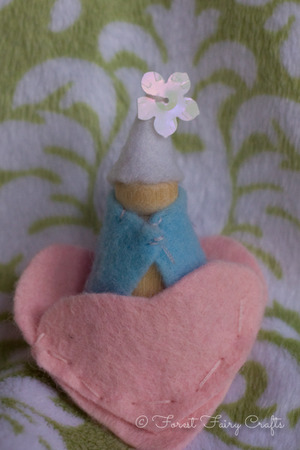
A few years ago, my daughter made me a precious gift. She asked for a few supplies. Felt scraps. A tiny wood gnome.
She made me this treasure. She designed and sewed everything herself. She was seven years old.
She had a lot of practice with needles and thread (her mama is Queen of the Fairy Forest after all (her title for me)). But the design and creating of this little gnome is a perfect beginning sewing project.
All you need is felt scraps, needle, thread, a couple decorations, and a wee gnome. This project allows for a lot of trial and error because the felt pieces are small.
She cut the hearts first. They didn't match. She liked that one was bigger than the other. She trimmed them to fit together (mostly). If your child doesn't know where to start with cutting hearts, your child can make a pattern on a piece of paper. Draw a few sketches and pick your favorite. Cut and trace onto felt. Or fold the felt in half and cut just like folding a paper heart (this is a little trickier for little hands).
She could have decorated the hearts with sequins, buttons, or beads. She didn't feel like making it too fancy. I love the simplicity, myself. She sewed them together with straight stitches.
She didn't use a pattern for the gnome. She cut scraps into shapes that she liked and tried them on the peg doll. She sewed the cape with a few stitches. Then she did the same thing for the hat. She folded it in half and sewed it together. She added a flower sequin to the top.
She had sewn before using lots of the ideas in our Forest Fairy Craft Book. If this had been her first sewing project, I would have sat with her and given support as needed.
What I appreciated about this project was how she was able to plan and test ideas. She found a project- cape and hat, with a little home- where she could try her own patterns. I could have cut the shapes and orgazined the project step by step. But I enjoyed how this gnome gave her a lot of freedom. Yes, I had a pile of teeny-tiny piece of felt at the end. I didn't care.
Visualizing, planning, and creating are all valuable life-skills. A little toy for your efforts is a big bonus!
And it's one of my favorite gifts ever.
Welcome home, little gnome :)

Game Token Gnomes
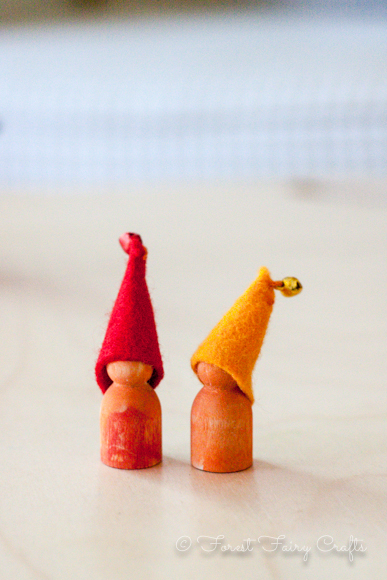
We are delighted to team up with the lovely people at SewMamaSew. The free tutorial for Gnome Game Tokens is posted here.
I love to share a little behind-the-scenes :)
The entire project inspired us! I used to make these games and tokens with my second grade students. We drew a game-board and sewed gnomes to travel through the game. I adore the creativity that children bring to game-making.
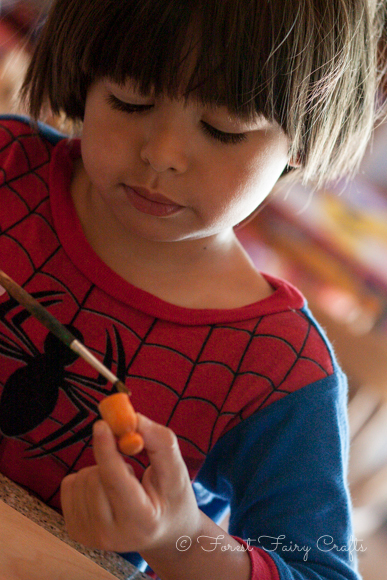
Even younger children love making gnomes. We decided to use paint this time around. It worked really well. We used regular watercolor paints. Ian chose the wee size gnomes. Of course he chose orange, orange, orange.
Anika is a unicorn-and-rainbow-girl these days, so her game featured a forest and garden where the unicorns could play. We drew the boards, then decided paint would be great, too. This project kept us busy for awhile :)
Our neighbor-friend came over and made a couple of gnomes, too. Here is the finished family! Our paint had a tinge of sparkle in the watercolor which gives them a shine. You could add a little glue and glitter after the paint dries for a similar effect.
We had to talk Ian into one red hat. He wanted orange, orange, orange, until we explained that we needed to tell the gnomes apart.
The gnomes ended up traveling on a few trips with us. I didn't worry about losing them since the process was so fun and we can easily make more. Every once in awhile, a craft becomes a treasure and I don't want it to be lost at the park or on a far-flung adventure. These were perfect pocket-pals.
Afterwards, Anika decided that her game needed cards with specific instructions. Their games kept growing as they thought of new fun additions. We used dice from another game box. The finished activitiy was just as fun as creating the games. We are all inspired to create new ones :)
We hope that everyone enjoys the tutorial! Thanks again to SewMamaSew for the opportunity! What fun :)

A Month of Gratitude
The mind is everything. What you think, you become. ~Buddha
With this in mind, I hope to catch a month of gratitude, a little one each day.
We are trying this experiment in the Dragonfly class. I asked them what they appreciate in the world and I chose a theme to write as a sentence on a large piece of paper. I drew a border with a block crayon and a student helped me illustrate.
As with everything, sustaining the effort is the hard part. So I hope I can keep the momentum going!
Today they were grateful for birthdays!
I want to honor their childhood vision. Even though I wanted to steer them towards lovely, poetic appreciation, I also want to catch their world today. I love the beautiful, the quirky, and the silliness of the world through their eyes.
I built a foundation for this activity with our weekly Gratitude Circles. Every Friday we turn off the lights and turn on a battery-operated candle. We sit in a circle. We pass the candle around. Each student shares at least one thing in the week that she or he appreciates. At first, the circle is a stretch for some children. These days, the ideas are easier. Mom, Dad, my school, my friends. We have so much to be grateful for! I cannot wait to see what the month discovers!
I will try for a short daily post, but we may have summaries depending how the week goes :). Happy season of thanks! For me, I am thankful for my children's school (where I teach). Spending time with my boy yesterday, watching the littles with their Big Buddy Class (seventh grade) was a huge inspiration. So much sweetness!

My boy is Batman playing tag. The big kids were so fun and happy with the littles. Makes a Mama's heart happy and a teacher's heart proud :)
Also as a side note, I had to share this project from Ian's class. His teacher is amazing. She made these laterns with the students. The day before, they taped the jars with masking tape and painted them orange. On Halloween, the children drew Jack-O-Lantern faces. The teachers used an exacto knife to cut the shapes. So pretty! I am going to keep ours out for another few weeks :)
Pirate Week Adventures
This year I focus on a mini-theme each week in the Dragonfly Class. We are a kindergarten/first grade class. Our activities become a rotation during Groups or a whole class writing adventure. Activities need to be very flexible for many different skills. And my goal is high interest opportunities for learning. I want them to take these activities home and add to their ideas.
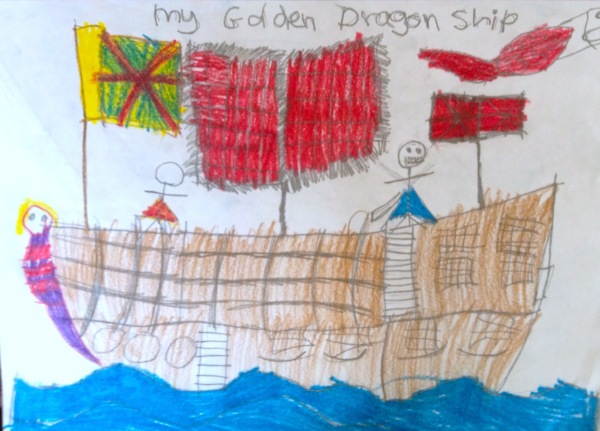
My hope is to have photos to share, but that didn't happen for Pirate Week. Too busy :) ... Wait, I have their ship drawings to assemble the Pirate Fleet Book. I took two photos to add, hurrah.
I still want to write our activities to capture them for the future, because I know I will sit down next year and think, "Now, what did I do last year?"
Pirate Maps: I cut brown paper bigger than usual so they could roll their maps. These turned into spyglasses very quickly. We marked the treasure and drew a path to find the treasure along with landmarks. Children loved these outside at recess.
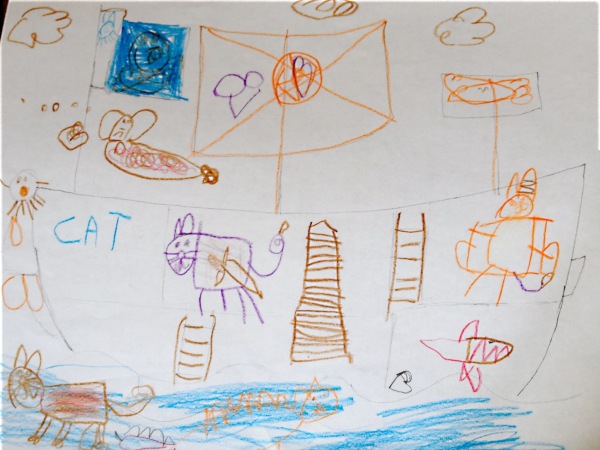
Pirate Fleet: I drew a pencil sketch of a pirate boat very simply and made a copy for each child. We discussed how pirates lived on boats and had to bring everything along with them. Each child then got to design their own fantasy ship. I drew with a cut-away design so they could show me the Captain's Quarters and add a hot tub if they liked. Some chose to color the outside of the ship, which was fine too. We had Kitten Ships and Ninja Ships and Mermaid Ships. Children became very creative and excited about the adventures these ships would find. Which led to....
Pirate Fleet Stories: I met with each child so they could tell me the story of their pirate boat. We had danger, beauty, and adventure on the high seas!
Pirate Flash Fiction: This was an idea that I had for groups for a shared writing project. What is each student wrote (or dictated) one sentence to their parent helper at group-time. At the end, we would read the sentences for a story about the Dragonfly Pirates. We had a lot of treasure-hiding and treasure-seeking and battles with Kraken. The children loved hearing their separate pieces come together to make a whole story.
Bonus topics during our two days (yes we did this is two days since I teach part time) included discovering the world, monsters of the deep (giant squid), and pirate discipline. Pirate captains gave time-outs too! Except they tied someone to the mast for awhile. We didn't go into great detail about pirate discipline, but the children found boat-life fascinating. I became the pirate captain and they all called, "Aye, aye, captain!" when I gave a direction like, "Wash hands for lunch."
Oh, and we talked about pirate flags and communicating on the high seas. Cell phones didn't exist in pirate-times so they needed to announce their arrival in a scary way. Children were fascinated by the idea of using images to communicate. They enjoyed designing their own flag on their pirate ship for the pirate fleet. I could make this a separate activity and even use fabric to create flags.... Another year :)
I also had the idea to develop a pirate persona with a chosen name, outfit, and companion (pet). This could connect to the pirate boats. So many ideas! And the children loved it because the idea of sailing the high seas searching for gold is always an adventure! Not to mention, sprinkling a few arghs! and avasts! into everyday sentences is great fun!
A pirates' life for us :). I am glad I remembered to write everything down.So this was a lot longer than I expected. We packed a lot of pirate fun into our days! I hope you get to enjoy life's treasures today!

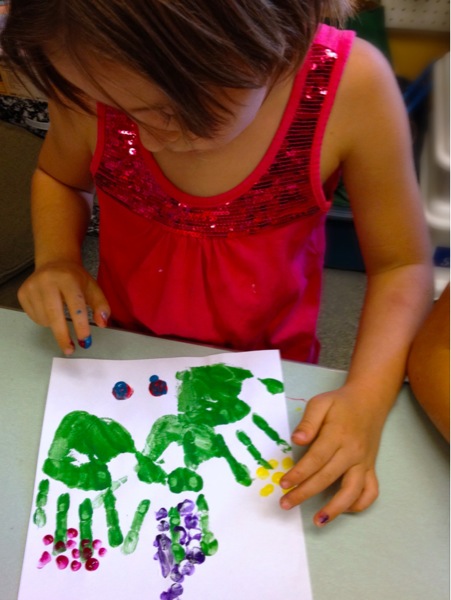
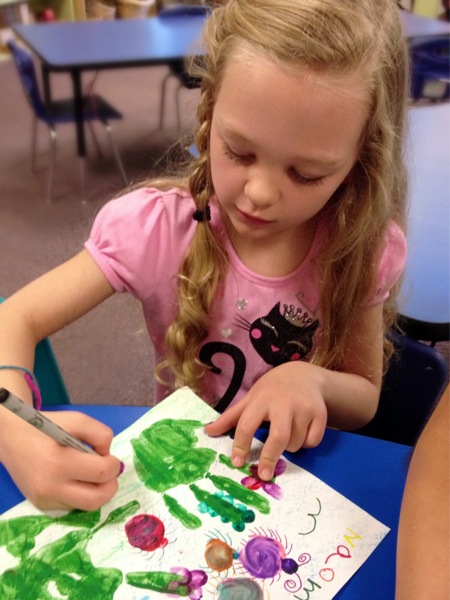
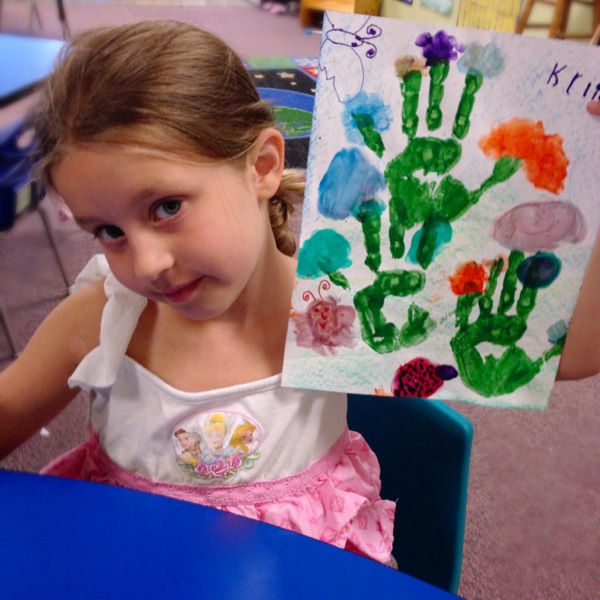
Handprint Gardens
Children loved creating these gardens. A few steps steps led to wild, wonderful gardens. We are using them for Grandparents Day cards, but they would be lovely any time of year. In fact, for winter, we might make trees with fingerprint snow and bright birds. One idea leads to another :)
Step one: make handprints with green tempera paint (or acrylic, if you a brave). We made three prints of the same hand because I was working with an entire class and they needed a clean hand to turn on the faucet. At home, you could print both hands. Let the handprints dry.
Aside: I later realized we should use a color for the background- perhaps and layer of green over blue for ground and sky. Since we printed onto white paper, I used beeswax crayons to lightly shade ground and sky. The first graders painted their petals, bugs, and clouds before I shaded- both ways worked. A few children shaded their own. I had to watch that the colors wouldn't get too thick and cover their handprints. Next time, I will have them shade grass and sky first.
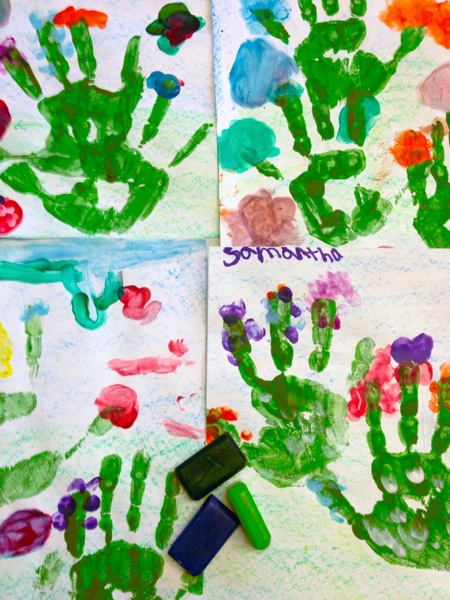
Step two: Add petals, leaves, and clouds. Use fingers! They loved dreaming up ways to create butterflies and different flowers like lupins. we did not use water to switch colors. Instead, we wiped our fingers clean with a paper towel. This kept the paint from getting drippy. I did supervise so they didn't start smearing too many colors together, or covering up their handprints with heavy petals. Let your colors dry.
Step three: Use markers to add embellishments. Add butterfly details, ladybug legs, and spiders.
I told them that they could only color small areas- a few wanted to cover the paper with marker. I also told them to stop when the details started to overwhelm the painting. An art of childhood creativity is learning when to say Done. For personal projects that reflect their inner vision, I let them go until they say done. But every once in awhile, I say done.
A lovely moment within their gardens were the stories they shared while they drew. In my home, I would scribe their stories to go along with the illustrations. Spiderwebs and ladybug tea parties and rainbow butterflies. Beautiful!
We are gluing the gardens on colored paper-mats and writing I love you on the other side. Another adorable addition that everyone appreciates is a few open-ended prompts, like I love when my grandparents _______ and I hope they take me to the __________ and My grandparents are good at ________.
My favorite art catches personality and the moment. My favorite art is shared with proud smiles. These gardens grow wild and wonderful.
I hope you have fun painting them!
 "Pin It")
Hearts for Sweet Beginnings

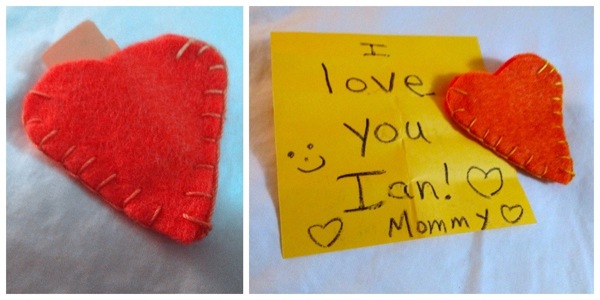
A rainbow of hearts to start the school year. The hearts were pleasantly quick and fun to sew. I used multicolor rainbow crochet thread so the colors wove through the hearts one after another.
My boy adores orange, so I made him one in his favorite color. He had his first day of transitional kindergarten today. So I tucked a little note inside the heart and placed it in his lunchbox. I couldn't be with him because I taught my own class of students. But I felt closer to him, knowing that he had a little craft to discover in his lunchbox.
For my students, I am creating a story. Our class mascot is a small dragon. I imagine that our dragon doesn't collect gold and jewels like most dragons. No, our dragon, Sparky, collects the most valuable treasures of all. Sparky collects the treasures that cannot be bought with all of the gold in the world. Sparky collects love. And kindness. And joy. And friendship. He saves these emotions in magical glass pebbles that protect the feelings inside.
We also call these pebbles Dragon-Tears, but I don't think that will make sense within the happy story. The pebbles are not Dragon-Tears, they are dragon treasures. The pebbles fit inside the little hearts perfectly. Each student can hold one through the day. For now, we plan to keep them in a basket and put the students' names inside on a watercolored slip of paper. I am sure that students will get attached to their heart and memorize whether they have red, orange, green, blue, or purple.
Perhaps Sparky knows that our students can trusted to care for Love and Friendship and Peace. And by caring for these hearts, the emotions will be nurtured in our class community as well.
A sweet way to bring those gifts into our school year. I am excited to share them with my students. Begin well, travel in joy, learn along the way. Sounds lovely. Rainbow heart lovely.
Sending inspiration your way. I wish you many precious treasures today. :)
Intentions
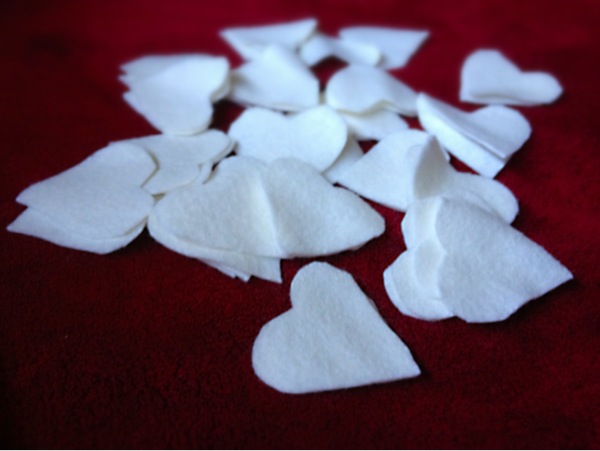
August is a whole new year. Perhaps not on the calendar, but for many children, a year begins in August. I feel the energy gather as a teacher and a mom. New stories. Blank pages. New teachers and friends.
In my teaching program years ago, we learned about Self Fulfilling Prophecy. Two teachers were told two stories about their incoming classes. One heard she was getting a bright, kind, fabulous class. And the other heard he was getting a mischievous, difficult, unruly class. The classes, in reality, were randomly assigned. A few months later, the teachers were asked to describe their classes. Guess how they answered?
This is the Self Fulfilling Prophecy. Your beliefs shape your reality.
So I am thinking about intentions as we prepare the classroom for a new group of kindergarten and first grade students. All of our stories will weave together into one story. How can I, as a teacher, set them up for success? How can I make intentions meaningful?
I thought of a big gesture. I am sewing a little felt heart for each student. I will leave an opening at the top so we can slip their name inside and they can add wishes of their own. Friends, fun, learn, peace, joy. Paying attention to the good stuff.
I have them cut out. And I have a few days to seem them all together. For my own children, I will choose their favorite colors and put them in their lunchbox on the first day. Manifest love :)
Halloween Skirt
Just in time! I finished the tutorial for the Halloween Skirt! Of course, the skirt can be made any time of year with different fabrics.
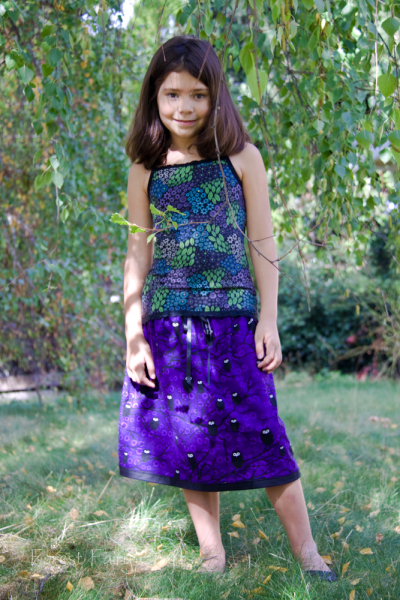
The fabric inspired this skirt. Black owls with white eyes sit on winding black branches. Anika has already taken it twirling :)
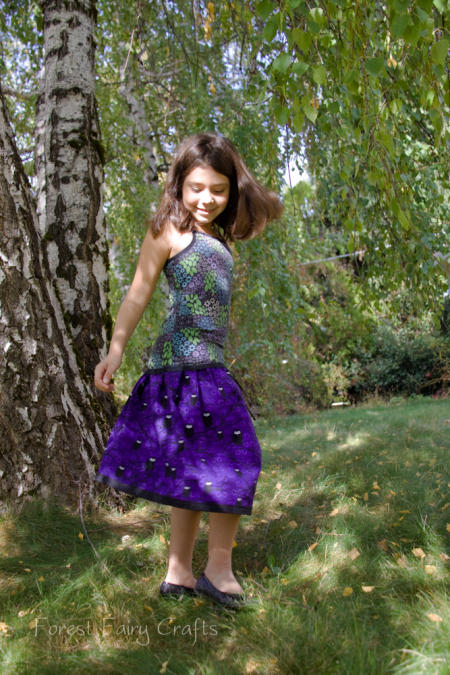
I have a feeling we'll be seeing the owls all winter :)
Our free tutorial has photographs for each step. Enjoy!
Click here for the Halloween Skirt Tutorial pdf
All tutorials are property of Forest Fairy Crafts. Please contact us for use permissions. Thank you!

In case you are wondering why is says Sweet Little Skirt #2 when you cannot find #1. . .
I took photos of another skirt project over a year ago and never got to the tutorial. This skirt will be #1 :). Hopefully posting soon :)

Free Fun Book Craft
When I'm not crafting fairies and magical friends, I teach at the Nevada City School of the Arts. And this is a favorite activity book with kids ages 7 and up. Younger children love it too, if I trace the basic shape lightly so they know where to put the head and feet.
Everyone loves a flip-book, especially a creepy, silly flip-book.
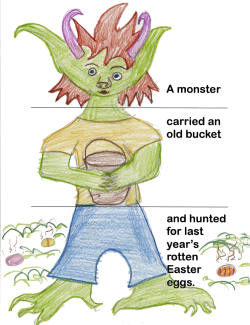
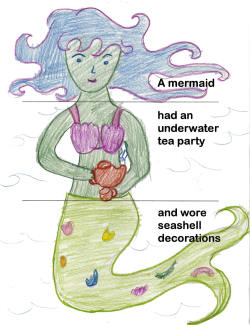

The fun begins when you flip the pages and make new stories.
This is a fantastic project for children learning to read because they can hold parts of the story as familiar text. And the illustrations support the words. Children will read over and over so they get different beginnings, or middles, or endings.
The creativity with this project is in your child's illustrations. I drew these examples to share how the book works, but you will find that the template is blank except for words and cutting guides. Each page also has small marks at the neck and waist. Guide children to draw with the head and legs starting at those marks so the creatures match from page to page. The cat will need to be drawn sitting up to match the other creatures.
I am happy to help if you have questions or get stuck. I suggest allowing children to draw each page as a whole sheet, then binding the book with yarn or staples, and cutting last.
Enjoy! Feel free to share with your teacher and homeschooling friends! I love inspiring children to read! :)
Click here for The Crazy Creepy Creature Book PDF
