

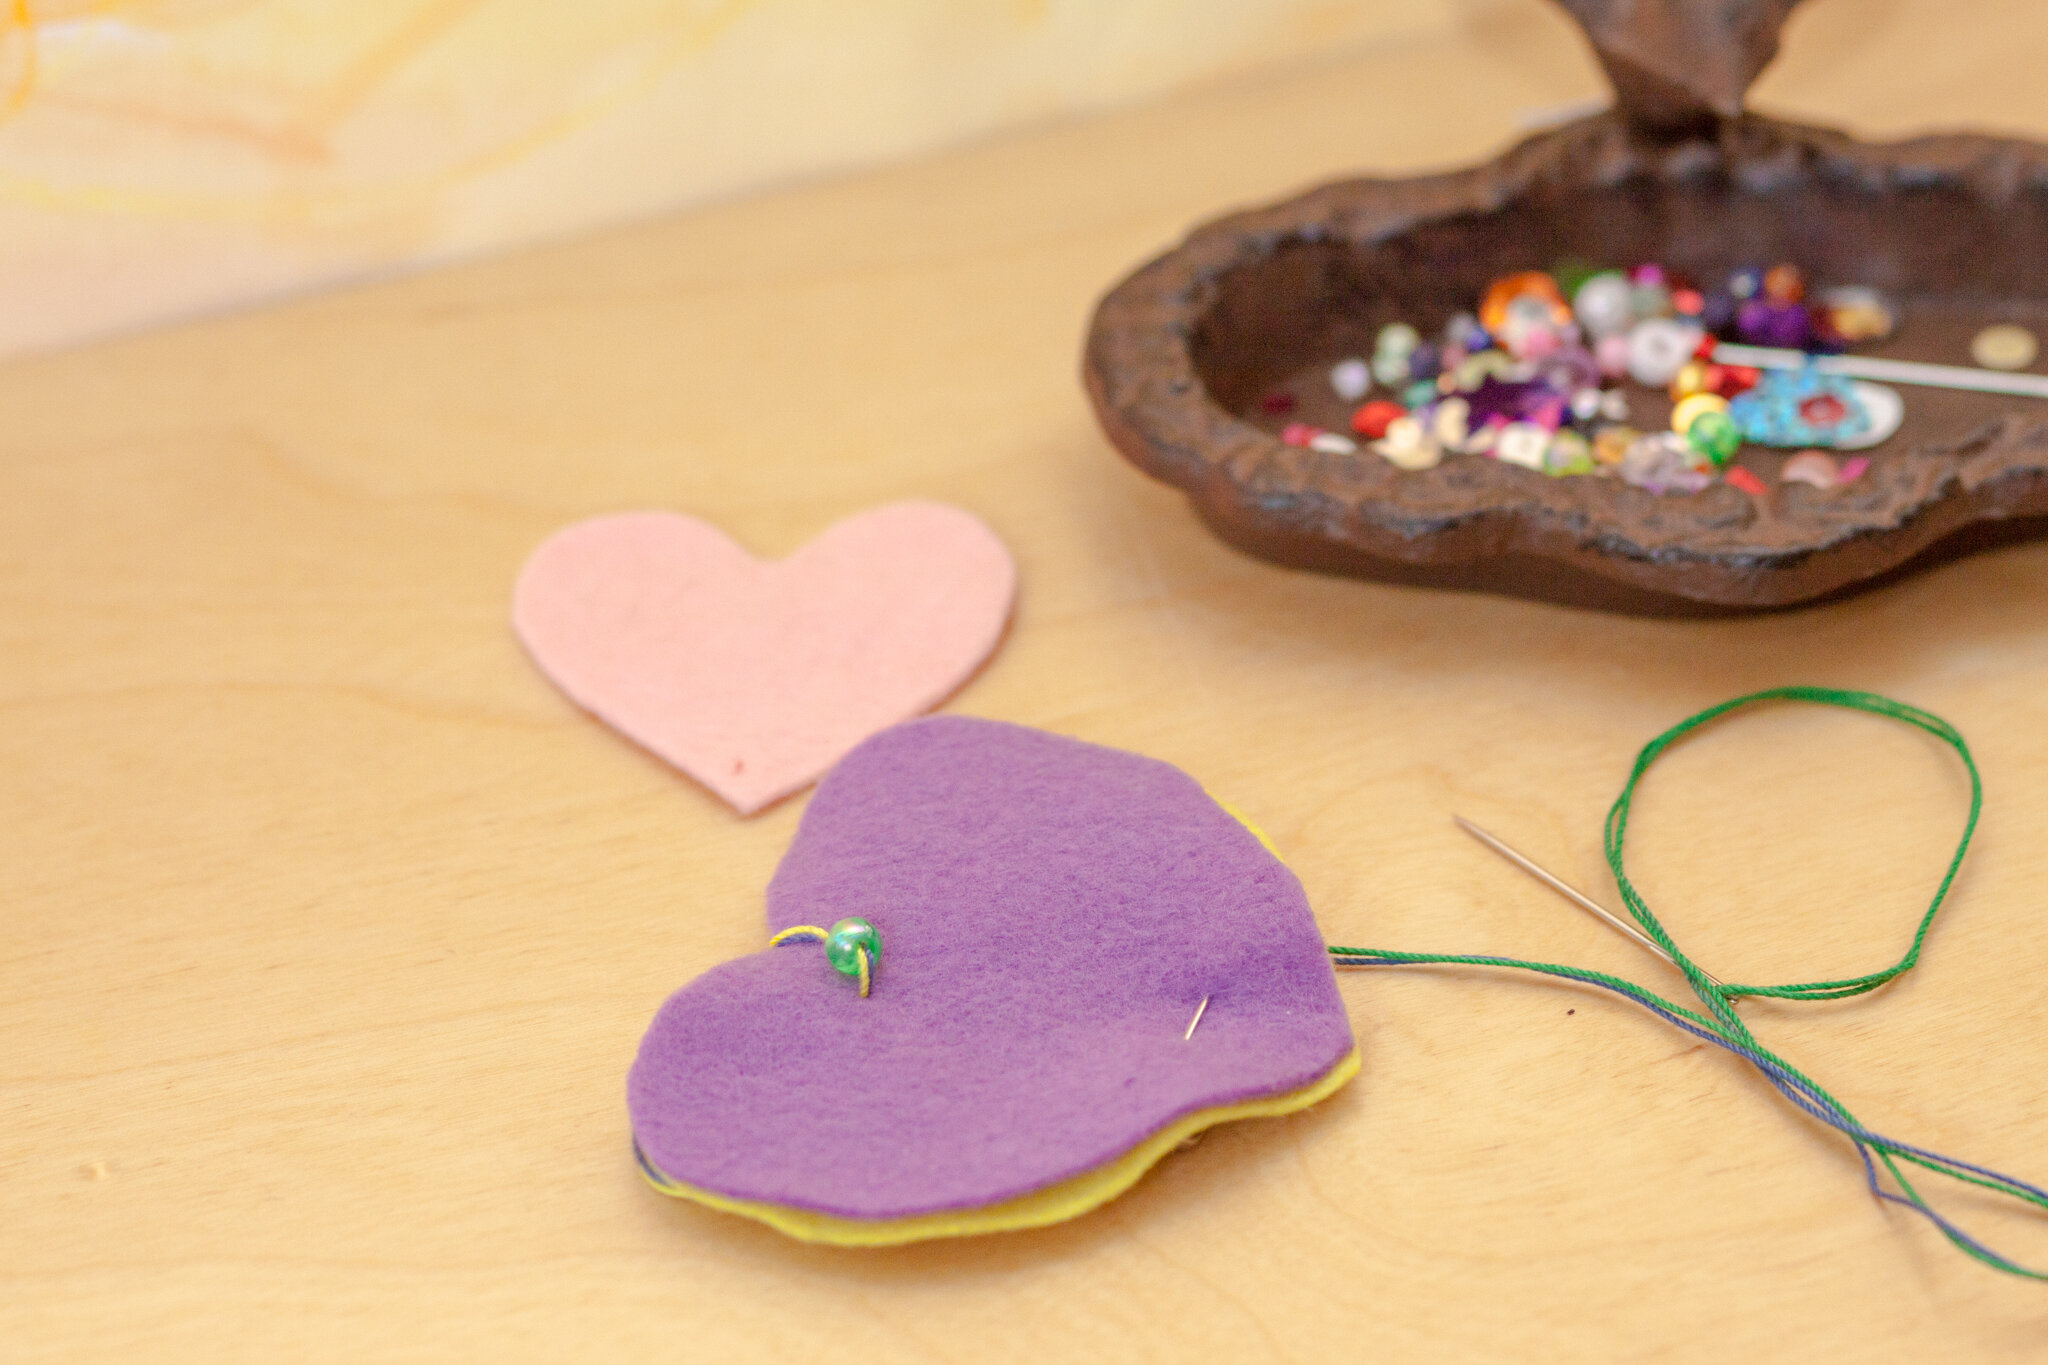
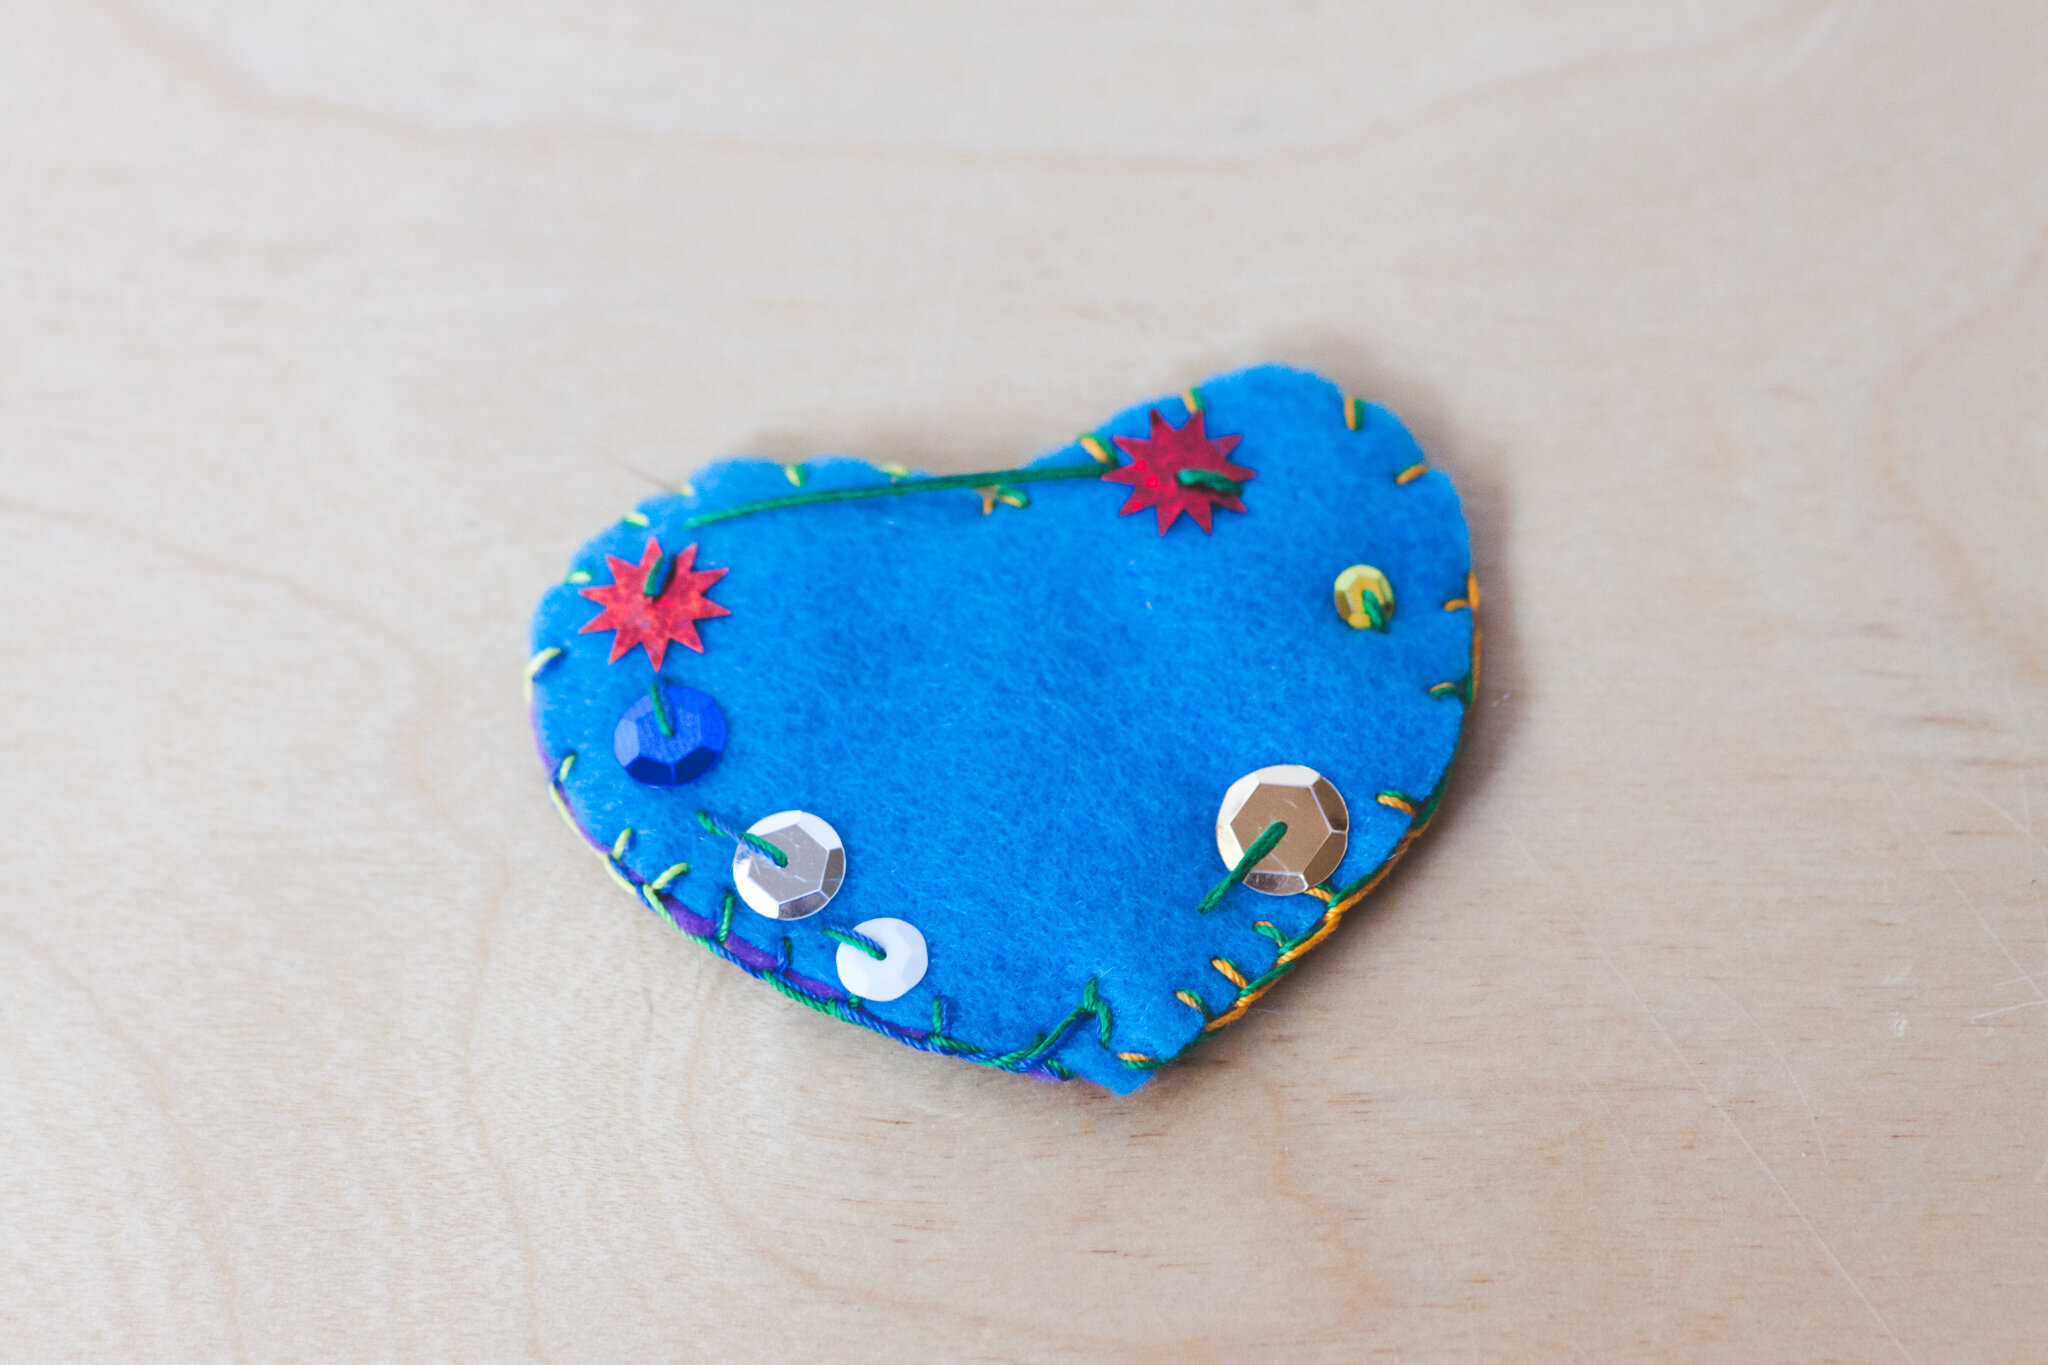
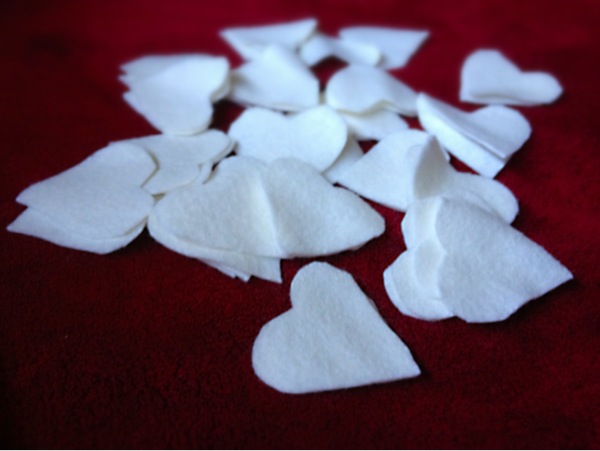
Heartfelt Hearts with Children
Invite children to decorate to their heart’s content. This felt sewing project is an opportunity for children to add many decorations. The resulting heart is lovely to hang as decoration or gift to loved ones.
As with all of our projects, be mindful of a child’s abilities and the sharpness of the needle. If you’re using a blunter needle (like a tapestry needle), more layers may be too many layers of felt.
You can also make the heart any size. We recommend not making it a size where the felt becomes floppy and won’t hang straight. You can draw your own pattern on a piece of paper before cutting out of felt. Or we have a heart pattern in Forest Fairy Crafts Through the Seasons.
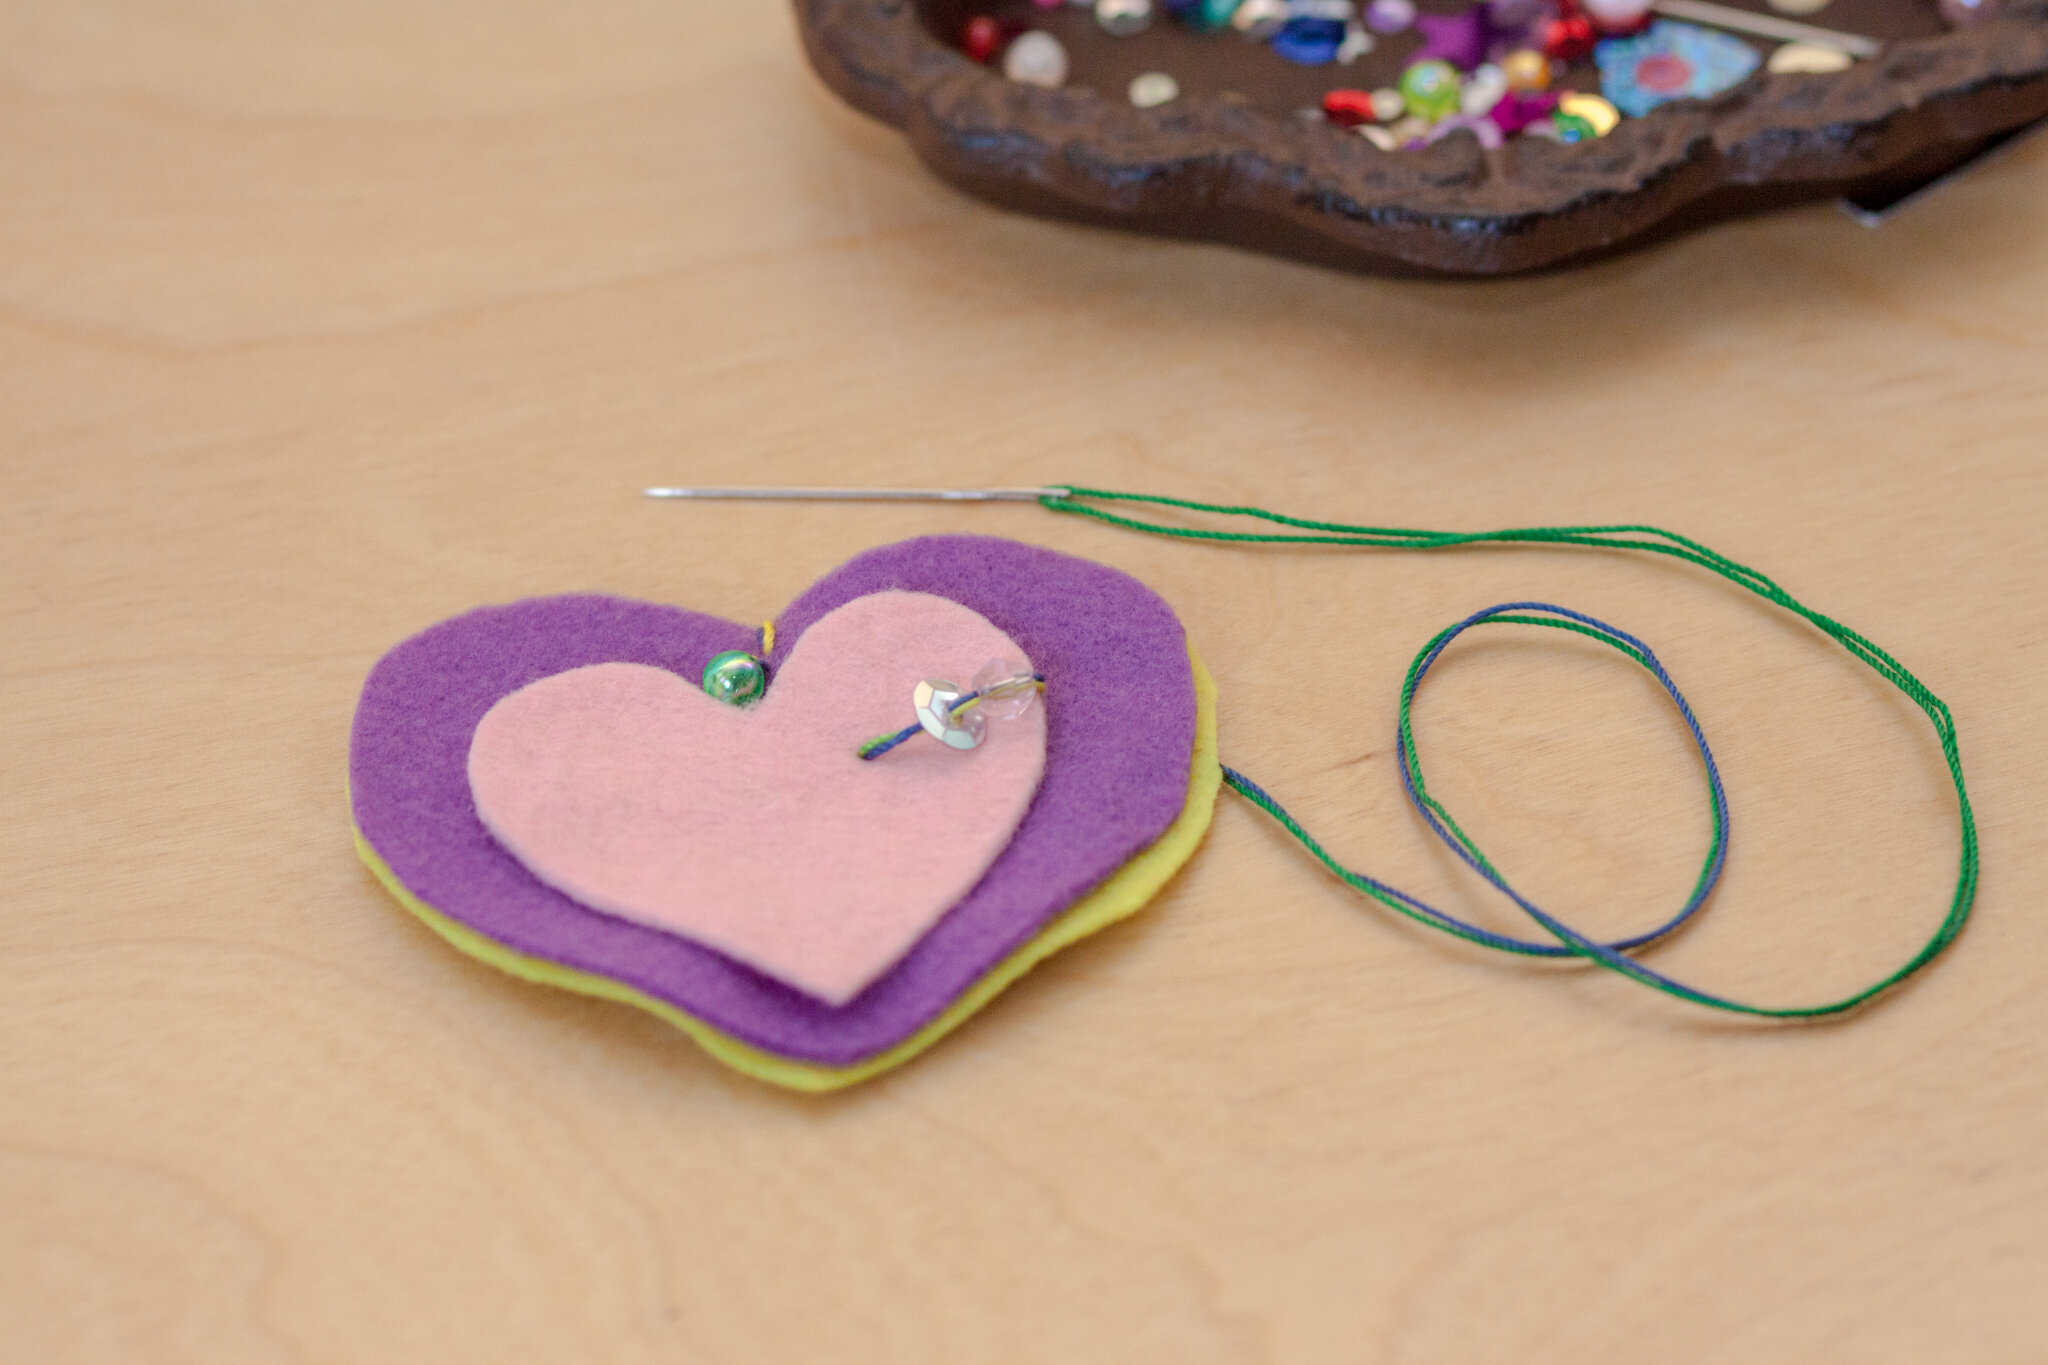
For any version of the heart, cut out your felt heart shapes. We use crochet thread which doesn’t tangle as easily as embroidery thread. For children, we always put the thread through the eye of the needle, fold in half, then tie slipknot securing both ends together. This prevents the needle from pulling off when they pull the thread taut. The multicolor thread in the photos is due to a variegated thread which changes color on its own.
Use a safety pin to hold the felt hearts together at first. Sew through one piece of felt so the knot will be “sandwiched” between the two felt hearts. Loop around the first stitch so the hearts won’t wiggle (or you can secure with more than one safety pin). Lay a smaller heart on your hearts after a stitch or two.
The direction is to “add decorations, push your needle through, then add decorations.” Repeat and repeat.


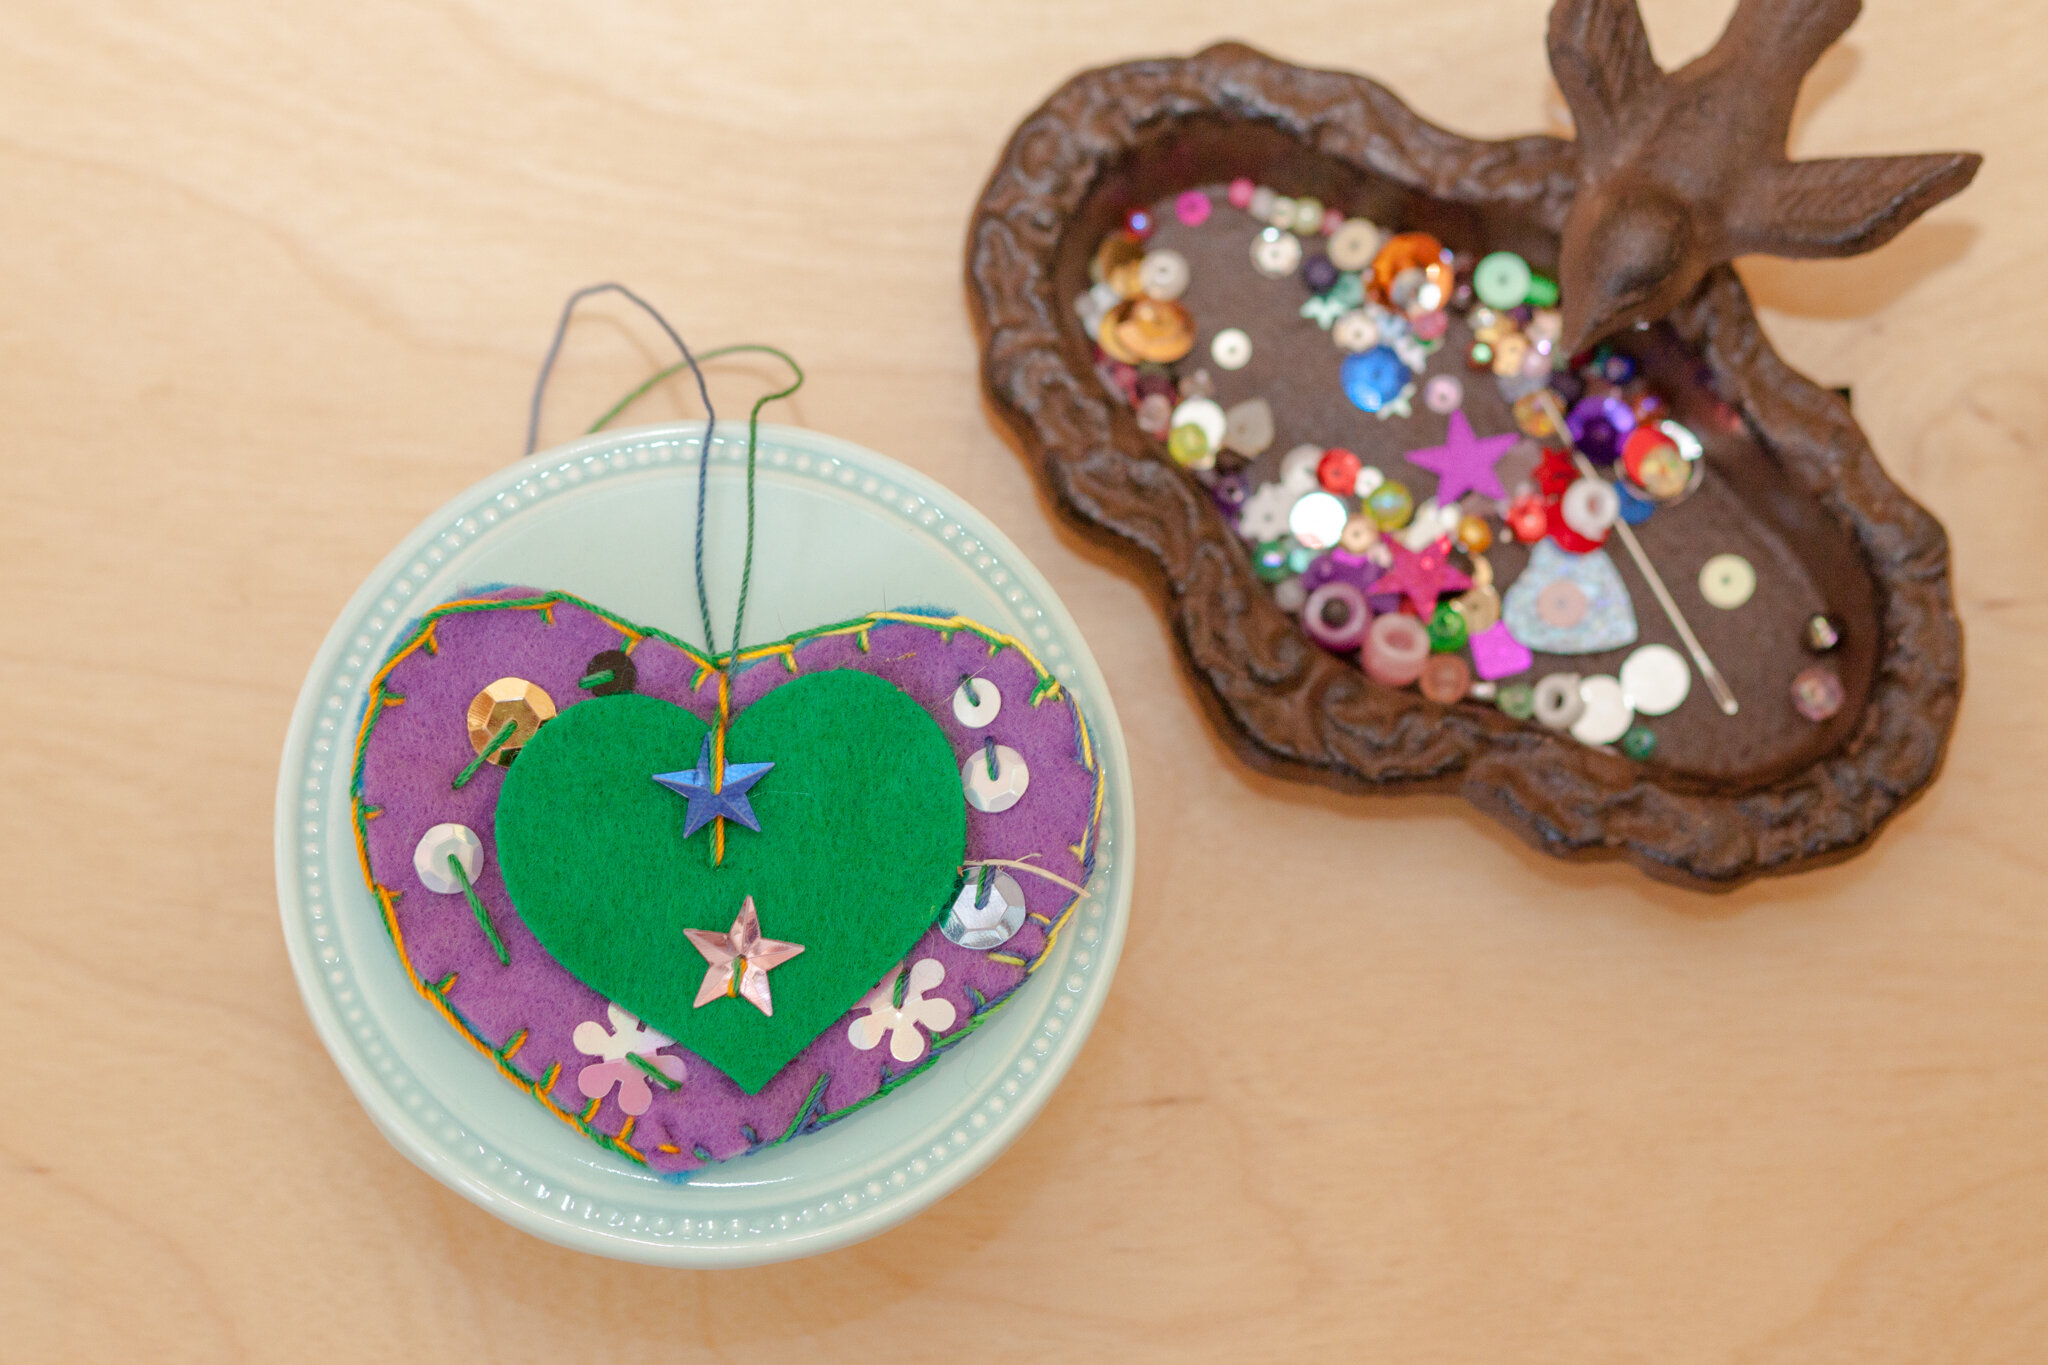

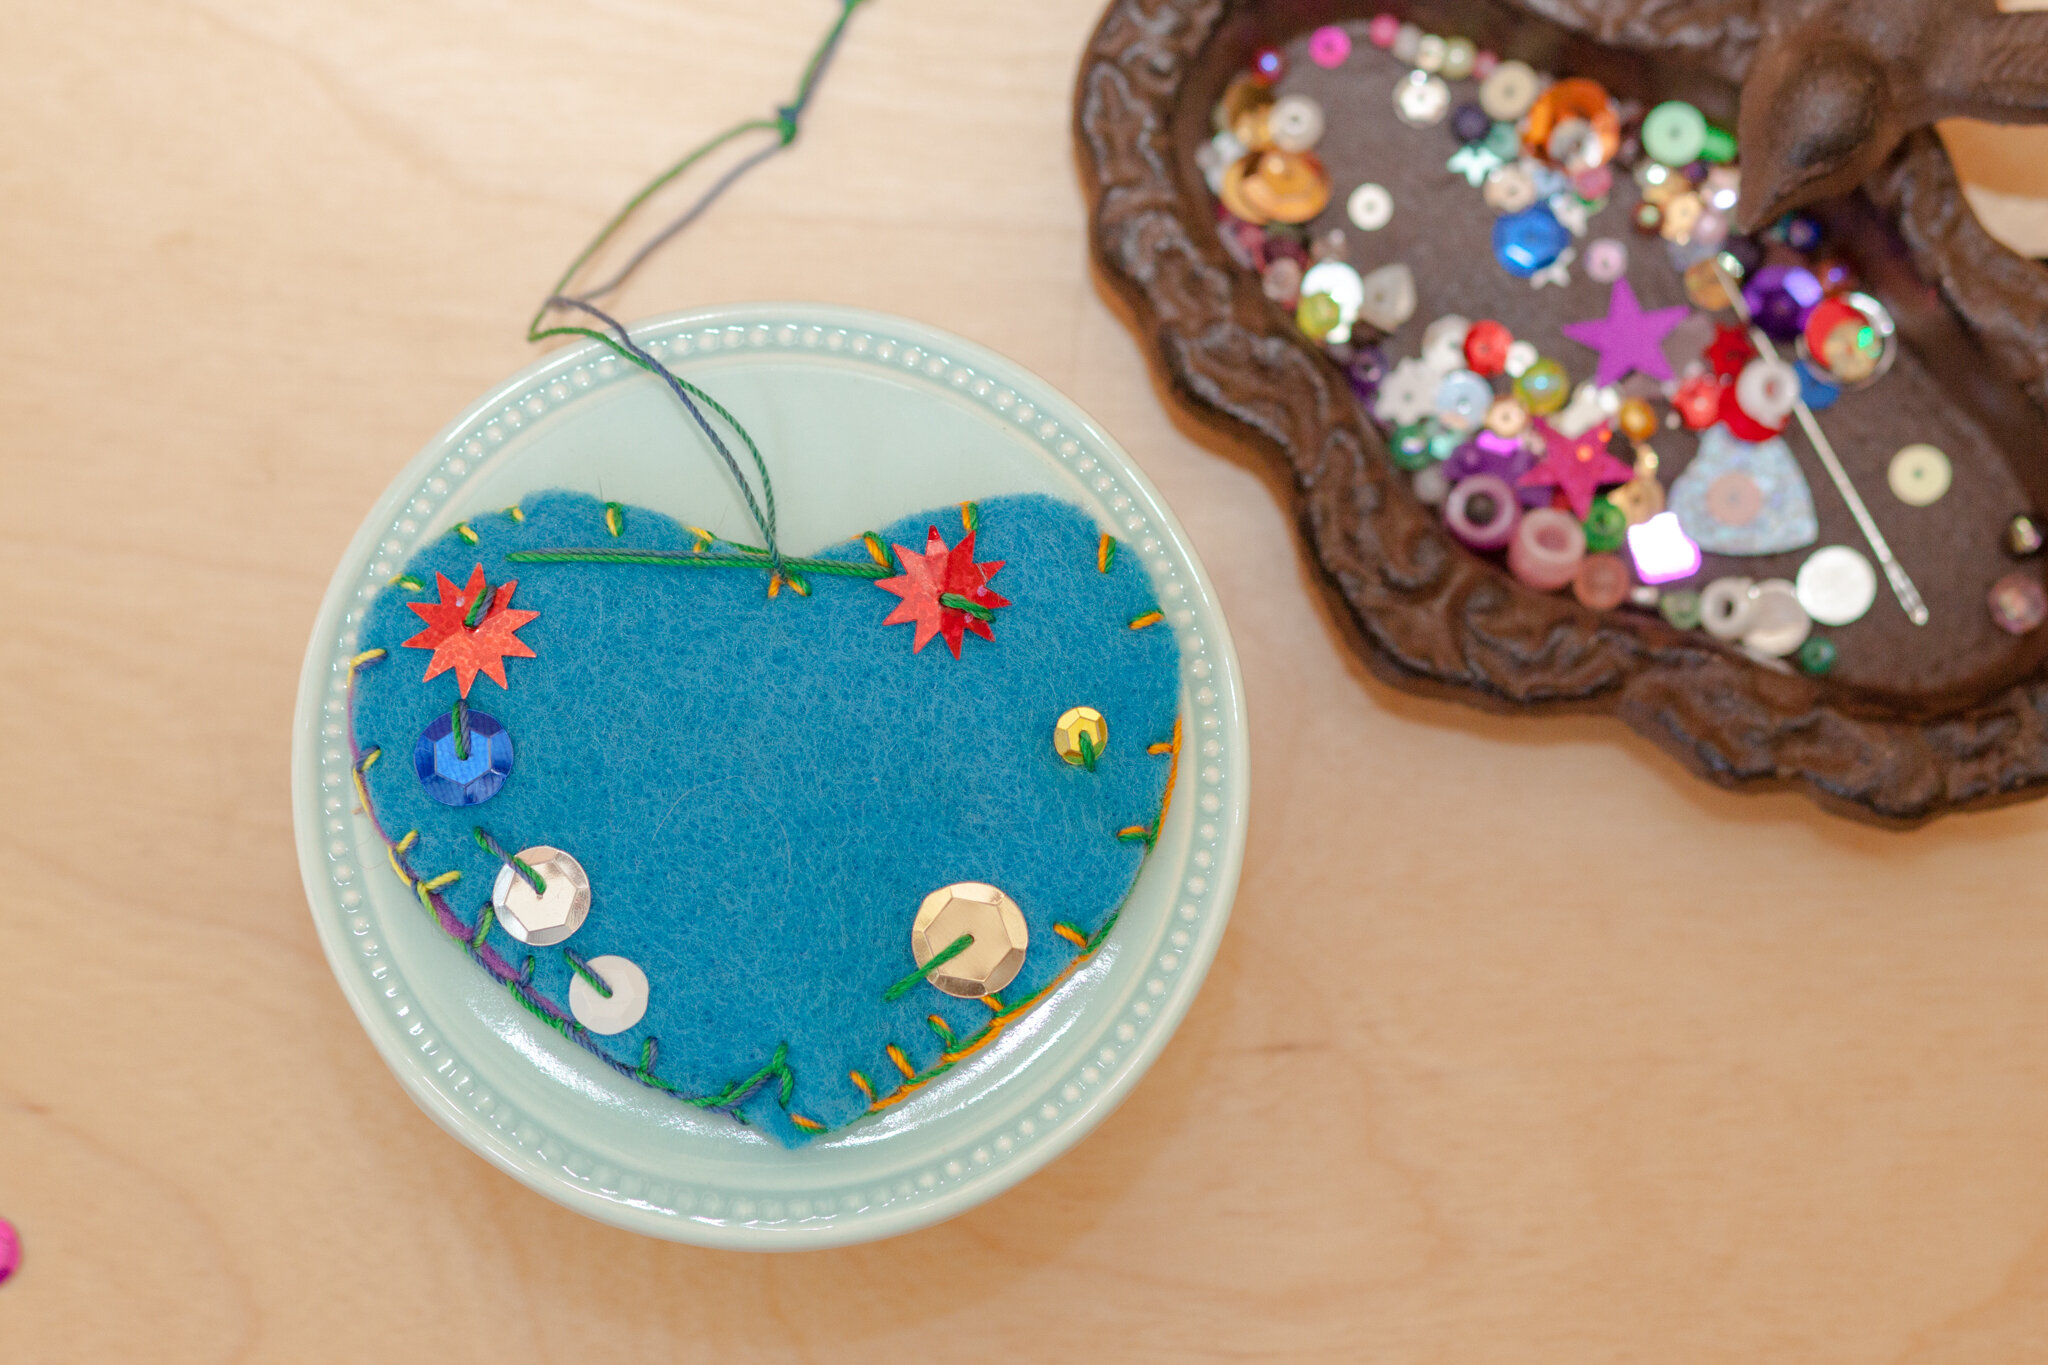
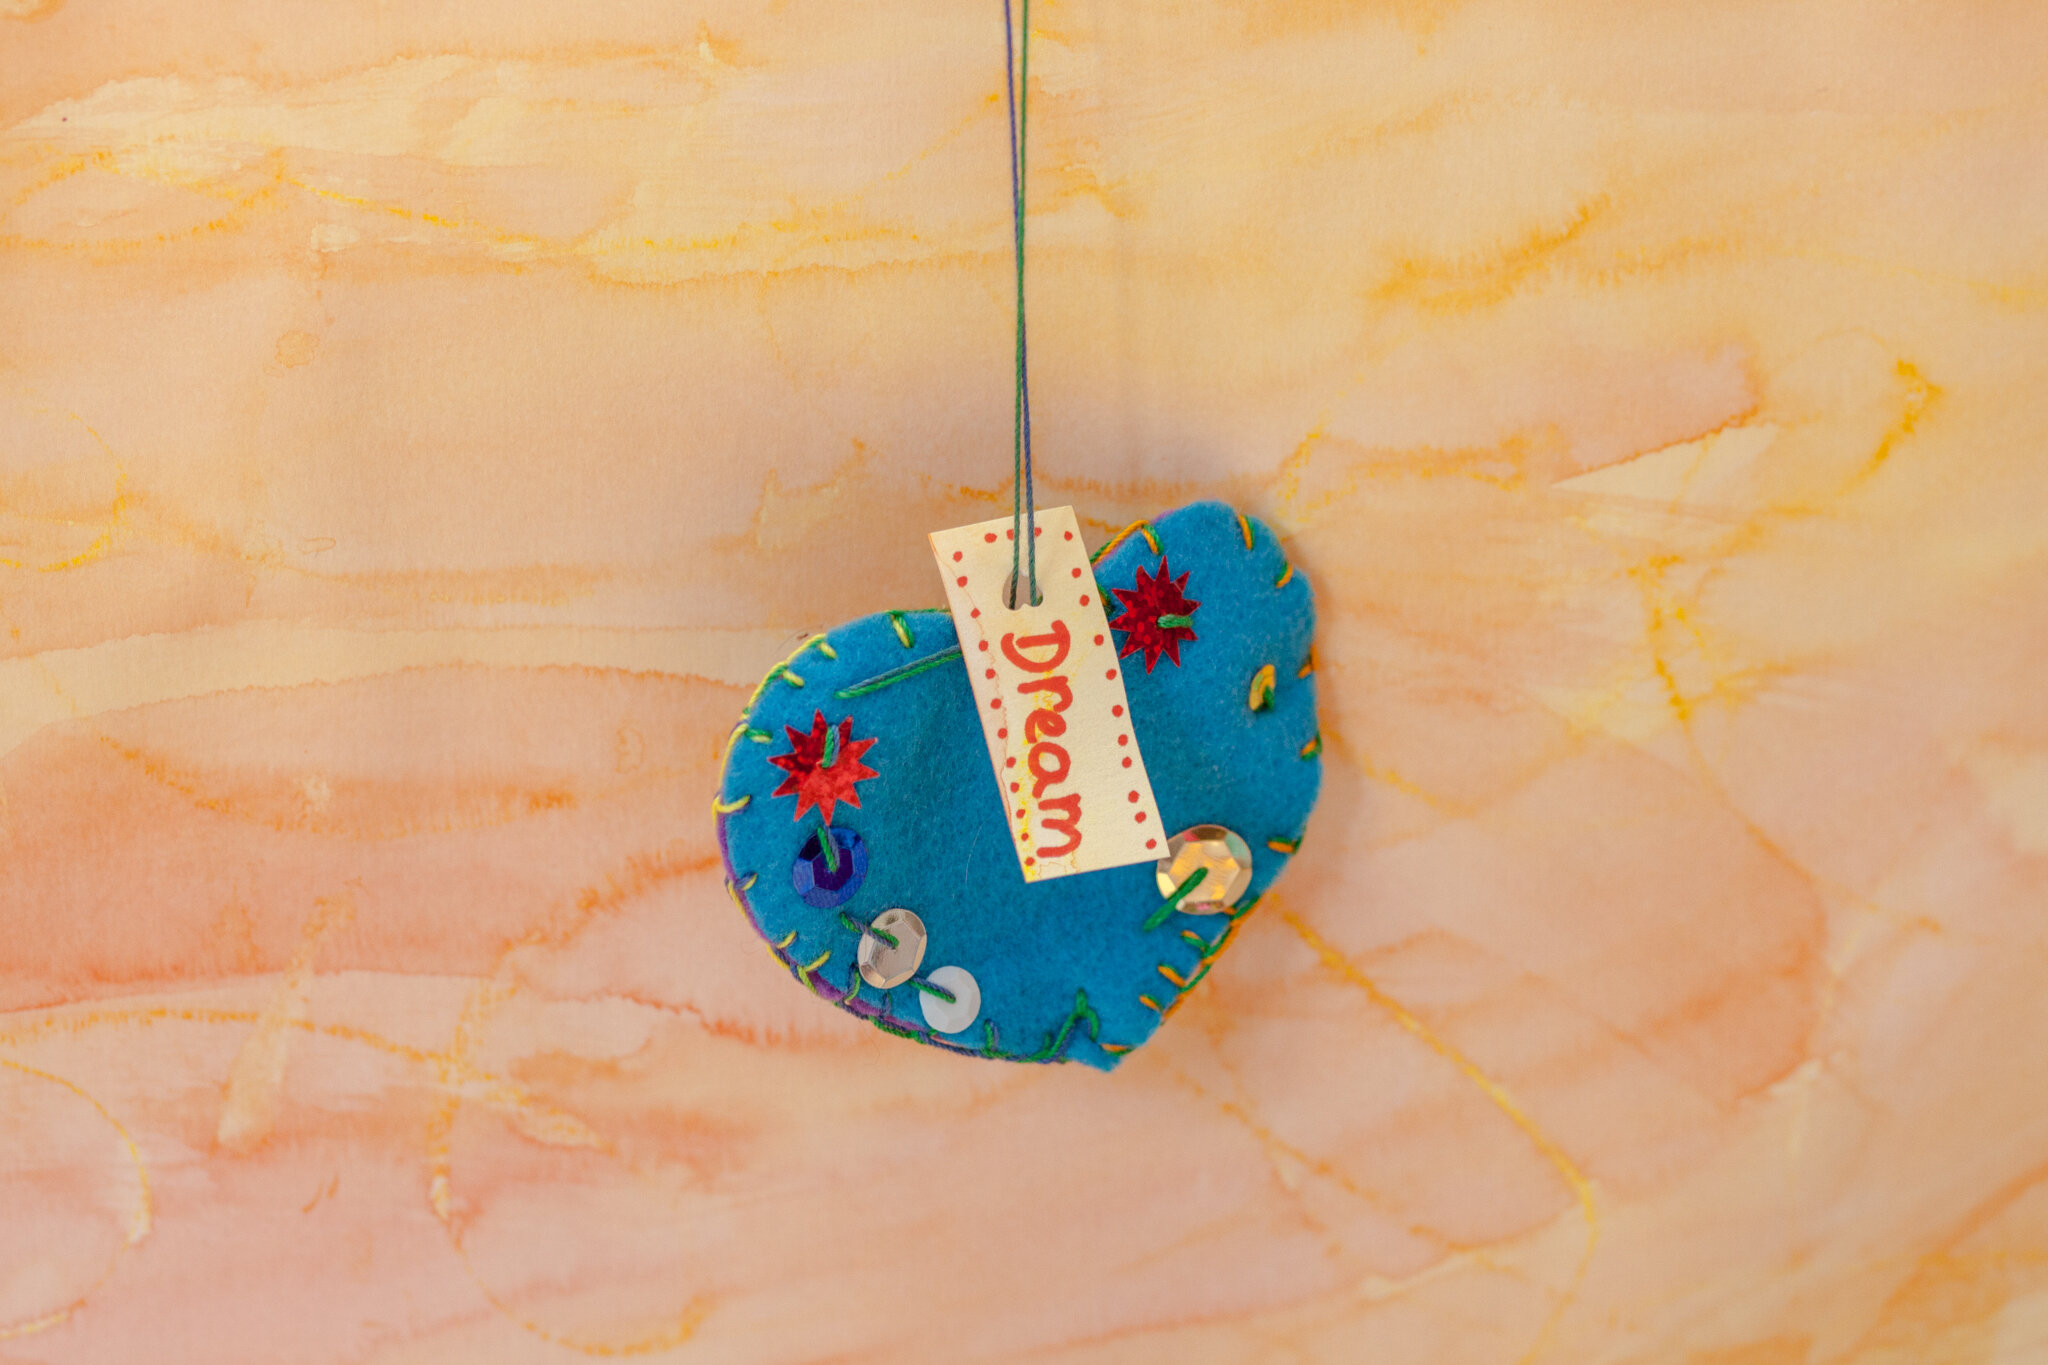
These can be strung together to make a garland or mobile. We enjoyed a class collection hanging from the ceiling overhead. They become such expressions of whoever sews them. May your heart’s wish come true!


Upcycled Owl and Cat Treasure Keepers
Upcycled owl and cat treasure keepers by students feature incredible personalities and embellishments. Upcycled means to take one item and use it for another purpose. Worn clothing with holes can become toys. Upcycling is a fun way to repurpose fabric instead of throwing things in the trash.
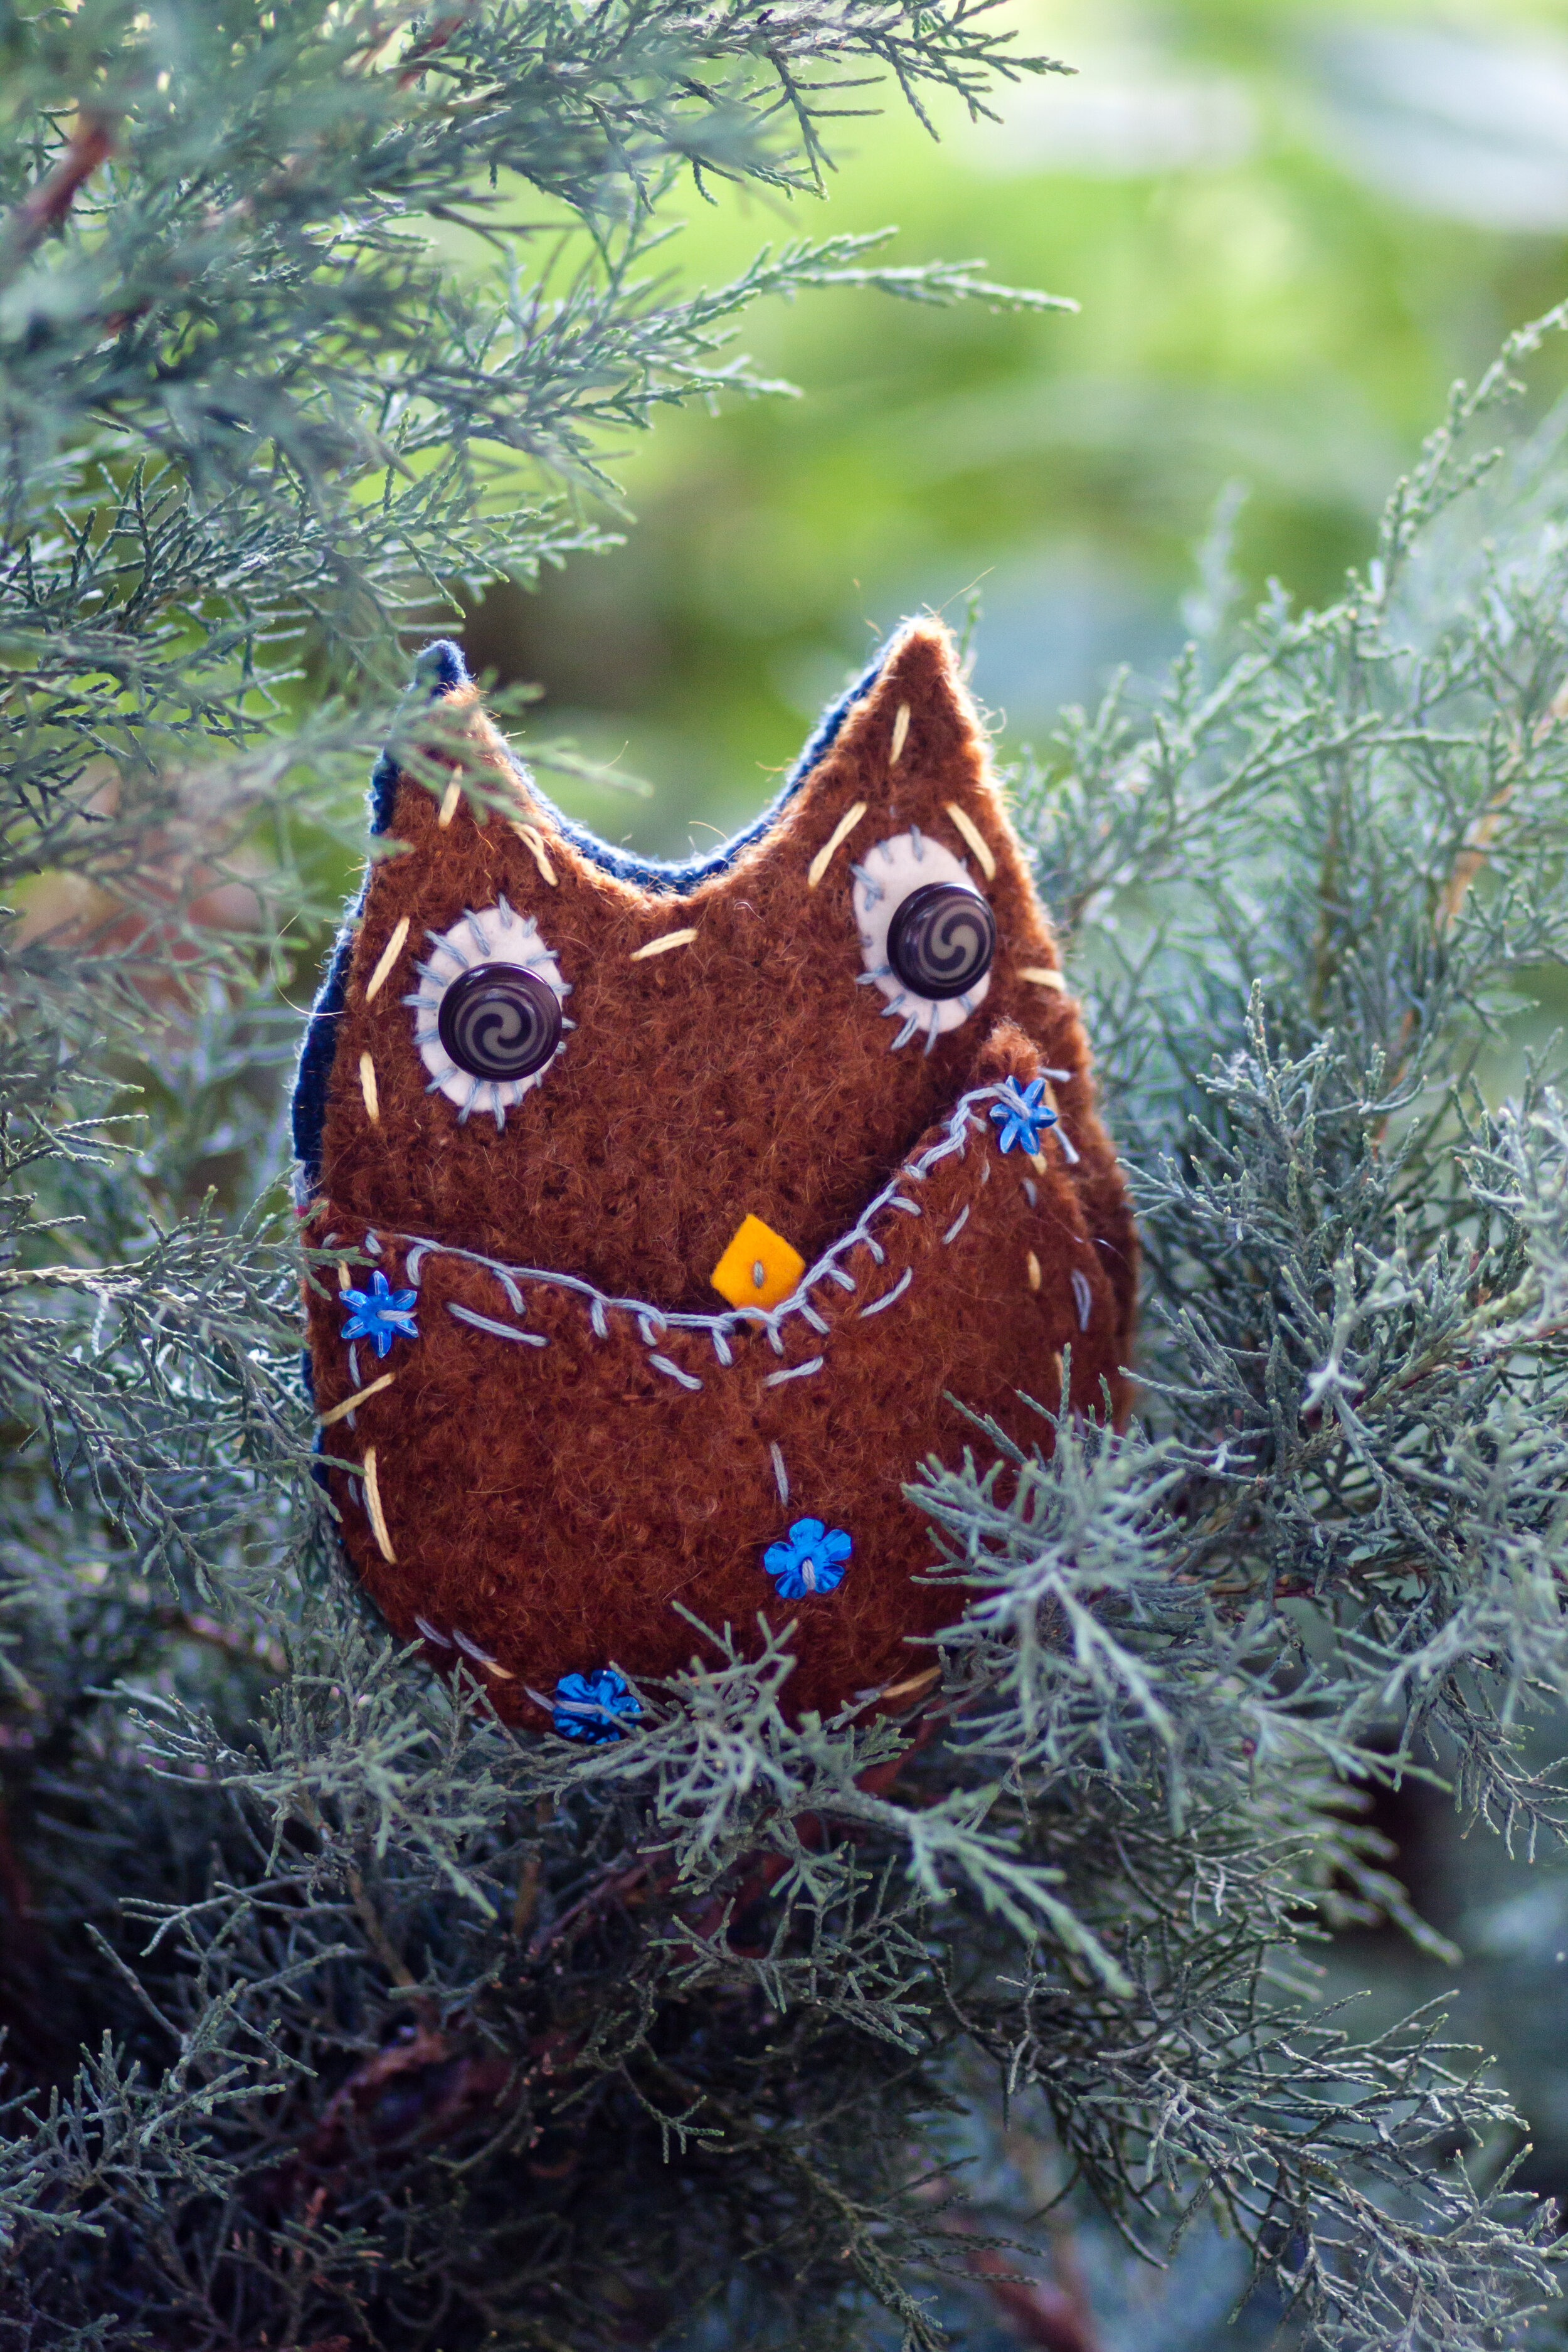


Any fabric that doesn't fray easily and isn't too stretchy or thick for pushing a needle through it will work fine for fairy crafts. We see every project as an invitation to create. We welcome exuberant self-expression when children sew. The pattern and tutorials for the Owl and Cat Treasure Keepers are in the first Forest Fairy Crafts book. They're a wonderfully fun activity when it's chilly outside. The front decoration is actually a pocket. Perfect for little treasures. Or tooth fairy pillows. The Forest Fairy Crafts book shares patterns, tutorials, and photographs for making your own little critters.

And they’re so cute!
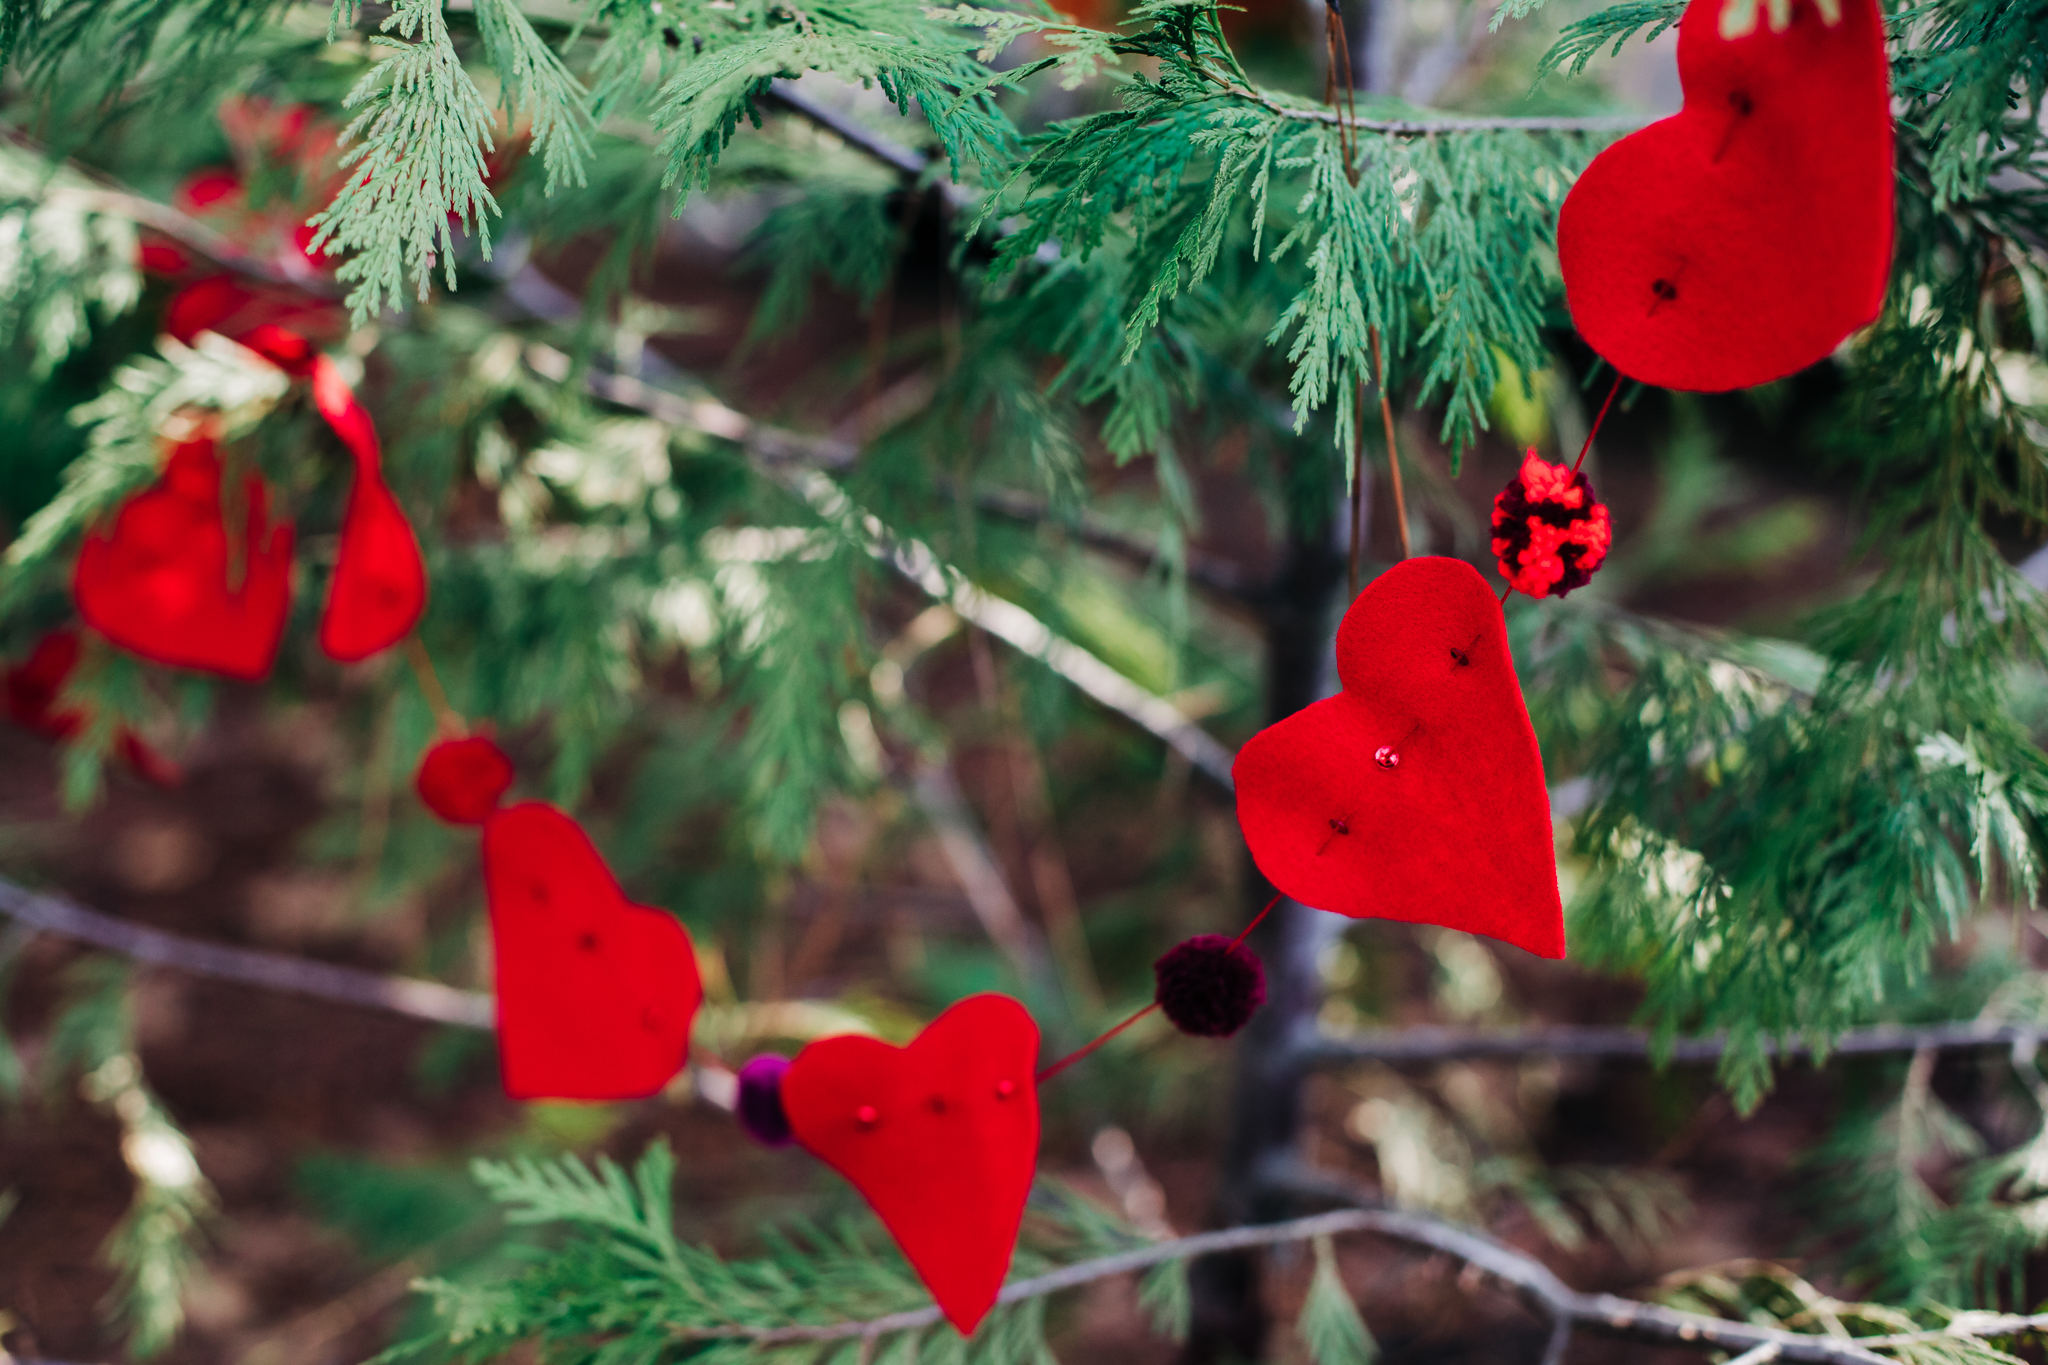
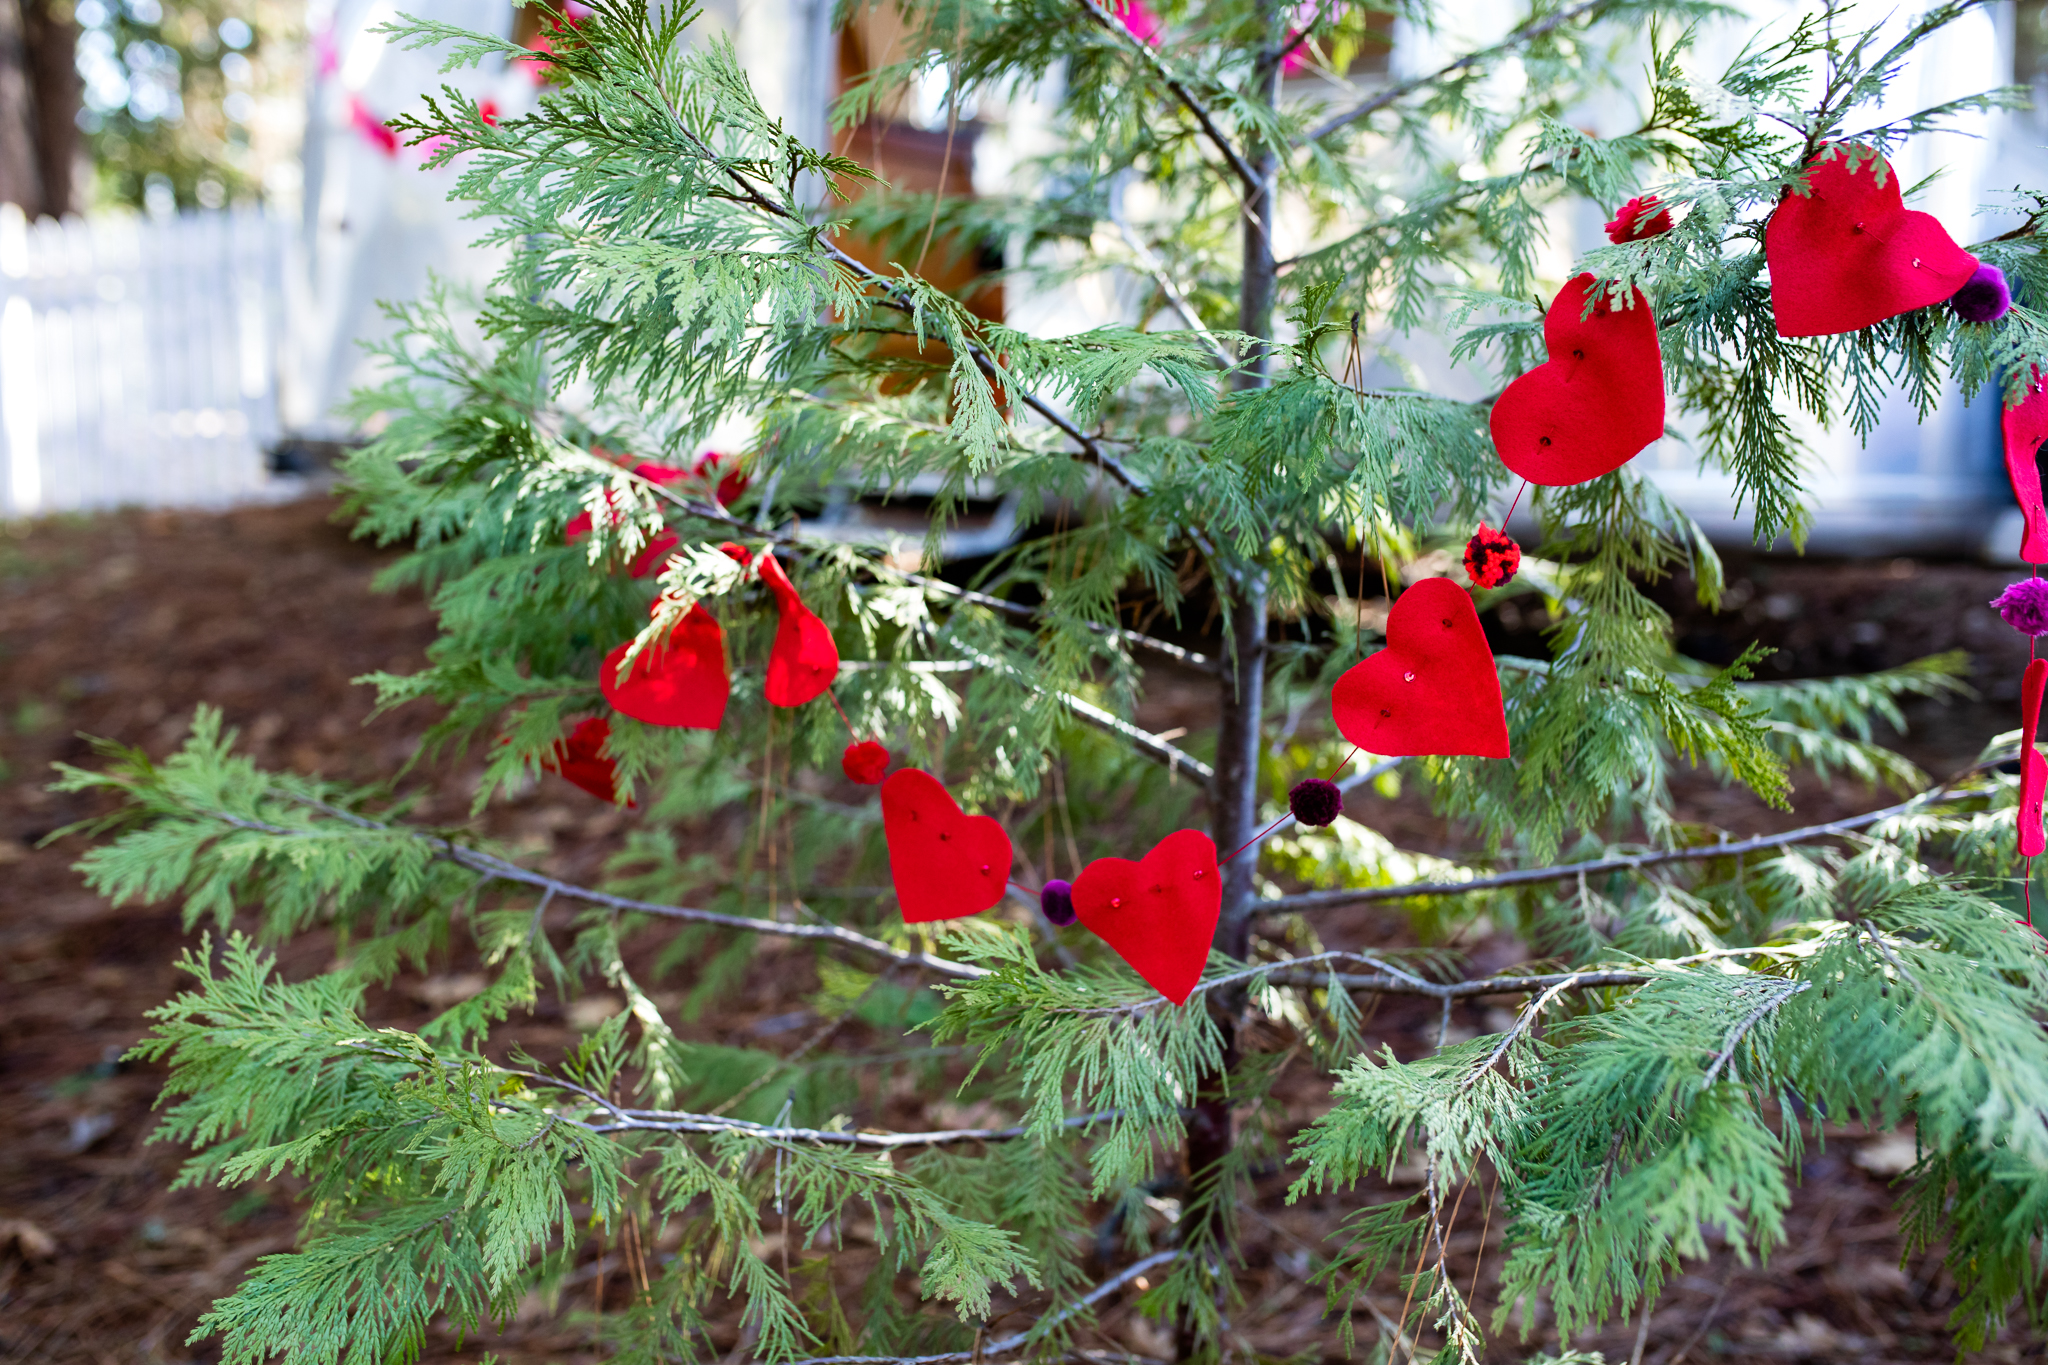
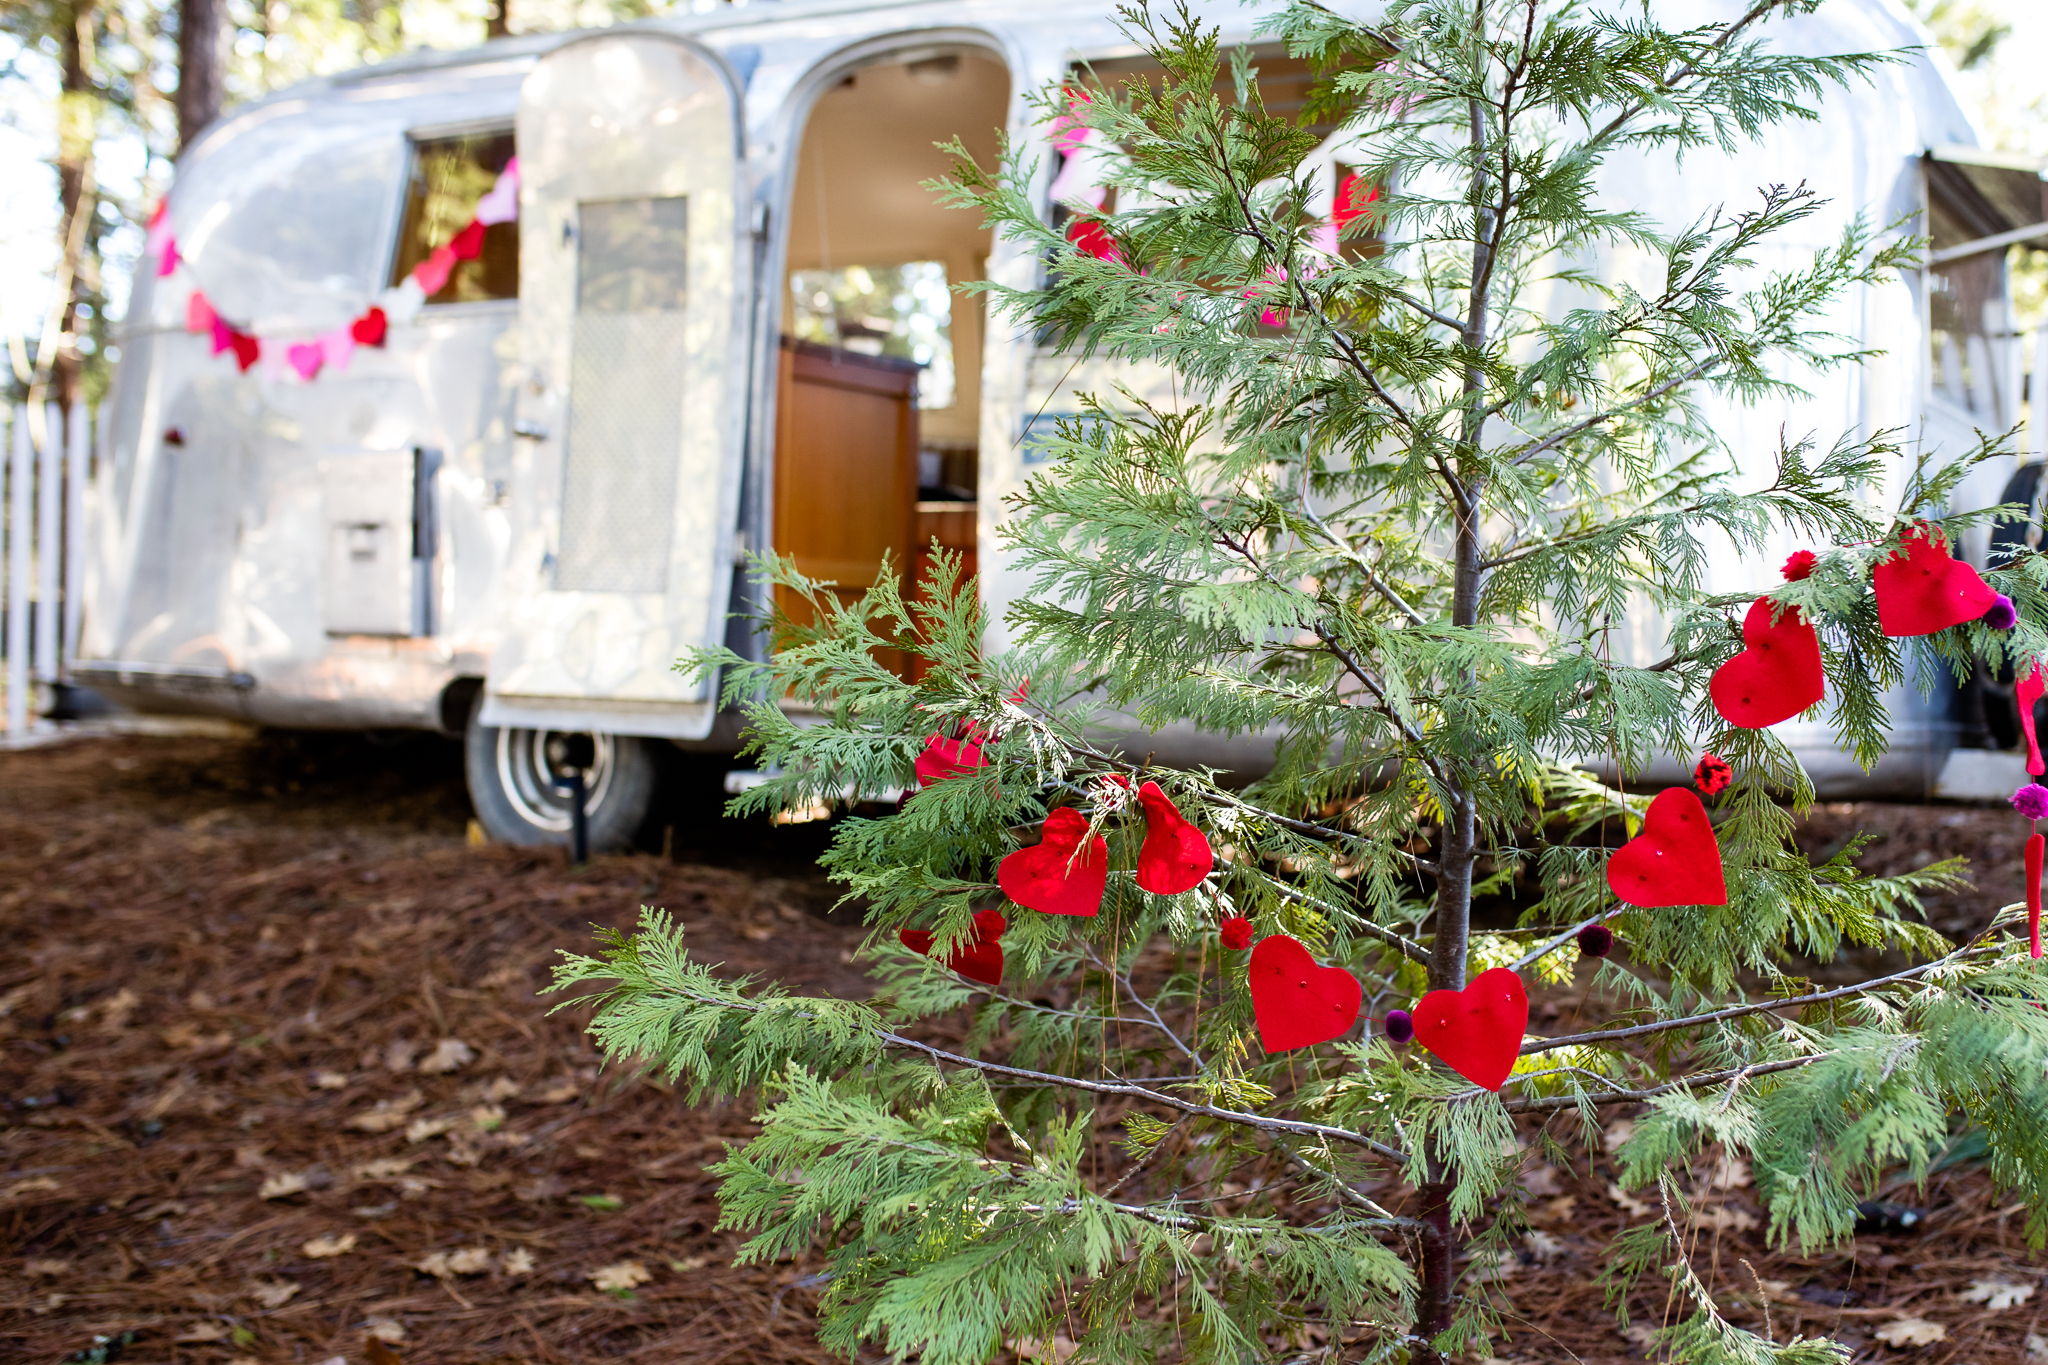
Valentine's Heart Garland
Hurrah for decorating! And hurrah for crafting homemade decorations that help a house feel like a cozy home. The personal touches that go into homemade decorations make for charming displays (and gifts). This year I made a Valentine Garland using our Magical Forest Fairy Crafts Through the Seasons book. And then we used the garland for a delightful Valentine themed campsite at Inn Town Campground.

The garland can be made by anyone- children or adults. I find myself making decorations even when my children are older, because I love being able to share the spirit of homemade in every season.
And it helps that winter is one of my favorite seasons for crafting. As the wind blusters and blows outside and rain (or snow) piles up everywhere, it’s lovely to sit with thread, sequins, and felt.

For this garland, I followed the directions on page 108 for the leaf garland. The next page has ideas for making our own patterns and garlands. I used the heart as inspiration.
One thing that we believe strongly is that children (and adults) benefit immensely from Invitations to Create. These are ideas or questions that encourage independent thinking. We have encountered a few times where folks say, “Why don’t you tell them what to do instead of asking what they want? Don’t most craft books give instructions?”
Well, we give instructions and offer ideas for inventions and creative growth. After all, the world needs creative problem solvers and innovation. Why not encourage that with invitations to make craft projects unique?

For my garland, I found the pom poms already made (or you could search online for pom poms or felt balls if you want to make those, too). I cut a stack of red hearts. One hint, it’s easier, for me, to cut when the pattern is another piece of felt- paper is slippery. So I cut one heart using the pattern on Page 136, then used that heart to cut more. You could also trace the heart onto the felt and cut that way. Whatever feels fun for you :)
I sewed across the top third of my hearts, adding red sequins. I used large stitches. Between each heart, I strung a pom pom.


If you don’t know how to sew, or if you’re making with children, our book has all of the steps for tying knots, adding sequins, and even cutting patterns. It’s an engaging, and rewarding, quick craft that can decorate anywhere from a mantle, windowsill, or campsite.

Share the love :)
Discover directions for the heart garland in Magical Forest Fairy Crafts through the Seasons (which has ideas for many seasonal crafts). And visit the Inn Town Campground for your own enchanted getaway in the forest :)
This post does contain affiliate links. Should you choose to purchase, a small amount is given to the Forest for the referral while your pricing remains the same. Thank you!
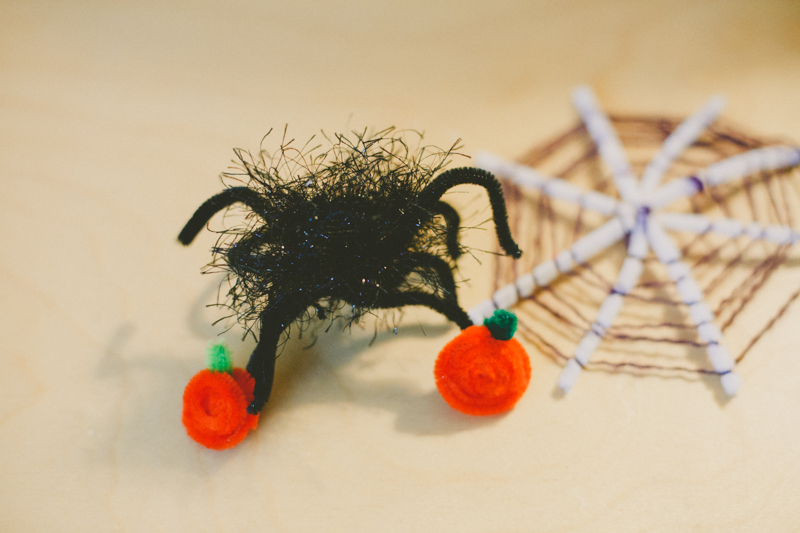
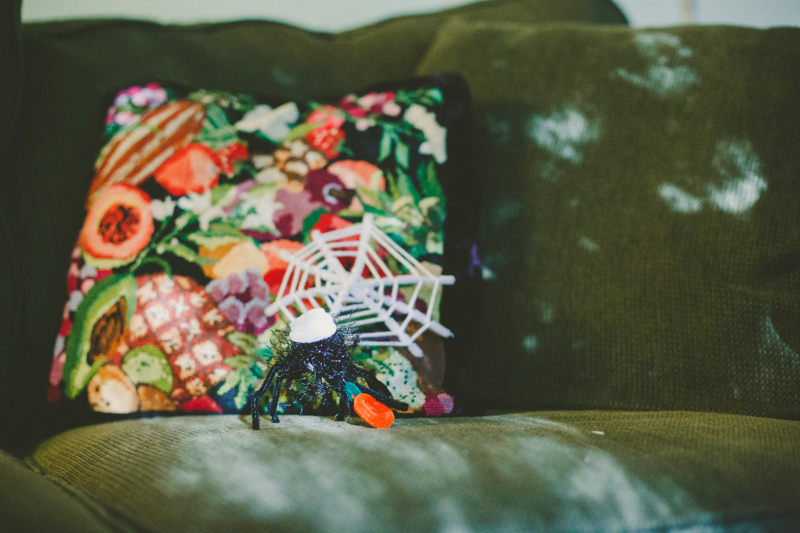
Spiderwebs and Spider Craft
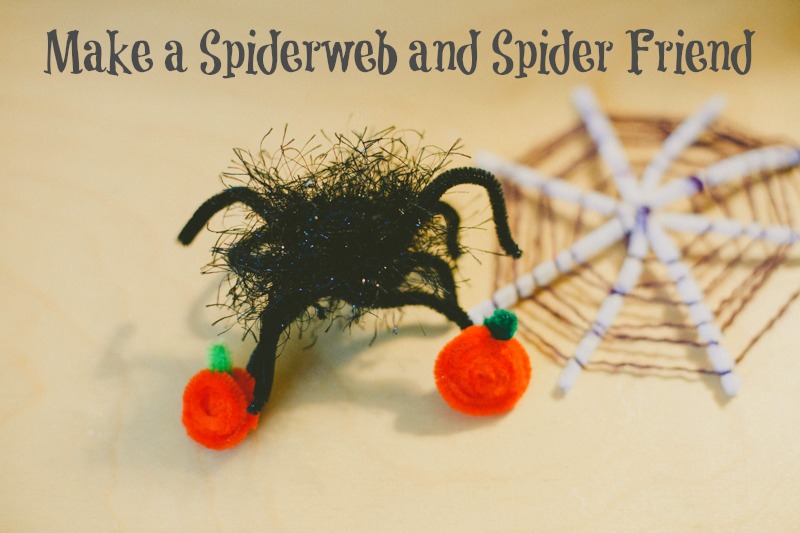
My girl and I love Halloween! As we brought out this year's decorations, she really really wanted to decorate her room. In our family, that means creating new goodies!
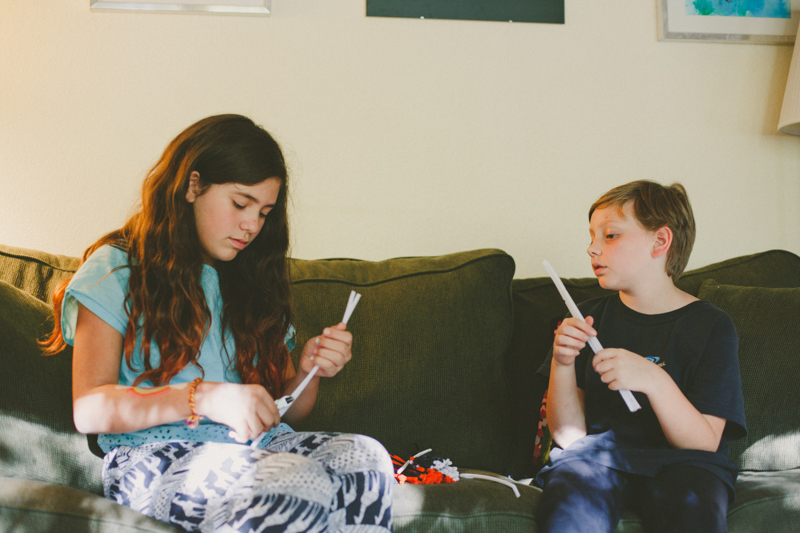
She wanted to create cute spiderwebs and spiders. They're fun, easy, and quick. My niece visited and she had just finished reading Charlotte's Web so this craft especially inspired her. That gave my girl the chance to be Teacher, which is always fun.
Along the way, we learned more techniques for different looks. We hope you enjoy!
Supplies:
- Pipe Cleaners
- Wire Clippers (or scissors if you don't mind possible nicks in the metal when cutting wire)
- Yarn
- Fuzzy Yarn (we used Festive Fur)
The Making:
Clip three pipe cleaners in half so you have six in all. If you don't clip the pipe cleaners, they get weak towards the outer edges of the circle. I've also seen this project made with dowels which lets you make larger spiderwebs. The fuzzy pipe cleaners are easier for the yarn to stick in a spread out design.
Lay them them down and tie a piece of yarn around the middle. Spread them out and start winding the yarn around the center to hold them together.

The yarn can be white or black or purple (or any color). You can tie the pipe cleaners together while they are straight and then fan them out. My daughter insisted on tying them while they were all spread apart, which is trickier but still doable.

Start wrapping the yarn around the pipe cleaners, going around one, then the next one and the next one. Give yourself a little space between each layer as you go around and around the spiderweb. It may take a few passes to get the hang of it, but even spiders must practice making their webs (don't they?).
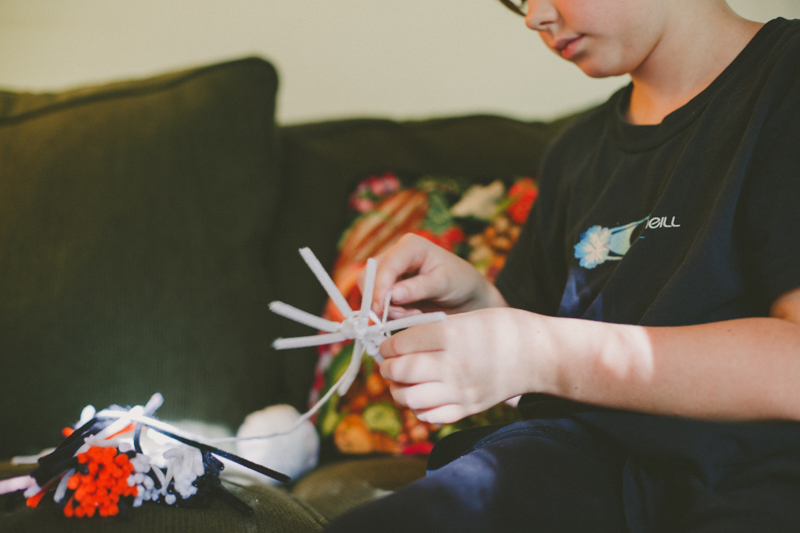

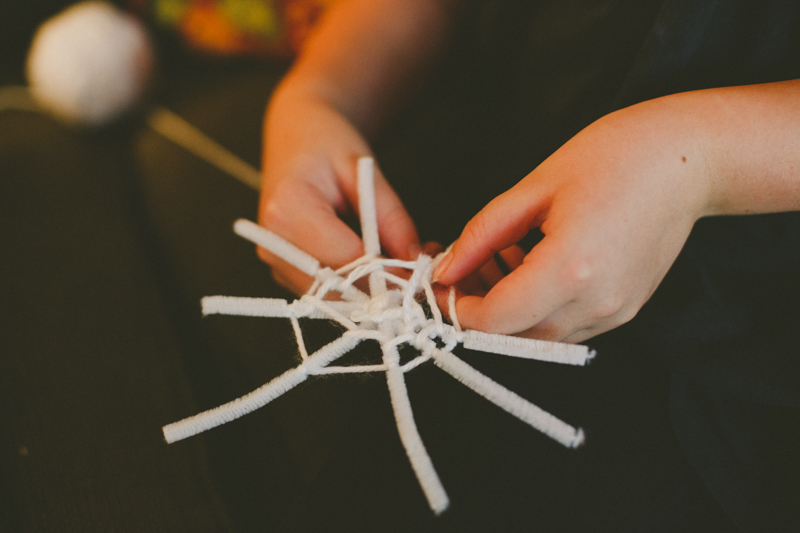
Continue to the outer edge of your spiderweb. Clip the yarn and tie around a pipe cleaner. Leave a little extra that you can use to hang the web.
For the spider, clip three pipe cleaners again to make six. The fuzzy yarn is a little tricky for little hands, so I helped with making the first spiders. We tried two ways that both worked.
First, we wrapped the fuzzy yarn around three fingers a few times. We clipped a length of plain purple yarn and tied around the middle. After our little fuzzy ball was secure, we tied it again around the middle of the three pipe cleaners to give our spider six legs.

Spread out the legs and bend to give your spider personality.
This version of the spider was a little flopsy (which was totally fine) except it inspired us to try again.
This time, we wrapped the fuzzy yarn into a ball. To learn how make a yarn ball, you can visit here. Basically, wrap the yarn around a few fingers, take off your fingers, wrap a few times in another direction, and again, and again. Once you get the hang of it, yarn balls are simple and fun.
Once the ball was about the size of a grape, we laid the three pipe cleaner legs across and wound around them too. Now we had six legs. We could fan them out and wrap the yarn between the legs. This technique made the spider more durable.

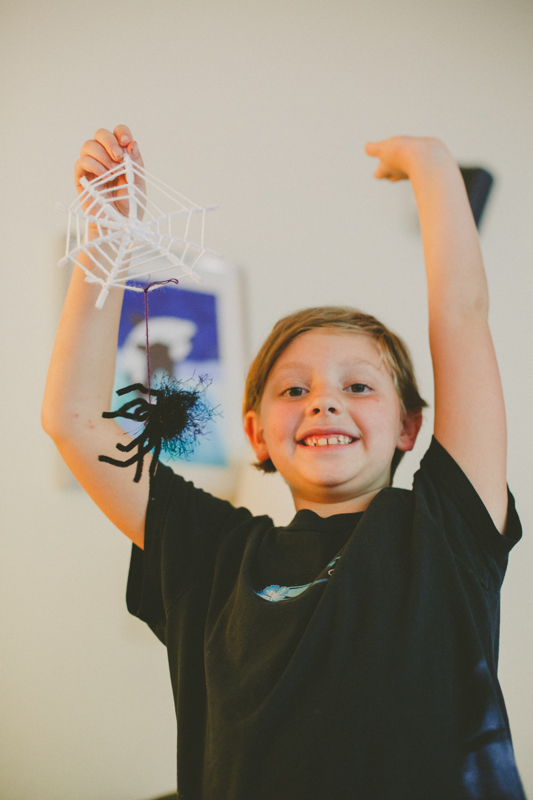
Isn't she cute?
Once our spider was nice size, we tied the yarn around the middle to secure it. The nice thing about fuzzy yarn is that it hides all the knots and loose ends. We tied a strand of plain yarn around it to give a thread/web for hanging.
Hurrah! The excitement kids show when they love their creating gets me every time!
Meanwhile, the girls realized they could spin a piece of orange pipe cleaner in a spiral to make pumpkins! So many pumpkins! A tiny pice of green tucked into the spiral became perfect stems.

What lucky spiders getting decorations of their own!
Then, my favorite part of creating! The kids took off with their own ideas. My niece spiraled a white piece of pipe cleaner into a hat.
And my girl realized white pipe cleaners and white yarn can make an awesome ghost. Little pieces of orange pipe cleaner tucked into the yarn made perfect eyes.

Sometimes, all we need to do is give children the opportunity (and supplies). I am constantly amazed!
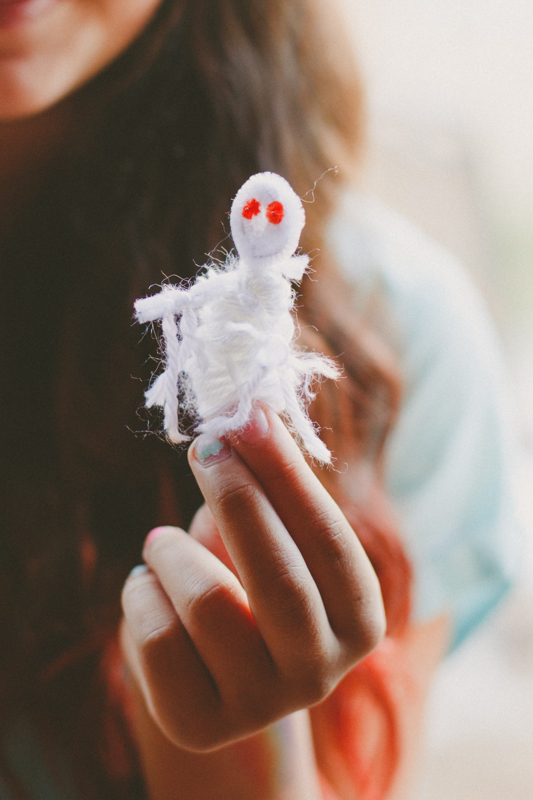
What a darling little ghost!
*I might need to write a tutorial for her ghost because I'm so curious how she made it :)
I hope these inspire your own decorations. A few pipe cleaners and yarn sure gave us a fun afternoon. And now our house is pleasantly spooky!

Magic Wands with Yarn

So simple and so fun for the class today. I collected fallen branches about a foot in length. I brought sandpaper, yarn, and a few beads to class. Students chose the branch that "spoke" to them. They could use sandpaper to smooth rough patches. A few spent ages making their sticks all smooth.
I showed them how to tie a knot around the branch- the short end dives through the loop, wrapping around the long end. I showed them how to hide the short tail by wrapping around it. We discussed layering colors and adding beads. I said they could fingerknit then wrap the knitted chain. They wanted to engage quickly so no one tried that. Another day :)
Their wands went home with them today, all unique and beautiful! Just like the children :)
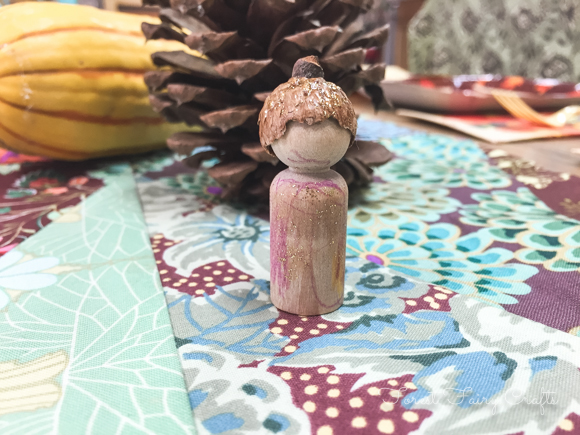
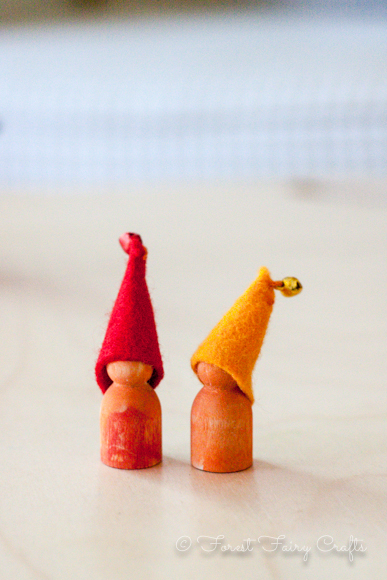
Acorn Gnomes

About an hour before class with my youngest kindergarten students, I was inspired. They had a feast later in the day. They would be excited, yet needing to keep busy. They needed an activitiy that would be fun, successful, and simple. Enter the Acorn Gnome.
Easily the easiest gnome ever. And, yes, that's two 'easies' in one sentence :). For this gnome, I gave each student a gnome and colored pencils. We talked about gratitude, and guests at the table, and whether gnomes are real (very heated discussion there). Then they decorate their gnome. They chose their acorn cap. I added glue. Let the gnomes dry a bit. Then I dusted them with a thin coat of gold-glitter paint. Just because everyone loves a little sparkle.

One student opted out of the acorn hat. He didn't want to hide his art under an acorn. Another made Darth Vader. We discussed using our imagination for faces (not needing to draw a face).
The gnomes became guests at their feast. Super sweet.
Oh, I did bring a little sharpie to write initials on the bottom of gnomes. I changed it quickly to teeny-tiny names because intials were a strange idea (these adults with their strange ideas!).
Supplies
- Peg dolls
- Acorns (would be fun to collect with children, but I didn't have the time, I always collect them when I find them (again, adults and their strange ideas)
- Colored pencils
- Craft Glue
- Sharpie for names
- Optional glittler paint
Create
Write names when handing out gnomes. Children decorate pegs however they like. Call up children to choose an acorn. Glue acorn caps. Allow to dry during recess. Paint light layer of glitter. Let children enjoy and bring home!

Big thanks to Teacher Holly at the Nevada City School of the Arts for making this class possible :)

Wishing everyone a very happy day. Hoping these gnomes find you with family and plenty to be thankful for!
 Photo Credit: Sara Serrata of North Fork Photography
Batty in the Forest
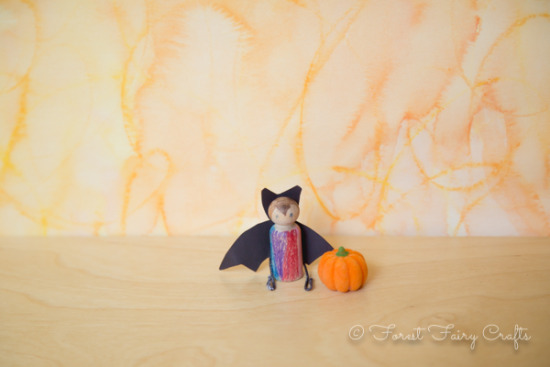
We adore bats!
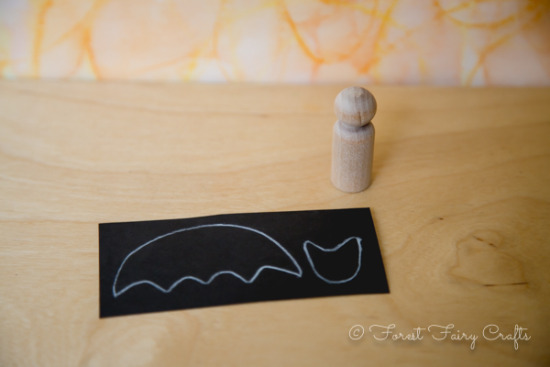
The bats on We Bloom Here inspired us! We had to bring them to Handwork class. But how? Each week I am challenged to bring an adorable and sweet idea to forty students in first or second grade. Margaret Bloom, the lovely author of Making Peg Dolls and Making Peg Dolls and More
(new! yay!) helped me adapt her tutorial for lots and lots of bats.


I thought of using sharpies instead of paint. Which meant a layer of sealant so the sharpie wouldn't 'bleed' into the wood.
"Why not use colored pencils?" she said.
Why not?
So we used colored pencils and black paper instead of felt. I played with the shapes until I made a template that I liked. I traced that shape forty times onto black paper. The kids cut their own wings and ears. They decorated their pegs with rainbows or fangs or both. These are magical bats after all :)
Each student had an envelope where I collected the decorated peg, wings, and head to glue at home. I used tacky glue because I added wire feet. Every bat needs to hang out!
Here was a little mistake, though, for me. I had white floral wire and thought, "this won't be so difficult to color black." Ack! I should have gone to the store and bought black wire to save myself a lot of time. If you are making one or two, coloring the wire was fun. For forty bats, not so much.
At home, I layered out the wings, head, and wire. I added glue and the peg. I let them all dry on the envelopes to return the next day.

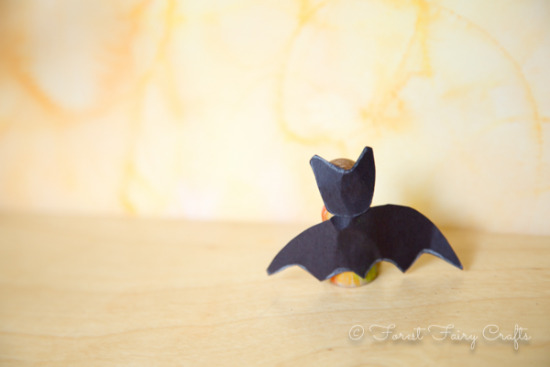
Back of the Bat
Thank you so much for the wonderful idea and tutorial, Margaret! Children loved their bats :)
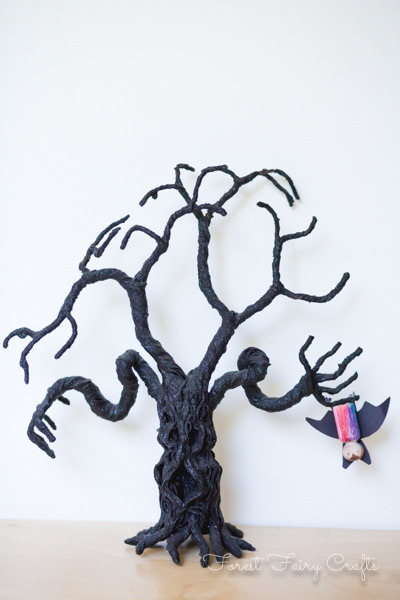
Even a grumpy tree needs a little bat friend hanging about :)
Enjoy :)
*please note: this post contains affiliate links. Should you decide to purchase a book using these links, a small amount returns to the Forest. Your price remains the same. Thank you!
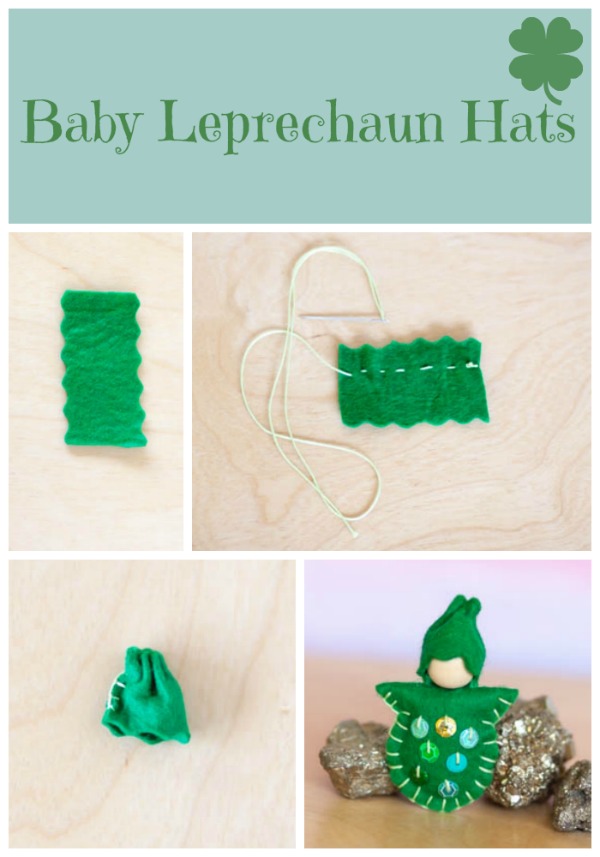
Leprechaun Baby
Hello wee leprechaun!
Happy Saint Patrick's Day!
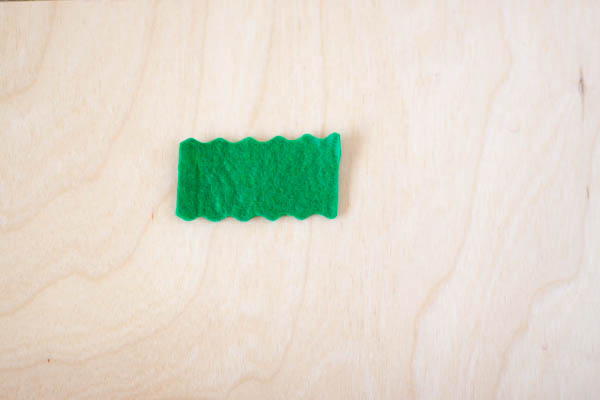
Today I get to sew with little friends in first grade. I will be taking photos to share of course. I had to make a sample for them. And it's so fun to make these little leprechauns. I used the Blossom Baby pattern on Page 99 of our Forest Fairy Crafts book. I used green felt and green and gold sequins.
I was a little creative with the hat. I didn't have enough acorn caps for my class project. And I want to finish them and send them home today. That means I needed to glue hats the day before. I made the hats ahead of time. And I had fun with the design.
I cut a rectangle with curvy lines (I just measured around the 5/8" bead, very scientific). It came out to 2" if you are curious. I made a few taller and a few shorter. I like every fairy to be unique :)
The next step would be tricky for children, but I sewed all these hats so I was okay with a few tricks :). I ran a stitch near the top of the hat. Note: for children, I always double the thread and knot so the needle won't pull off. These were for me. I've had a lot of practice :)
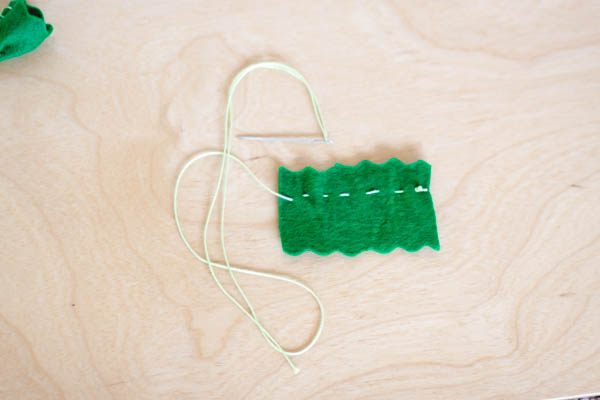
I cinched the thread tight and tied a knot so it wouldn't come loose. I am pondering how to best teach this to children... more on that soon. Anyway, I folded the hat in half and sewed a few stiches along the back.
Easy cuteness!
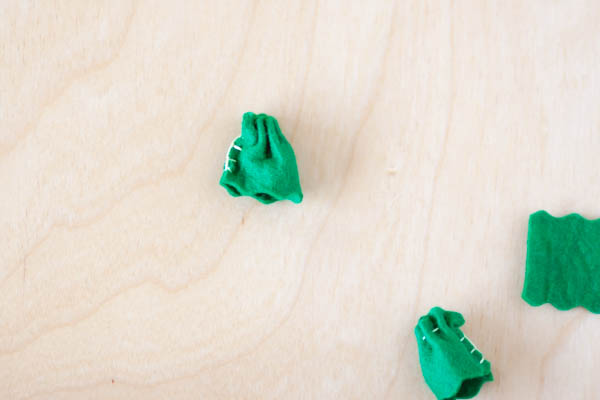
Ready to glue :)
I could have added sequins or a clover of course, but I have one day to finish these. I wanted the children to sew sequins on the body, sew around the outside, stuff, and close up. Will be fun!

Wishing you lots of magic today!
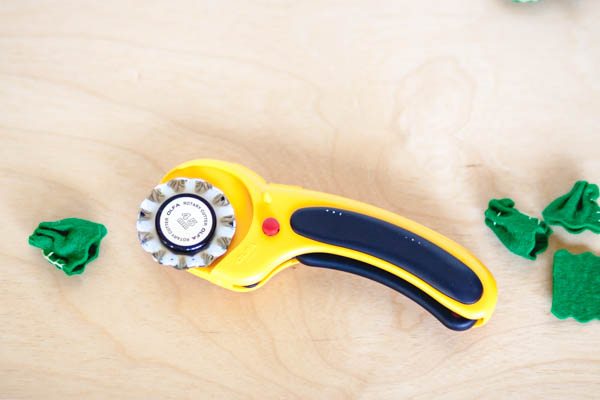
Tip: Last summer I realized that curvy lines were a challenge for cutting, yet looked wonderful. I took the leap and treated myself to a rotary cutter. I love the curves for blossoms and mermaid waves. It took me ages to choose, so here's the link in case you are interested: OLFA Rotary Cutterwith the Olfa Scallop Blade
. And I use a small cutting mat
(not photographed). It's been a great investment!
*Please note: this post does contain affiliate links. Should you purchase anything, your price doesn't change, but a small percentage commission returns to the Forest. Thanks for helping us buy more felt :)
For sharing:
 Enjoy!
Favorite Valentine Crafts
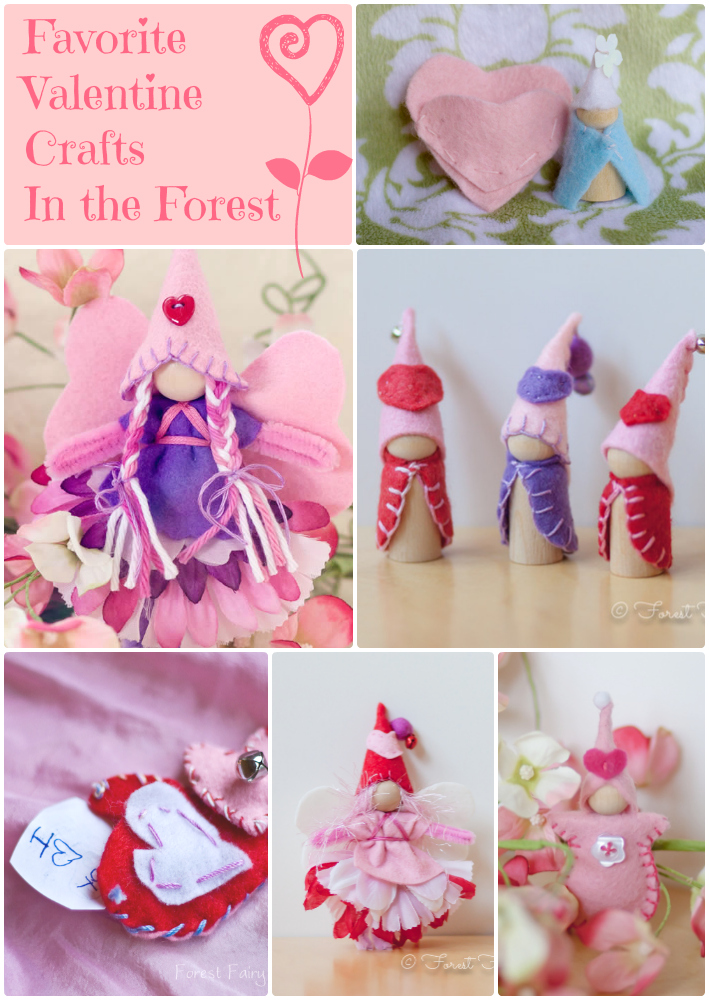

Time to collect our favorite Valentine Crafts in the forest!
Valentine's Day is the holiday of love and friendship. With children, we notice all the gifts that love brings into our lives. The time we spend together, the sweetness of a hug, the joy of shared laughter. Our families and our friends are tremendous gifts.
The crafts here have been created over the years to show appreciation for the ones we love. We hope they inspire you to create and share!
Most of these links show ideas and do not have patterns or tutorials included (a few have step-by-step directions). You can find detailed instructions (with many photos) in our Forest Fairy Crafts book. The book is also available for instant download using Kindle
, iBooks, or Nook.
Wishing you lots of love this week and all year :)
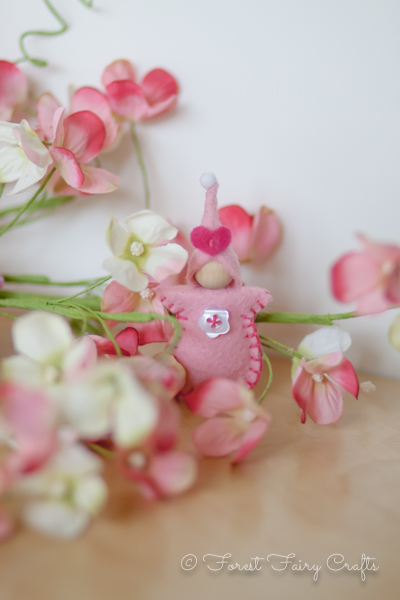

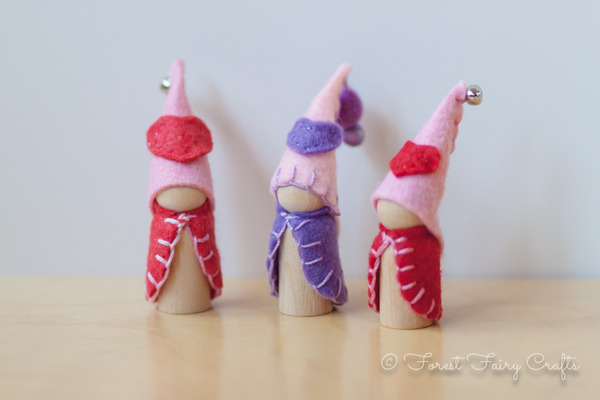


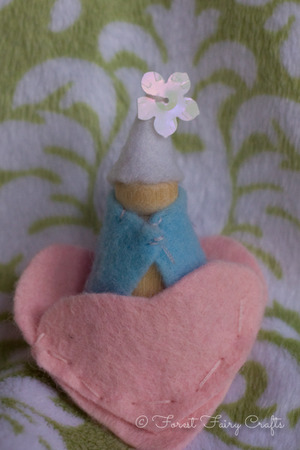
Sweetheart Fairy Babies
Fun in the forest sounds like, "Guess what I made?"
Aw, welcome little sweetheart fairies!
Asia shared these darlings with me last week. We love being inspired by the season.
Asia used ideas from our Forest Fairy Crafts book and switched them around to match the holiday. We've been getting more requests for holiday-theme projects. We aren't able share the exact directions, but we can point you towards inspiration.
The wee babes started as Blossom Fairy Babies (page 100). Instead of a leaf bed, Asia made a heart similar to the heart pockets on page 114. She then took the hat from the Love Fairy on page 66 and made the heart-shaped hat small enough for a baby.
Putting it all together is brand-new magic!
Certain things, like the pom-poms on their hats and felt heart decorations, are not in our book. The pom-poms are in most craft stores and can be sewn with a little stitch at the top of the hat. The hearts are cut freehand and secured wtih a stitch.
We keep hearing about mixing and matching ideas from the book. We love that!
Of course, each idea began as a question. "How could we...?" I have a few ideas tumbling in my thoughts right now. "How can I...?" And the results are so much fun!
We wish you lots of love as you create :)


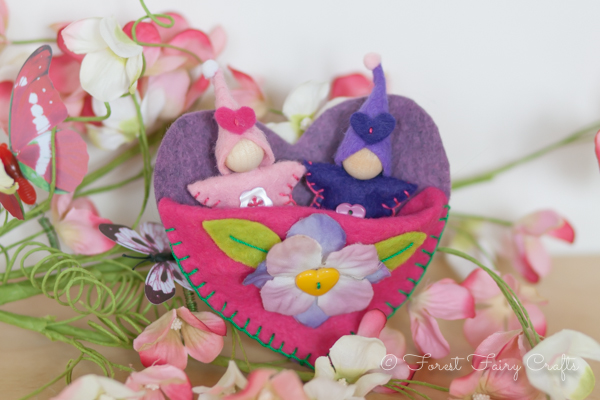
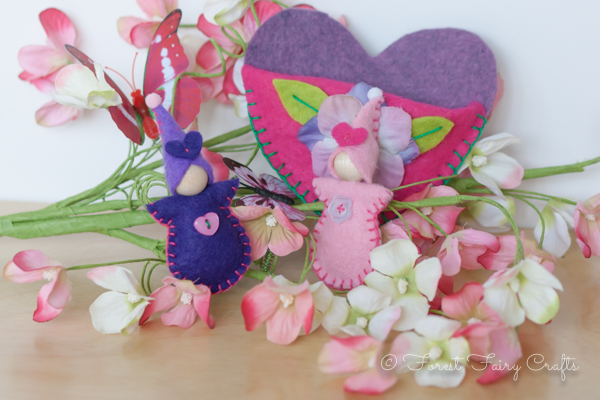
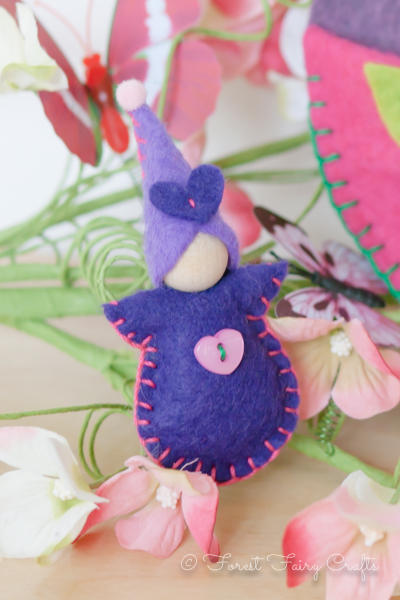
Sweet Gnome Homes
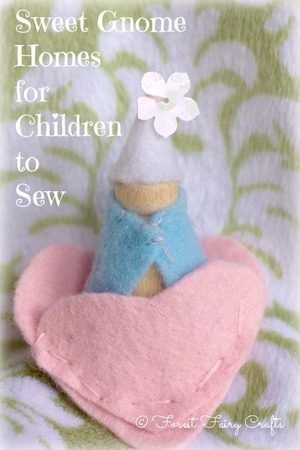
A few years ago, my daughter made me a precious gift. She asked for a few supplies. Felt scraps. A tiny wood gnome.
She made me this treasure. She designed and sewed everything herself. She was seven years old.
She had a lot of practice with needles and thread (her mama is Queen of the Fairy Forest after all (her title for me)). But the design and creating of this little gnome is a perfect beginning sewing project.
All you need is felt scraps, needle, thread, a couple decorations, and a wee gnome. This project allows for a lot of trial and error because the felt pieces are small.
She cut the hearts first. They didn't match. She liked that one was bigger than the other. She trimmed them to fit together (mostly). If your child doesn't know where to start with cutting hearts, your child can make a pattern on a piece of paper. Draw a few sketches and pick your favorite. Cut and trace onto felt. Or fold the felt in half and cut just like folding a paper heart (this is a little trickier for little hands).
She could have decorated the hearts with sequins, buttons, or beads. She didn't feel like making it too fancy. I love the simplicity, myself. She sewed them together with straight stitches.
She didn't use a pattern for the gnome. She cut scraps into shapes that she liked and tried them on the peg doll. She sewed the cape with a few stitches. Then she did the same thing for the hat. She folded it in half and sewed it together. She added a flower sequin to the top.

She had sewn before using lots of the ideas in our Forest Fairy Craft Book. If this had been her first sewing project, I would have sat with her and given support as needed.
What I appreciated about this project was how she was able to plan and test ideas. She found a project- cape and hat, with a little home- where she could try her own patterns. I could have cut the shapes and orgazined the project step by step. But I enjoyed how this gnome gave her a lot of freedom. Yes, I had a pile of teeny-tiny piece of felt at the end. I didn't care.
Visualizing, planning, and creating are all valuable life-skills. A little toy for your efforts is a big bonus!
And it's one of my favorite gifts ever.
Welcome home, little gnome :)

Game Token Gnomes
We are delighted to team up with the lovely people at SewMamaSew. The free tutorial for Gnome Game Tokens is posted here.
I love to share a little behind-the-scenes :)
The entire project inspired us! I used to make these games and tokens with my second grade students. We drew a game-board and sewed gnomes to travel through the game. I adore the creativity that children bring to game-making.
Even younger children love making gnomes. We decided to use paint this time around. It worked really well. We used regular watercolor paints. Ian chose the wee size gnomes. Of course he chose orange, orange, orange.
Anika is a unicorn-and-rainbow-girl these days, so her game featured a forest and garden where the unicorns could play. We drew the boards, then decided paint would be great, too. This project kept us busy for awhile :)
Our neighbor-friend came over and made a couple of gnomes, too. Here is the finished family! Our paint had a tinge of sparkle in the watercolor which gives them a shine. You could add a little glue and glitter after the paint dries for a similar effect.
We had to talk Ian into one red hat. He wanted orange, orange, orange, until we explained that we needed to tell the gnomes apart.
The gnomes ended up traveling on a few trips with us. I didn't worry about losing them since the process was so fun and we can easily make more. Every once in awhile, a craft becomes a treasure and I don't want it to be lost at the park or on a far-flung adventure. These were perfect pocket-pals.
Afterwards, Anika decided that her game needed cards with specific instructions. Their games kept growing as they thought of new fun additions. We used dice from another game box. The finished activitiy was just as fun as creating the games. We are all inspired to create new ones :)
We hope that everyone enjoys the tutorial! Thanks again to SewMamaSew for the opportunity! What fun :)

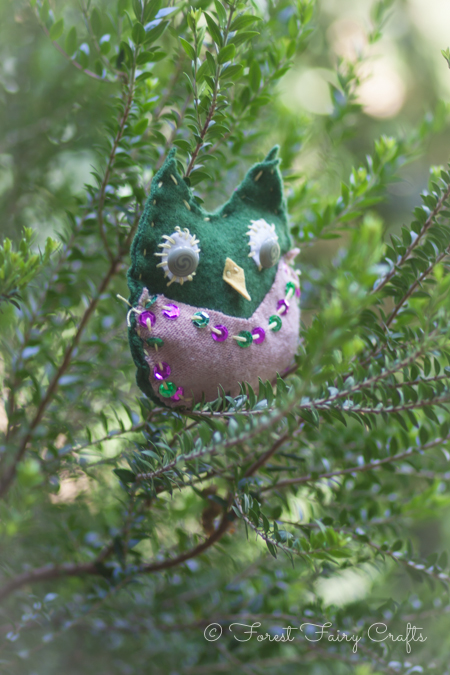
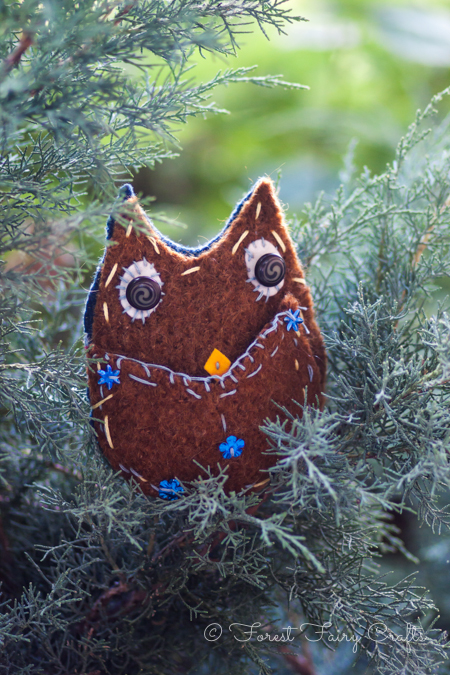
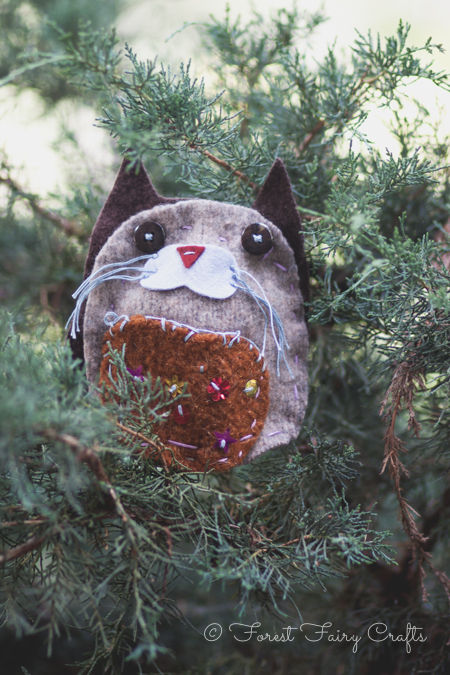
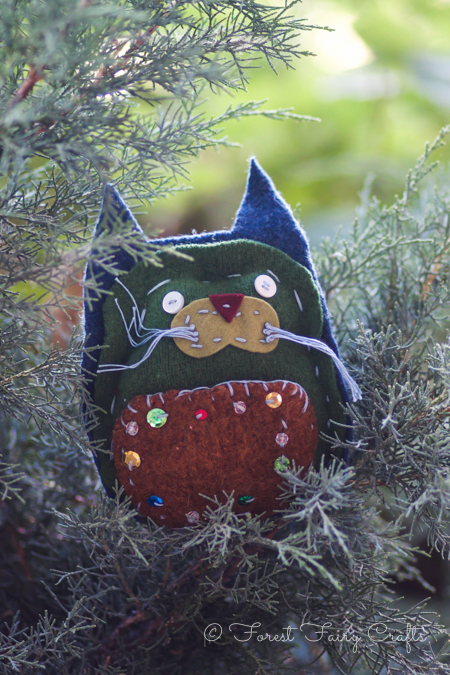
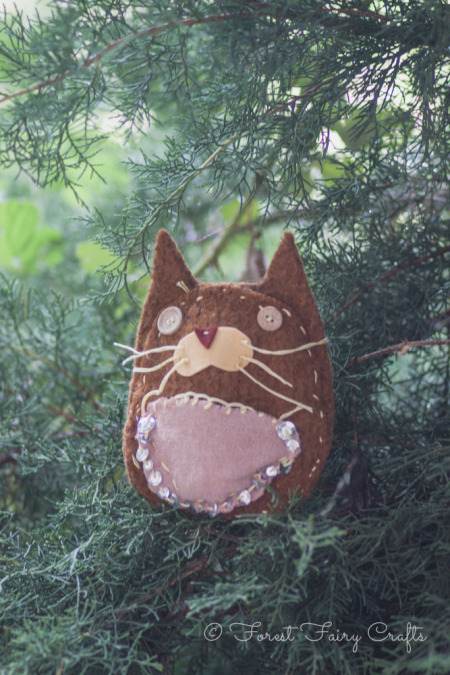
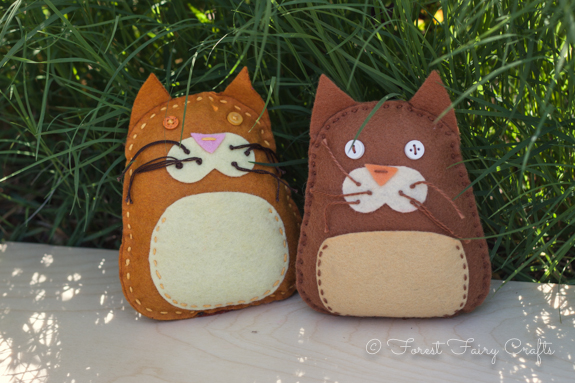
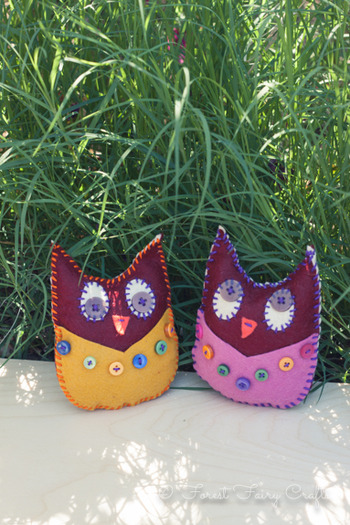
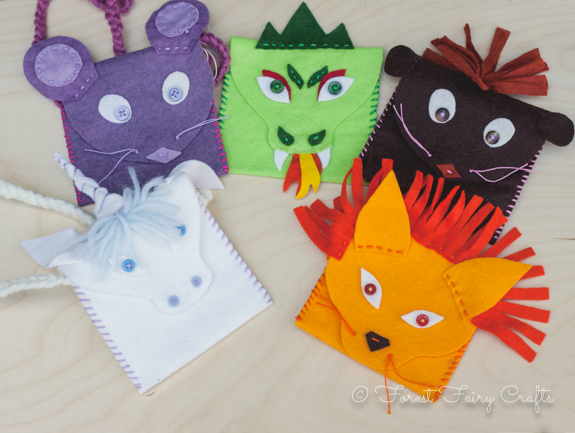
Upcycled Owls and Kitties
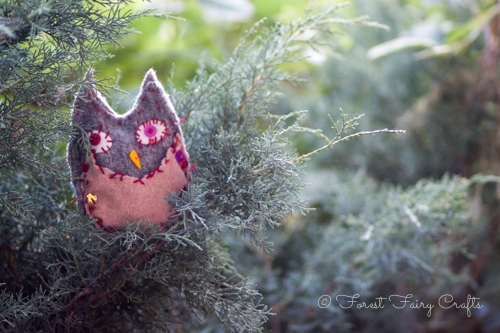
Asia created these lovlies with second and third grade students at NCSA (7-8 years old). She saved fabrics (ripped clothing, shrunken sweaters) and found supplies. Repurposing the clothing showed children that changing old fabric to a toy can be magical.

By this time of year, students have learned three ways to sew: the Running Stitch, the Whip Stitch, and the Blanket Stitch. We call them the Dolphin Stitch (up and down), the Polar Bear Stitch (around and around), and the Rabbit Stitch (up or down and through the hole). I can see children using all three to make their crafts unique.
I am fascinated how some children use patterns and even spacing for their sewing. While other children use mismatched, unexpected decorations. Each style delights us. Each style shares a child's personality. With sewing, there is no 'right way'. Only your own way :)

Upcylced sewing with found fabrics instead of felt meant the fabric was softer. Asia made the animals bigger so students wouldn't be frustrated. These owls and kitties were oversized when compared to our felt critters. This gave the children more to hold as they sewed. Asia is so good at modifying a project so students are successful :)
Here are a few for inspiration :)

I couldn't photograph all of them- Asia made about forty! These are just a few :)
Patterns and directions for the Owl and the Pussycat are in Forest Fairy Crafts. Creating your own critter just needs imagination and old clothing. Have fun upcycling :)

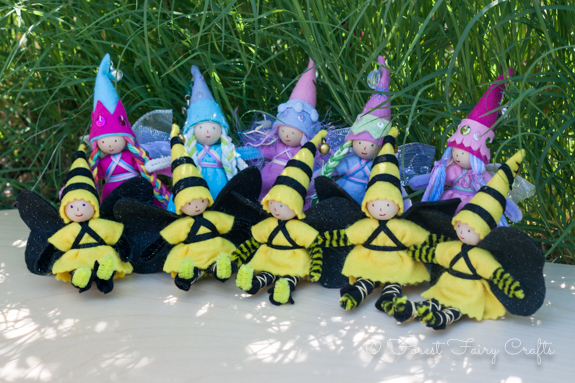
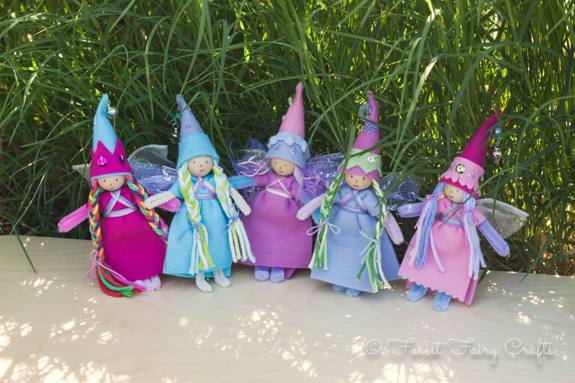
Fairy Crafts at Book Expo America
We are featured giveaways with C&T Publishing this year at Book Expo America! We have been busy creating a collection that is on its way to New York. I hope our crafts share with everyone how fun and magical they are in person :)
Asia sewed favorite Treasure Keepers. Little cats and owls have pockets for keepsakes...
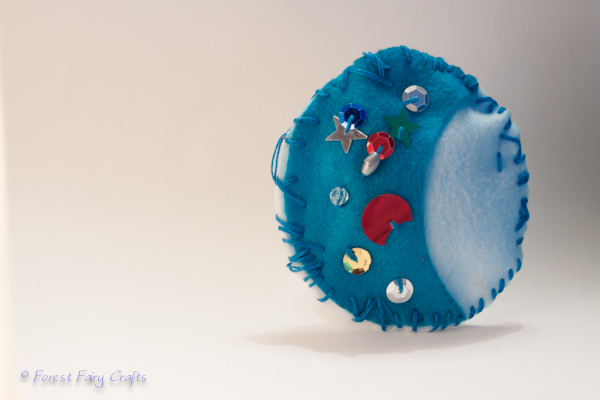
A moon is a favorite beginner sewing project- the heart and sun are beautiful too (I still want to make a mobile with these one day :))
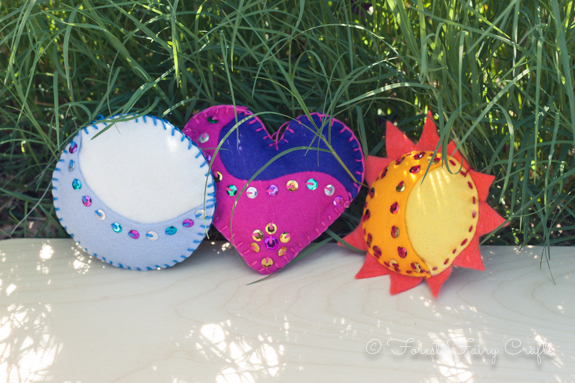
She also sewed five Animal Treasure Keepers. These sweet little bags can have a handle, or not, and they are become friendly companions.
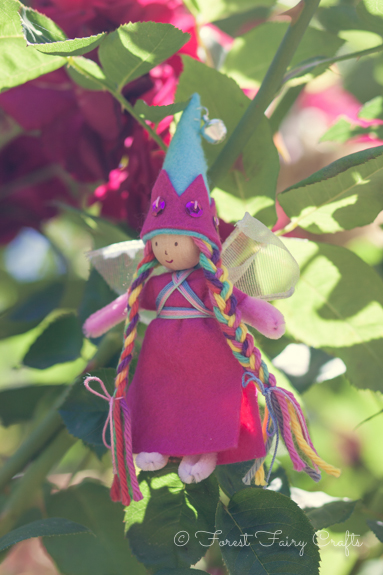
I added ten fairies to the collection- five girls and five bumblebee boys.
The girls together~
And the boys~
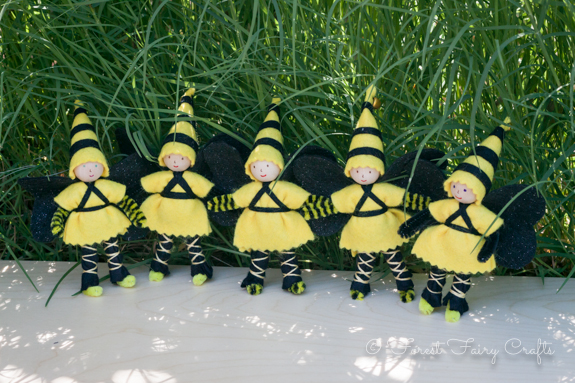
I love how each fairy gets a personality. Even the bumblebees had their own quirks that made them uniqiue. I love the discovery of creating them!
I had fun with the girls, getting to give them a personal style. I knew they would be displayed as a group, so I laid the felt out to see the palatte working together. I also wanted to show how the fairies can be gentle and softly colored, or vibrant and bright. I had a good time coordinating the different outfits to be a stand-alone while working within the group. I also used the same varigated pastel crochet-thread to keep them similar.
I did add a decorative ribbon with pom-poms for one girl~
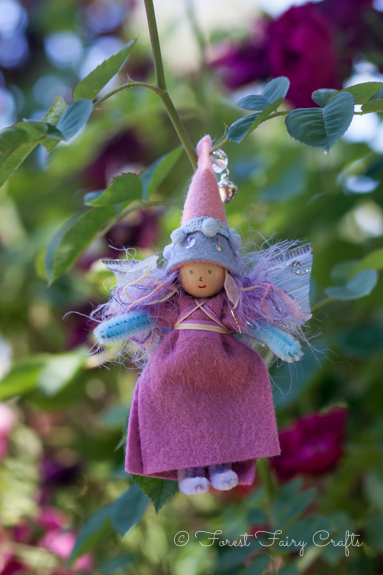
And played with the hair and crown designs for the rest. They were an absolute delight to create :)
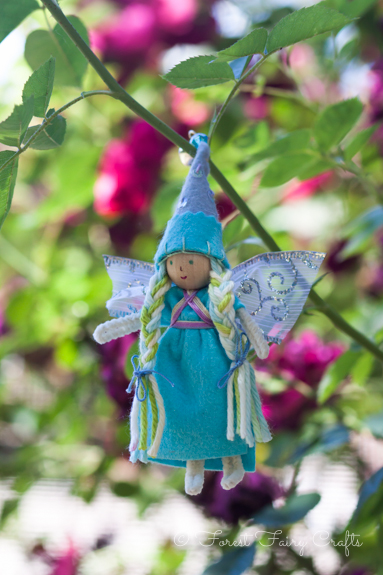
This fairy has cotton chenille stems from A Child's Dream Come True. I love the different texture they offer. And they are soft, too!
I play with many different materials for fairy-crafting. Pinking shears made the little ruffles on the bottom of her crown. The effect is super-simple to create!

For this girl, I sewed a little star on her hat. Simple is sweet :)

And she is my jewel-tone girl. Her bright colors make me smile :)
I couldn't get the entire collection in a photo- so much together! Asia and I are excited that they get to go to New York and inspire all the book-lovers at BEA. Unfortuantely, you need to be at BEA to win one of these treasures. Happy trails, fairies and critters!
We are planning a few online chances to win our crafts, too! We want everyone to join the fun :)
PS- We saw that our book is shipping now! All of these projects are shared in Forest Fairy Crafts. Enjoy :)
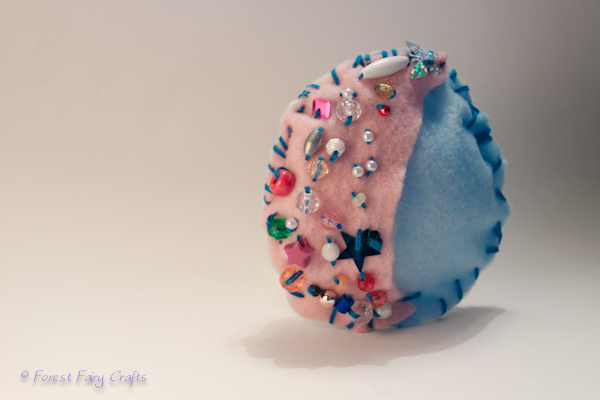
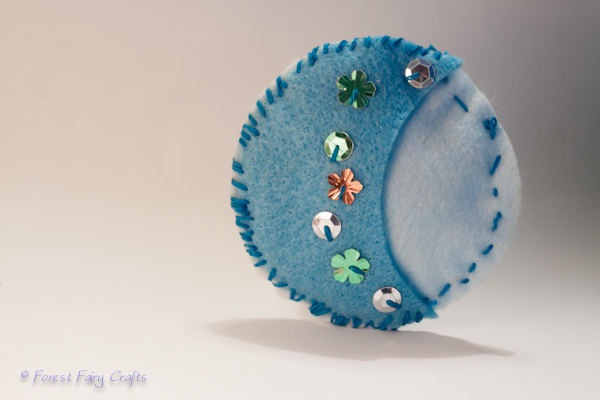
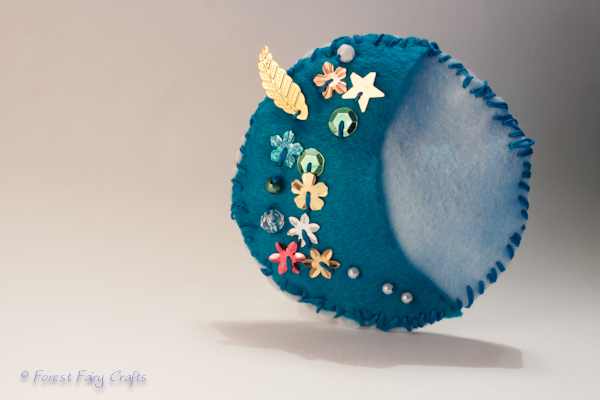
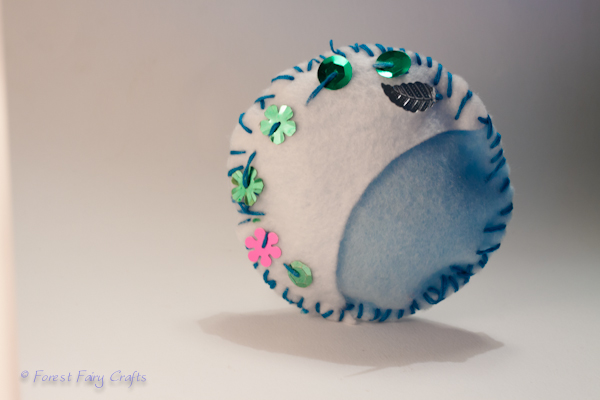
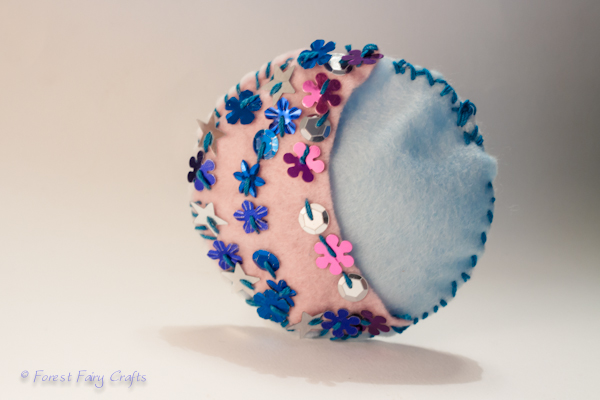
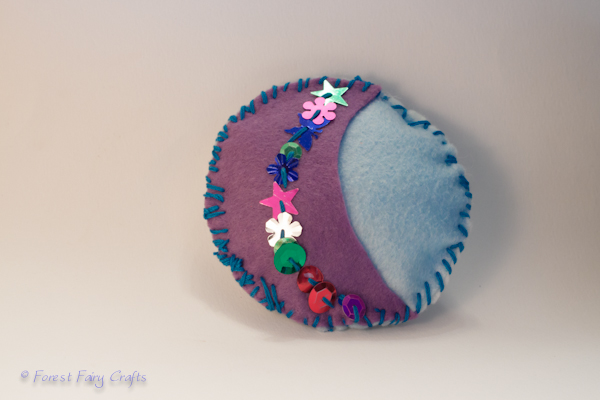
Moon Pocket

These Moon Pockets brought sunshine into my day. Students in our first grade class sewed these beauties. I am in constant awe how we can provide students with the exact same supplies and directions, yet every project reflects the crafter in colors and stitching.
Before sewing, we discussed treasures. The moon on the front is a pocket where children can keep teeth for the tooth fairy or little notes or any little keepsake. Our last step is stringing a little ribbon to hang them.
Children are careful, conscious crafters. This moon has a pattern of flower, moon, flower, moon. This meant choosing them from the bowl of mixed-up sequins. What a lot of work!

A big challenge for grown-ups helping sew is how much to help, and how much to let go. Hopefully these images might inspire Letting Go as a help-strategy. Even wild stitiching is lovely!
At first I thought I would photograph a few to share the idea, but I couldn't choose a favorite! They are all charming.

This next one always inspires a smile.
And simplicity is amazing, too. I like how this student used a whipstich around the moon and a running stitch to finish the pillow. I wouldn't have taught it that way, but it works. And the one simple line of sequins is beautiful.
I love when sequins break out of the felt 'boundary'. This little leaf sequin seems to be floating down to land in just that spot. Very sweet. And these tight tiny whipstitches are so careful!
Another simple line of sequins frames the moon. I can see where the crafter started to get tired and stitches got farther apart. Sewing is hard work!
Here the sequins found many lines. This crafter was careful with colors as well. I notice patterns again, flower, moon, flower, moon. What dedication.
Another line of overlapping sequins. Again, those tiny little whipstitches amaze me.
We teach a K/1 class and our first graders stay in the afternoon. We have a much easier time sewing with the smaller group. These children are 6-7 years old. They had experience sewing with us last year so they know the basics of controlling the needles and adding decorations. This year will be fun for crafting!
Asia and I are working on directions for these Moon Pockets that will be available soon. If you would like hints about sewing with children, visit our Tips and Tricks. For now, I hope these inspire you like they inspired me! Best wishes!

Watercolor Lanterns
As seasons change, these beautiful lanterns celebrate those darker evenings.

To make these lovely lanterns, watercolor a long piece of paper.
When it's dry, draw a line on the back about 1/2 inch from a wide edge. Fold in half to your drawn line. Fold in half again so you have four sections. Fold up along the bottom edge to make a base.

Cut along your fold lines on the bottom edge. Draw or trace shapes on each panel. Cut out those shapes to make holes.

On the back, glue tissue paper over the holes to make pretty glowing windows.
Fold the lantern again with the bottom edges overlapping to form the base. Glue along the 1/2 extra paper from that first line you drew in the beginning. Tuck that into the lantern to glue the four sides together. Let your lantern dry.
We use battery operated candles inside our lanterns. Fire can be dangerous.
These lanterns are a beautiful reminder of light. We hope you enjoy the crafting.
Many thanks to my co-teacher, Marin, for this gorgeous craft :)

Wish Upon a Watercolor Star


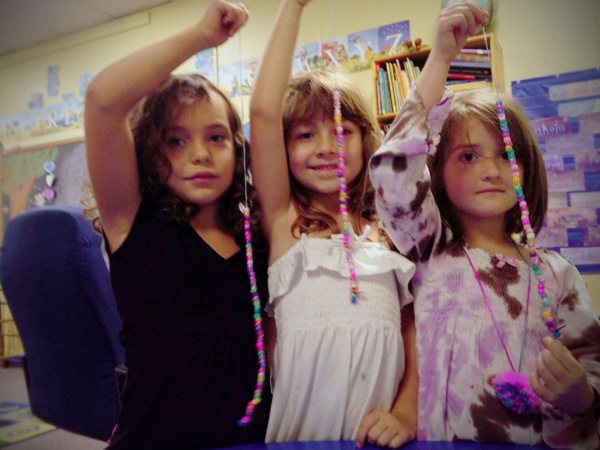
The school year begins with hopes and dreams. I love to make dreams come true. So we create beautiful crafts to catch our dreams. Focus on them. Believe in them.
These watercolor stars were a three day project with our twenty kindergarten and first grade students. On day one, we painted stars. Day two, we strung beads. Day three, we wrote wishes. Along the way, we discussed ideas. What do we want? Play, discovery, friends. What fun, imagining our wonderful year!
Of course, you can wish anytime, for any reason. A wishing star would be a lovely party favor, or a baby mobile, or a rainy afternoon craft. Endless possibilities...
How do we make them?
- Cut a star with medium or heavyweight paper. We used watercolor paper. You can draw your own, or have your child draw a star, or use a free printable like this one on Spoonful.
- Children paint the star on both sides. We used watercolor paints, giving children yellow, red, and orange colors. You could use any paints you like, or markers, or colored pencils. Decorate your star.
- Thread a tapestry needle to a long piece of crochet thread. A tapestry needle has a blunt tip. It. Is perfect for children who say, "But I don't know how to sew!" Tie a bead to the ends of the thread so the other beads won't fall off.
- Have fun beading! Add beads and sequins to make a rainbow hanger for your star.
- Punch a hole into the star. Thread the needle through, tie off, and snip.
- Children write their name on one side, and their wish on the other side of the star. Hang your star in a special place. Enjoy your dream shining over you!
I encourage children to dream for emotions more than things. They may want money for our school (they know times are difficult) or toys or more books. I ask, "Why? How would you feel?" We want the emotion, not the stuff. Because maybe we can find fun and adventures another way.
At the same time, I change my ideas to catch a moment. I have a star-wish that my daughter made when she was three. Her wish?
I want to wish for a pony
That captured her. At three. Her sweetness. And that is my dream. To create projects with children that celebrate childhood. My dreams are coming true :) Enjoy!

Hearts for Sweet Beginnings

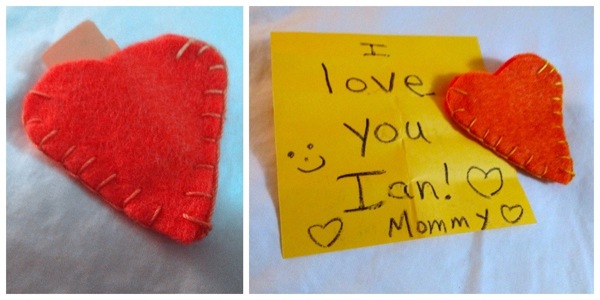
A rainbow of hearts to start the school year. The hearts were pleasantly quick and fun to sew. I used multicolor rainbow crochet thread so the colors wove through the hearts one after another.
My boy adores orange, so I made him one in his favorite color. He had his first day of transitional kindergarten today. So I tucked a little note inside the heart and placed it in his lunchbox. I couldn't be with him because I taught my own class of students. But I felt closer to him, knowing that he had a little craft to discover in his lunchbox.
For my students, I am creating a story. Our class mascot is a small dragon. I imagine that our dragon doesn't collect gold and jewels like most dragons. No, our dragon, Sparky, collects the most valuable treasures of all. Sparky collects the treasures that cannot be bought with all of the gold in the world. Sparky collects love. And kindness. And joy. And friendship. He saves these emotions in magical glass pebbles that protect the feelings inside.
We also call these pebbles Dragon-Tears, but I don't think that will make sense within the happy story. The pebbles are not Dragon-Tears, they are dragon treasures. The pebbles fit inside the little hearts perfectly. Each student can hold one through the day. For now, we plan to keep them in a basket and put the students' names inside on a watercolored slip of paper. I am sure that students will get attached to their heart and memorize whether they have red, orange, green, blue, or purple.
Perhaps Sparky knows that our students can trusted to care for Love and Friendship and Peace. And by caring for these hearts, the emotions will be nurtured in our class community as well.
A sweet way to bring those gifts into our school year. I am excited to share them with my students. Begin well, travel in joy, learn along the way. Sounds lovely. Rainbow heart lovely.
Sending inspiration your way. I wish you many precious treasures today. :)
Intentions
August is a whole new year. Perhaps not on the calendar, but for many children, a year begins in August. I feel the energy gather as a teacher and a mom. New stories. Blank pages. New teachers and friends.
In my teaching program years ago, we learned about Self Fulfilling Prophecy. Two teachers were told two stories about their incoming classes. One heard she was getting a bright, kind, fabulous class. And the other heard he was getting a mischievous, difficult, unruly class. The classes, in reality, were randomly assigned. A few months later, the teachers were asked to describe their classes. Guess how they answered?
This is the Self Fulfilling Prophecy. Your beliefs shape your reality.
So I am thinking about intentions as we prepare the classroom for a new group of kindergarten and first grade students. All of our stories will weave together into one story. How can I, as a teacher, set them up for success? How can I make intentions meaningful?
I thought of a big gesture. I am sewing a little felt heart for each student. I will leave an opening at the top so we can slip their name inside and they can add wishes of their own. Friends, fun, learn, peace, joy. Paying attention to the good stuff.
I have them cut out. And I have a few days to seem them all together. For my own children, I will choose their favorite colors and put them in their lunchbox on the first day. Manifest love :)
My Heart's Wish
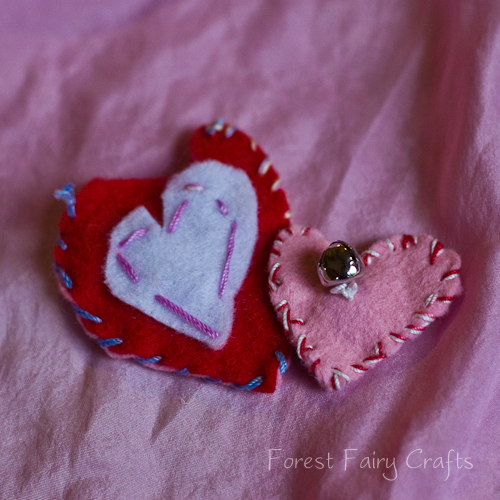
Last week, I went to a teacher-gathering in the evening. My eight-year-old asked to use some felt and thread while I was gone.
"Are you sure you're okay on your own? I won't be here to help you."
"I'll be fine, mom."
A mama's dream. With a twinge of sadness that this little girl is not so little anymore. So away I went and, when I came home, she gave me her heart's wish.
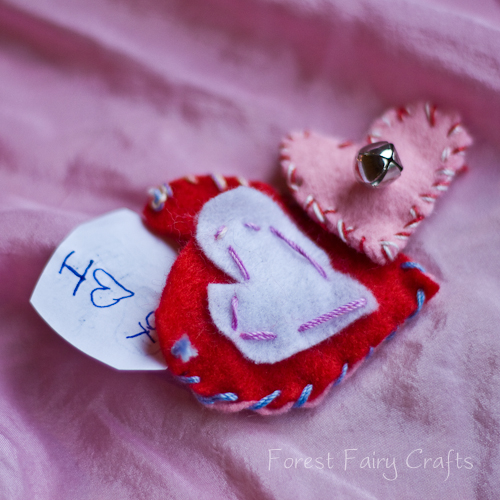
She made this mama teary-eyed. I believe in the power of hearts. And wishes.
She created two small hearts. The pink one is 1.5 inches across and the pocket-heart is about two inches across. They are very simple to make. The little heart has a heart bead inside of it, no stuffing at all. She sewed the bell on, then sewed them together, sealing the heart-shaped bead inside. I doubted her idea at first. But, sure, enough, I find a great tactile comfort in feeling that little heart shape inside the bigger felt heart. The fact that the heart is sewn shut and the bead is safe and sound inside is also soothing. The jingle bell is cheerful. Again and again, I learn to trust the creativity in children.
Her larger heart is a pocket-heart. She sewed a heart shape on the back and front separately, then attached both hearts together with an open top. She gave it to me with a story that the heart is meant to be shared. I can write her little notes and then she can write me little notes and we can both write wishes. The heart keeps giving.
I hope to sew enough for each student in her class, or perhaps put a few in the mail for cousins and grandparents. I asked her where she found her inspiration and she said, "I just thought of it."
I love many things about these hearts (of course), but my treasure is the personal stitching that catches her age perfectly. We may be tempted to guide children towards neat, even stitching and perfectly cut heart shapes, but really, the imperfections shine. Even her little knots with the strings fraying are wonderful.
Children can play with felt like they play with blocks and paints. Their wishes are magical.
Thank you for sharing, Anika!